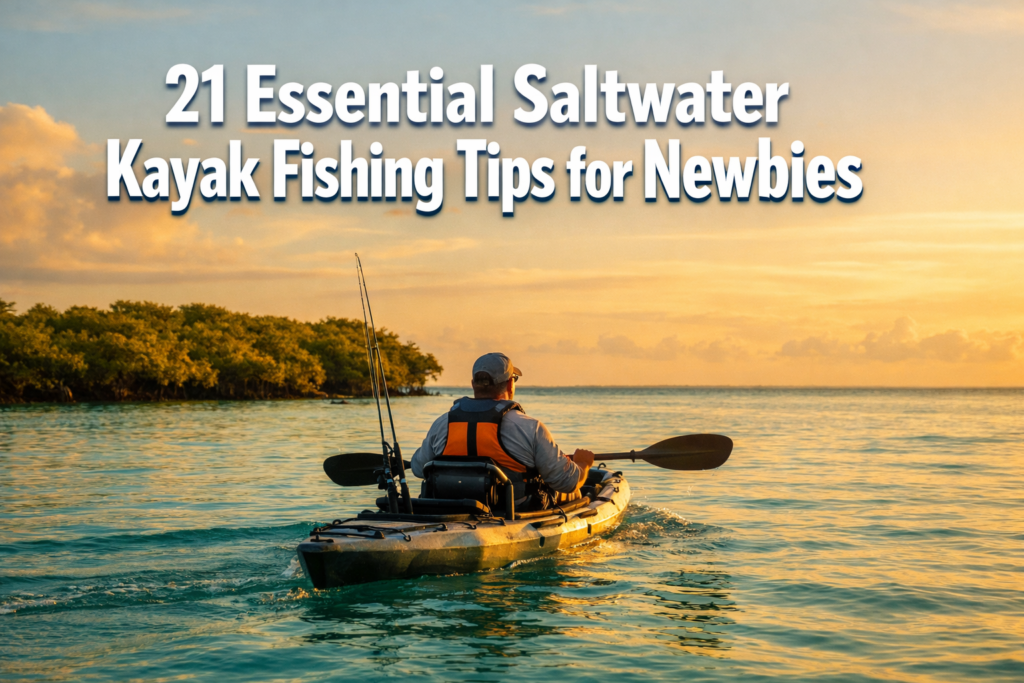

Your first time paddling out into open saltwater on a kayak is a moment you remember. The water moves differently. The fish are bigger. The stakes feel higher. And if you are not prepared, the ocean will remind you of that fast.
At FishOnYak.com, we have coached hundreds of anglers through that transition from freshwater ponds and calm lakes to the dynamic, demanding world of saltwater kayak fishing. The 21 essential saltwater kayak fishing tips for newbies in this guide are not filler content. They are field-tested, expert-backed fundamentals that will keep you safe, help you catch fish, and build the confidence you need to grow as a kayak angler.
Whether you are targeting redfish on a grass flat, chasing speckled trout around a dock, or working the skinny water for snook, these tips apply. Read every one. Apply them in order. Then get on the water.
Key Takeaways
- Choose a stable, wide-hull fishing kayak with hull rocker for saltwater conditions before buying any other gear.
- Safety equipment, including a PFD, VHF radio, and signaling device, is non-negotiable on saltwater.
- Rig 2-3 rods in advance with your top saltwater setups so you spend time fishing, not switching lures.
- Read tides and wind before every trip. These two forces control everything in inshore saltwater fishing.
- Rinse your kayak, rods, reels, and tackle with fresh water after every single saltwater outing.
Tip 1: Choose the Right Kayak for Saltwater Conditions

Choosing the right kayak is the single most important decision you make as a beginner. A kayak built for flatwater lakes performs poorly in saltwater chop, tidal current, and wind.
For inshore saltwater fishing, look for these features:
- Width: A kayak 30 to 34 inches wide gives you the stability to fight fish and cast without tipping.
- Hull rocker: Rocker refers to the upward curve of the hull from bow to stern. More rocker means better performance in wavy and choppy saltwater conditions [4].
- Sit-on-top design: Sit-on-top kayaks self-drain and are far easier to re-enter after a capsize than sit-inside models.
- Length: A 12 to 14-foot kayak balances tracking efficiency with maneuverability in tight inshore spots.
Kayak Style Comparison Table
| Feature | Sit-On-Top | Sit-Inside |
|---|---|---|
| Self-draining | Yes | No |
| Re-entry after capsize | Easy | Difficult |
| Gear storage access | High | Limited |
| Best for saltwater | Yes | No |
| Stability for casting | High | Moderate |
Talk to your local kayak shop before buying. They know the regional water conditions and will steer you toward the right hull for your area [7].
Tip 2: Understand Pedal Drive vs. Paddle Kayaks
The debate between pedal drive and paddle kayak systems is real, and it matters for saltwater fishing.
A pedal drive system, like those found on Hobie kayaks, lets you move with your legs while keeping both hands free to cast, manage rods, and fight fish. This is a significant tactical advantage in open water or when you need to cover ground quickly.
A paddle kayak costs less and requires less maintenance. For beginners on a budget, a quality paddle kayak is a smart starting point.
Budget Guidance:
- Entry-level paddle fishing kayak: $400 to $800
- Mid-range sit-on-top with rod holders and storage: $800 to $1,500
- Pedal drive fishing kayak (e.g., Hobie Mirage series): $2,500 to $5,000+
Start with what your budget allows. Upgrade when your skills and commitment justify the investment.
Tip 3: Master Proper Paddling Technique Early
Poor paddling technique wastes energy and reduces your time on the water. Learn it correctly from the start.
The core principle: use your torso, not your arms, to power each stroke. Your core muscles are far stronger and more enduring than your biceps.
Practice the one-arm paddle guide technique. Use one arm to guide the kayak while the other rests. This conserves energy for casting and fighting fish [2].
Three strokes every kayak angler needs:
- Forward stroke: Your primary propulsion stroke. Rotate your torso and drive the blade fully through the water.
- Sweep stroke: A wide, arcing stroke used to turn the kayak without stopping forward momentum.
- Draw stroke: Pulls the kayak sideways toward a dock, structure, or another boat.
Practice these on calm water before heading into tidal current or wind.
Tip 4: Never Skip the PFD
🚨 Safety First
Wear your personal flotation device every time you are on the water. No exceptions.
The U.S. Coast Guard requires all kayakers to carry a Coast Guard-approved PFD. Wearing it is the smart move. Saltwater conditions change fast. A rogue wave, a boat wake, or a large fish can put you in the water before you have time to react [7].
Choose an inflatable PFD for comfort in warm climates. These low-profile designs do not restrict your casting motion and inflate automatically on contact with water.
Keep your PFD fitted properly. A loose PFD provides minimal protection.
Tip 5: File a Float Plan Before Every Trip
A float plan is a written record of where you are going, when you plan to return, and who to contact if you do not come back.
Leave your float plan with a trusted person on shore. Include:
- Your launch location
- Your planned fishing area
- Your expected return time
- Your kayak color and description
- Your cell phone number and VHF radio channel
This step costs you five minutes and could save your life. Fishing alone in saltwater without a float plan is a risk no experienced kayak angler takes [7].
Tip 6: Carry a VHF Radio and Know How to Use It
Your cell phone loses signal offshore and in remote inshore areas. A VHF radio does not.
A handheld VHF radio lets you communicate with the Coast Guard, nearby vessels, and other anglers. Monitor Channel 16 at all times. That is the international distress and calling channel.
Budget pick: Uniden MHS75 ($60-$80). It is waterproof, compact, and reliable.
Keep your VHF radio tethered to your PFD with a short lanyard. If you go overboard, you want it on your body, not floating away on your kayak [4].
Tip 7: Tether Your Gear with Lanyards
🎣 Gear Tip
Saltwater kayak fishing means everything that is not secured will eventually go overboard. Tidal current, wind, and the chaos of fighting a big fish all conspire to send your gear to the bottom.
Secure the following with lanyards or leashes:
- Paddle (to the kayak)
- Pliers
- Net
- Rod (when not in use)
- VHF radio (to your PFD)
- Tackle trays [2]
Pro Tip: Never leash yourself to the kayak in moving water. Leash your gear to the kayak, not your body. If your kayak gets caught in current or surf, you need to be free to swim clear.
Tip 8: Read the Tides Before You Launch

Tide is the engine of inshore saltwater fishing. It moves baitfish, activates predators, and determines where fish hold.
Check your local tide chart every morning before launching. The two most productive windows for inshore fishing are:
- Two hours before high tide: Water is pushing in, baitfish move onto flats and into creeks, and predators follow.
- Two hours after high tide: Water is draining, baitfish funnel through cuts and channels, and fish stack up to feed.
Fishing a dead low or dead high tide is rarely productive. Time your launch to hit the moving water [4].
Wind and tides work together or against each other. A strong wind opposing a strong tide creates dangerous chop. Know both before you leave the dock.
Tip 9: Understand Wind Direction and Speed
Wind is your biggest physical challenge on a kayak. Unlike a motorized boat, you feel every gust.
A general rule for beginners: stay off the water when wind exceeds 15 mph. At that speed, paddling into the wind becomes exhausting, and conditions deteriorate fast.
Plan your route to paddle into the wind first. You will be fresh at the start of your trip and have the wind at your back on the return when you are tired.
Check wind forecasts on Windy.com or the National Weather Service marine forecast. Both give hour-by-hour wind speed and direction for coastal areas.
Tip 10: Select the Right Rod and Reel for Your Environment
🎣 Gear Tip
Tackle selection in saltwater is not one-size-fits-all. Your environment dictates your setup.
Grass Flats Setup (Redfish, Speckled Trout, Snook):
- 2500 series spinning reel
- 8 lb monofilament or 10 lb braided line
- 7-foot medium action spinning rod [1]
Dock and Structure Fishing (Snook, Sheepshead, Black Drum):
- 4000 series spinning reel
- 20 lb braided line with a fluorocarbon leader
- 7-foot medium-heavy spinning rod [1]
Spinning rods are the right choice for beginners. They are easier to cast accurately from a seated position than baitcasting setups [2].
Rig 2 to 3 rods before you launch with your most productive setups ready to go. Switching lures wastes prime fishing time [2].
Tip 11: Master the Paddle Tail Lure
If you fish one lure in inshore saltwater, make it a paddle tail swimbait.
A 3 to 5-inch paddle tail on a 1/8 or 1/4-ounce jig head is the most versatile and productive inshore lure available. It catches redfish, tarpon, speckled trout, snook, and black drum in a wide range of conditions [1].
Work it with a slow, steady retrieve near the bottom on grass flats. Speed it up near structure to trigger reaction strikes. Match the color to water clarity: chartreuse in murky water, natural shad or white in clear water.
Carry a selection of both 3-inch and 5-inch versions. Downsize in cold water or when fish are finicky. Upsize when targeting larger fish or in deeper water.
Tip 12: Target High-Probability Locations
🎣 Skill Tip
Experienced kayak anglers do not fish randomly. They read the water and target locations where fish concentrate.
High-probability inshore locations include:
- River bends and current seams: Fish hold on the slack side of current breaks. Target the transition zone between fast and slow water [3].
- Dock pilings and structure: Shade, current breaks, and baitfish concentration make docks prime targets.
- Oyster bars and grass flat edges: The drop from grass to sand or mud holds redfish and trout.
- Creek mouths and tidal cuts: Fish funnel through these on every tide cycle.
- Mangrove shorelines: Snook and redfish use mangrove roots as ambush points.
Spend time on Google Earth studying your target area before you launch. Identify structure, creek mouths, and flat edges from above. Then confirm on the water.
Tip 13: Install Rod Holders and Organize Your Deck
A cluttered kayak deck is a safety hazard and a fishing liability. Organize your setup before you hit the water.
Install at least two flush-mount rod holders in the stern for trolling and storing extra rod combinations [2]. Add a RAM or YakAttack gear track system to mount accessories like GPS units, fish finders, and camera mounts without drilling extra holes.
Keep your most-used items within arm's reach from the seated position:
- Pliers in a holster on your PFD
- Tackle tray clipped to a gear track
- Water bottle in a cup holder behind the seat
- Net mounted within reach on the bow or side
A clean, organized deck lets you move fast when a fish is on.
Tip 14: Use GPS and Sonar to Find Fish
🎣 Gear Tip
A fish finder and GPS unit changes how you locate fish from a kayak. Instead of guessing, you see bottom structure, depth changes, baitfish schools, and fish arches in real time.
Install your GPS and sonar transducer on a RAM mount or through-hull fitting before your first saltwater trip [2]. Popular units for kayak anglers include the Garmin Striker series and the Lowrance Hook series, both starting around $150 to $300.
For inshore fishing on shallow flats, a sonar unit is less critical. But for fishing deeper channels, nearshore reefs, or offshore structure, it becomes essential.
Learn to read your unit before you go. Practice in shallow water where you can see the bottom and verify what the screen shows.
Tip 15: Anchor Correctly in Tidal Current

Anchoring a kayak in tidal current requires a different approach than anchoring a boat.
Use a kayak anchor trolley system. This rigging allows you to adjust the anchor point from bow to stern while seated, without leaning over the side. It keeps your kayak positioned correctly relative to the current and your target.
Anchor weight for kayaks: 1.5 to 3 pounds is sufficient for most inshore conditions. Use a folding grapnel anchor for rocky or structured bottom. Use a mushroom anchor for sand and mud.
Never anchor in a shipping channel or in conditions where your kayak could be swamped by boat traffic. Anchor in protected water and stay visible.
Tip 16: Protect Yourself from Sun and Bugs
🚨 Safety First
Saltwater environments are harsh on your skin. Sun exposure from the water surface reflects UV radiation from below as well as above. Without protection, a full day on the water leads to severe burns.
Your sun protection kit:
- SPF 50+ water-resistant sunscreen (reapply every 90 minutes)
- UPF 50 long-sleeve fishing shirt
- Wide-brim hat or buff
- Polarized sunglasses (protect eyes and help you see fish through the surface glare)
For bug protection in coastal marshes and mangrove areas, use DEET-based repellent on exposed skin. Apply it before you apply sunscreen. Permethrin-treated clothing provides additional protection without skin contact.
Carry plenty of water and snacks. Dehydration in saltwater environments happens faster than most beginners expect [7].
Tip 17: Learn How to Land Fish from a Kayak Safely
Fighting a fish from a kayak is different from fighting one from a boat. You have no room to move, and the fish has leverage.
When a fish runs, let the drag do the work. Keep the rod tip up and maintain steady pressure. Do not horse the fish toward the kayak. Tire it out first.
To land the fish: reel until you have one arm span of line between the rod tip and the fish. Place the rod in the hand furthest from the fish. Draw the fish across your body in a smooth arc while maintaining line tension [2].
For large fish like tarpon or big redfish, use a lip gripper or a landing net. Do not try to grab a large saltwater fish by the lip with bare hands. Gill plates and teeth cause serious cuts.
Keep the fish in the water as much as possible during the release. A quick photo and a clean release keep the fishery healthy.
Tip 18: Practice Kayak Re-Entry Before You Need It
Every saltwater kayak angler needs to know how to re-enter their kayak from the water. Practice this in calm, shallow water before you go offshore or into strong current.
The standard re-entry for a sit-on-top kayak:
- Approach the kayak from the stern.
- Grab the stern handle and kick your legs to the surface.
- Pull yourself across the hull belly-down.
- Rotate into the seated position.
Practice this until it takes less than 60 seconds. In cold water or strong current, your window to self-rescue is short.
Tip 19: Know Your Physical Limits and Train for the Water
🎣 Skill Tip
Saltwater kayak fishing is physically demanding. Paddling against tide, fighting large fish, and managing a kayak in wind and chop requires real fitness.
Before your first extended trip, build these physical capacities:
- Core strength: Planks, rotational exercises, and deadlifts build the torso power you need for efficient paddling.
- Shoulder endurance: Overhead pressing and rotator cuff exercises prevent the shoulder injuries common in kayak anglers.
- Cardiovascular base: 30 minutes of moderate cardio three times per week gives you the engine to paddle all day.
Start with short trips of 2 to 3 miles. Build distance gradually. Your first offshore or multi-hour inshore trip should not be your first time testing your limits.
Tip 20: Rinse Everything After Every Saltwater Trip
Salt destroys gear. It corrodes metal, degrades line, and breaks down adhesives and seals. A post-trip rinse ritual is not optional in saltwater kayak fishing.
After every trip, rinse the following with fresh water:
- The kayak hull, deck, and all fittings
- Rod and reel (run water through the reel bail and handle)
- All terminal tackle and lures
- Pliers, knives, and tools
- Anchor and anchor trolley hardware
Dry everything before storage. Lubricate reel bearings and moving parts with a corrosion inhibitor like Boeshield T-9 or WD-40 Specialist Corrosion Inhibitor.
A 10-minute rinse after every trip extends the life of your gear by years. Skip it consistently, and you will replace gear far sooner than necessary.
Tip 21: Build Your Skills Progressively, Not Randomly
The biggest mistake new saltwater kayak anglers make is skipping steps. They buy expensive gear before they can paddle efficiently. They fish offshore before they understand inshore. They target big fish before they know how to land a medium one.
Build your skills in this order:
- Master paddling and kayak control in calm water.
- Learn to read tides and fish inshore flats and creeks.
- Add GPS and sonar to expand your range.
- Progress to nearshore structure and deeper water.
- Consider offshore fishing only after you have logged significant inshore time.
The kayak angling community is generous with knowledge. Connect with experienced kayak anglers at your local launch, join regional kayak fishing clubs, and study the water in your area before you fish it.
Kayak. Drill. Catch. Repeat.
The Complete Beginner's Gear Checklist for Saltwater Kayak Fishing

Use this checklist before every trip. It covers the 21 essential saltwater kayak fishing tips for newbies in a fast-reference format.
Safety Gear:
- PFD (worn, not stored)
- VHF radio (charged, tethered to PFD)
- Signaling device (air horn or whistle)
- Cell phone in a waterproof case
- Float plan filed with a shore contact
Navigation:
- Tide chart for your area
- Wind forecast checked
- GPS unit mounted and charged
- Sonar transducer installed and tested
Fishing Gear:
- 2-3 spinning rods rigged and ready
- Tackle selection matched to target species
- Paddle tail lures in 3-inch and 5-inch sizes
- Jig heads in 1/8 and 1/4-ounce weights
- Pliers tethered to PFD
- Landing net or lip gripper
Personal Comfort:
- SPF 50+ sunscreen
- UPF 50 long-sleeve shirt
- Polarized sunglasses
- Wide-brim hat
- Bug repellent
- Minimum 2 liters of water
- High-calorie snacks
Post-Trip:
- Fresh water rinse for all gear
- Reel lubrication
- Kayak inspection for damage
How to Choose the Right Fishing Kayak: A Quick Decision Guide
This section targets a featured snippet for the question: “How do I choose the right fishing kayak for saltwater?”
Step 1: Define your primary fishing environment. Inshore flats and creeks require a shorter, more maneuverable kayak (12 feet). Offshore or open bay fishing requires a longer, faster hull (14 feet or more).
Step 2: Set your budget. A quality entry-level fishing kayak starts at $600. A tournament-ready pedal drive kayak runs $3,000 or more.
Step 3: Prioritize stability. Choose a hull width of at least 30 inches for saltwater fishing.
Step 4: Check for hull rocker. More rocker handles chop and waves better.
Step 5: Test before you buy. Visit your local kayak shop and sit in the kayak. Paddle it if possible. Buying a kayak online without testing it is a common beginner mistake.
What Equipment Do Beginners Need for Saltwater Kayak Fishing?
Beginners need seven categories of equipment to fish saltwater safely and effectively:
- A stable sit-on-top fishing kayak with rod holders and storage
- A Coast Guard-approved PFD (worn at all times)
- A VHF radio and a waterproof cell phone case
- A 7-foot medium spinning rod and 2500 to 4000 series spinning reel matched to your target species
- A selection of paddle tail lures and jig heads in multiple sizes
- Sun protection gear including SPF 50+ sunscreen, UPF shirt, and polarized sunglasses
- A signaling device (whistle or air horn) and a float plan [7]
This is the baseline. Everything else is an upgrade.
Regional Saltwater Fishing Micro-Guide: Where to Start
Your location determines your target species and your tactics. Here is a brief regional breakdown for beginners.
Gulf Coast (Texas, Louisiana, Florida Panhandle): Focus on redfish and speckled trout on grass flats and in back bays. Use paddle tail lures on 1/4-ounce jig heads. Fish the falling tide near oyster bars.
Southeast Atlantic (Florida, Georgia, South Carolina): Inshore kayak fishing here targets snook, redfish, and flounder. Work mangrove shorelines on the rising tide. Use weedless rigged paddle tails to avoid hang-ups.
Mid-Atlantic (North Carolina, Virginia, Maryland): Striped bass, bluefish, and flounder dominate. Target inlet jetties and channel edges. Use heavier tackle with 20 lb braid for stripers near structure.
Pacific Coast (California, Oregon, Washington): Rockfish, halibut, and lingcod are primary targets. Fish nearshore reefs and kelp beds. Use heavier jigs and cut bait rigs. Surf launch skills are essential on the Pacific coast.
Know your local species before you rig up. Match your tackle to your target [1].
The FishOnYak.com Approach: Skill Progression Framework
At FishOnYak.com, we structure kayak angler development in four stages. This framework applies directly to the 21 essential saltwater kayak fishing tips for newbies covered in this guide.
Stage 1: Shoreline Skirmisher (0-5 trips) Focus: Safety fundamentals, kayak control, basic casting from a seated position. Fish calm, protected water within 500 meters of shore.
Stage 2: Bay Voyager (6-20 trips) Focus: Tide reading, lure selection, fish location, and basic anchoring. Extend your range to open bays and tidal creeks.
Stage 3: Inshore Tactician (21-50 trips) Focus: Species-specific tactics, advanced rigging, sonar use, and multi-rod setups. Begin targeting specific structures and seasonal patterns.
Stage 4: Saltwater Commander (50+ trips) Focus: Tournament preparation, nearshore and offshore capability, advanced navigation, and coaching others.
Every expert kayak angler started at Stage 1. The progression is the point. Respect each stage and you will build skills that last.
You can learn more about our coaching philosophy and team on the FishOnYak.com About page.
Interactive Saltwater Kayak Fishing Readiness Checklist
The interactive tool below puts the 21 essential saltwater kayak fishing tips for newbies into a phase-based digital coaching format. Work through each phase before your first trip. Track your progress and earn your Saltwater Commander rank.
21 Essential Saltwater Kayak Fishing Tips - FishOnYak Readiness Checklist
FishOnYak.com
21 Essential Saltwater Kayak Fishing Tips for Newbies
Your Digital Coaching Checklist. Work through each phase. Earn your rank.
0%
Complete
⚓
Your Rank
Shoreline Skirmisher
Welcome back! You have mastered 0 of 21 saltwater essentials. Keep going.
Filter Tips:
Phase 1: Pre-Launch Prep
Before you leave the dock. Tips 1-7.
0 / 7
▼
TIP 01
Choose the Right Kayak
Gear
Select a sit-on-top kayak at least 30 inches wide with hull rocker for saltwater chop. Length of 12-14 feet balances speed and maneuverability.
Pro Tip
Test the kayak in the water before you buy. Sit in it, rock side to side, and simulate a cast. A kayak that feels stable on a showroom floor tilts differently on moving water.
TIP 02
Rig 2-3 Rods Before Launch
Gear
Pre-rig your top 3 saltwater setups on 7-foot spinning rods. Use a 2500 series reel with 8 lb mono for flats and a 4000 series with 20 lb braid for structure.
Pro Tip
Label each rod with a small piece of tape at the handle. Write the lure type and weight. When fish are feeding, you grab the right rod in seconds without looking.
TIP 03
Wear Your PFD Every Trip
Safety First
A Coast Guard-approved PFD worn at all times is non-negotiable in saltwater. Inflatable low-profile PFDs do not restrict your casting motion.
Pro Tip
Attach your VHF radio, whistle, and a small knife to your PFD with dedicated clips. If you go overboard, your survival kit goes with you, not with the kayak.
TIP 04
File a Float Plan
Safety First
Leave your launch location, target area, expected return time, and kayak description with a trusted contact on shore before every trip.
Pro Tip
Text your float plan to two people. Set a check-in time. If you do not text them by that time, they call the Coast Guard. This system has saved lives.
TIP 05
Check Weather and Tides
Safety First
Check the marine forecast for wind speed and direction. Pull your local tide chart. Know the two-hour windows around high and low tide for peak fish activity.
Pro Tip
Use Windy.com for hour-by-hour wind forecasts specific to your launch point. Set a hard limit: if wind exceeds 15 mph, you stay on shore. No fish is worth a capsize in open water.
TIP 06
Carry a VHF Radio
Gear
A handheld waterproof VHF radio keeps you connected to the Coast Guard and other vessels when your cell signal fails. Monitor Channel 16 at all times on the water.
Pro Tip
Register your VHF radio with the FCC and get a Maritime Mobile Service Identity (MMSI) number. This number lets the Coast Guard locate you by GPS when you transmit a distress signal.
TIP 07
Tether All Gear with Lanyards
Gear
Secure your paddle, pliers, net, and tackle with lanyards. Everything that is not leashed will eventually go overboard in saltwater conditions.
Pro Tip
Never leash yourself to the kayak in moving water. Leash your gear to the kayak, not your body. If your kayak gets caught in current or surf, you need to be free to swim clear.
Phase 2: On the Water
Paddling, positioning, and finding fish. Tips 8-14.
0 / 7
▼
TIP 08
Master Proper Paddling Technique
Skill
Power your strokes with your torso, not your arms. Use the one-arm guide technique to conserve energy for casting. Learn forward, sweep, and draw strokes before fishing.
Pro Tip
Paddle into the wind at the start of every trip when you are fresh. Return with the wind at your back when you are tired. This one habit prevents most beginner exhaustion situations.
TIP 09
Read the Tide While Fishing
Skill
Fish the two-hour windows around moving tides. Baitfish move on the push and stack on the drain. Position your kayak where current funnels through structure or cuts.
Pro Tip
Watch for birds working over the water. Diving birds mark baitfish schools pushed to the surface by predators below. Paddle toward working birds, not away from them.
TIP 10
Target High-Probability Locations
Skill
Fish river bends, dock pilings, oyster bar edges, creek mouths, and mangrove shorelines. Fish concentrate at structure and current transitions, not in open water.
Pro Tip
Study your target area on Google Earth before you launch. Identify creek mouths, flat edges, and structure from above. Mark waypoints on your GPS. Then confirm on the water.
TIP 11
Use GPS and Sonar
Gear
Install a fish finder and GPS unit to locate structure, depth changes, and baitfish schools. Entry-level units from Garmin or Lowrance start around $150.
Pro Tip
Mount your transducer inside the hull with epoxy for a clean install that does not require drilling through the hull. This works on most plastic kayak hulls and keeps the unit protected.
TIP 12
Anchor Correctly in Current
Skill
Use an anchor trolley system to adjust your anchor point while seated. A 1.5 to 3-pound folding grapnel anchor handles most inshore conditions.
Pro Tip
In strong current, anchor from the stern, not the bow. Anchoring from the bow in fast current creates a lever effect that can flip a kayak. Stern anchoring keeps the hull aligned with the flow.
TIP 13
Work the Paddle Tail Lure
Skill
Use a 3 to 5-inch paddle tail on a 1/8 or 1/4-ounce jig head. Slow retrieve near the bottom on flats. Speed up near structure. Match color to water clarity.
Pro Tip
When redfish refuse your lure, stop the retrieve and let it sink to the bottom. Count to three. Then give one sharp lift. That dead-stick pause triggers strikes from fish that ignored a moving bait.
TIP 14
Stay Visible to Other Vessels
Safety First
Wear bright colors. Mount a flag on your kayak in open water. Stay out of shipping channels. Make eye contact with boat operators before crossing their path.
Pro Tip
A 3-foot orange safety flag on a flexible pole costs $15 and makes you visible to boat traffic from 300 yards. In busy inlets and channels, this is the cheapest safety investment you make.
Phase 3: The Fight and Landing
Managing fish from a kayak. Tips 15-18.
0 / 4
▼
TIP 15
Let the Drag Fight the Fish
Skill
Keep steady pressure and let the drag tire the fish. Do not force a large fish toward the kayak. A tired fish is a safe fish to land.
Pro Tip
When a big fish runs and pulls your kayak, go with it. Fighting a fish that is pulling your kayak is called a "Nantucket sleigh ride." Keep tension on the line and let the fish burn energy against your drag.
TIP 16
Land Fish with the Cross-Body Draw
Skill
Reel until you have one arm span of line. Place the rod in your hand furthest from the fish. Draw the fish across your body while maintaining line tension.
Pro Tip
For large redfish or snook, use a lip gripper, not your bare hand. Gill plates and gill rakers cause deep cuts. A lip gripper also keeps the fish in the water for a faster, safer release.
TIP 17
Practice Kayak Re-Entry
Safety First
Practice re-entering your sit-on-top kayak from the water in calm conditions until you complete it in under 60 seconds. Approach from the stern, pull across the hull belly-down, then rotate.
Pro Tip
Practice your re-entry in warm, shallow water with a friend present. Cold water shock reduces your swimming ability in seconds. Knowing the motion automatically means you do not have to think during a real capsize.
TIP 18
Keep Fish in the Water for Release
Skill
Minimize air time for released fish. Take your photo quickly, keep the fish horizontal and supported, and slide it back into the water headfirst.
Pro Tip
In warm water above 80 degrees, fish stress faster. If a fish is not swimming away strongly after 30 seconds of revival, move it forward and backward in the water to force oxygen through its gills. Do not let go until it kicks free on its own.
Phase 4: Post-Trip Maintenance
The salt rinse ritual and skill building. Tips 19-21.
0 / 3
▼
TIP 19
Rinse Everything After Every Trip
Gear
Rinse the kayak hull, rods, reels, tackle, pliers, and anchor hardware with fresh water after every saltwater outing. Lubricate reel bearings with corrosion inhibitor.
Pro Tip
Run fresh water through the reel while turning the handle slowly. This flushes salt from the internal gears. One minute per reel after every trip adds years to your equipment life.
TIP 20
Train Your Body for the Water
Skill
Build core strength, shoulder endurance, and cardiovascular base before long trips. Start with 2-3 mile outings and build distance gradually over multiple sessions.
Pro Tip
Shoulder injuries are the most common kayak angler injury. Add 10 minutes of rotator cuff exercises to your weekly routine. Lateral raises, external rotations, and face pulls keep your shoulders healthy through a full season.
TIP 21
Build Skills Progressively
Skill
Master inshore flats before going offshore. Add sonar and GPS before extending range. Connect with experienced kayak anglers at your local launch and join regional clubs.
Pro Tip
Keep a fishing log after every trip. Record the tide, wind, water temperature, lures used, and fish caught. After 20 trips, patterns emerge that no guide can teach you. Your own data is your best coach.
Conclusion: Your Path from Newbie to Saltwater Commander
Every experienced kayak angler you admire on the water started exactly where you are now. They made mistakes with gear. They got caught in wind. They lost fish they should have landed. The difference between those anglers and the ones who quit is simple: they kept going back.
The 21 essential saltwater kayak fishing tips for newbies in this guide give you a structured path forward. Follow the safety fundamentals without compromise. Build your gear list methodically. Practice your skills in protected water before you push into open saltwater. Rinse your gear every single time.
Your next steps:
- Work through the interactive checklist above and identify which tips you still need to act on.
- Visit your local kayak shop and test sit-on-top models before buying.
- Pull your local tide chart and plan your first inshore trip around the two-hour moving tide window.
- File a float plan with a shore contact before you launch.
- Come back to this guide after your first five trips. You will read it differently.
For more resources, coaching, and expert guidance from the FishOnYak.com team, visit our About page and connect with our community of saltwater kayak anglers.
See you on the water.
References
[1] Kayak Fishing For Beginners - https://fishyourassoff.com/kayak-fishing-for-beginners.html
[2] How To Fish From A Kayak The Basics - https://toadfish.com/blogs/put-em-back-post/how-to-fish-from-a-kayak-the-basics
[3] Beginners Guide Types Of Kayak Fishing - https://kayakanglermag.com/stories/features/beginners-guide-types-of-kayak-fishing/
[4] Beginners Guide Inshore Kayak Fishing - https://oldtownwatercraft.johnsonoutdoors.com/us/blog/beginners-guide-inshore-kayak-fishing
[5] Beginners Guide To Saltwater Fishing - https://www.saltwatersportsman.com/howto/beginners-guide-to-saltwater-fishing/
[7] Saltwater Kayak Fishing Tips For Newbies - https://floridakayak.com/saltwater-kayak-fishing-tips-for-newbies/

