Last updated: March 14, 2026
Quick Answer
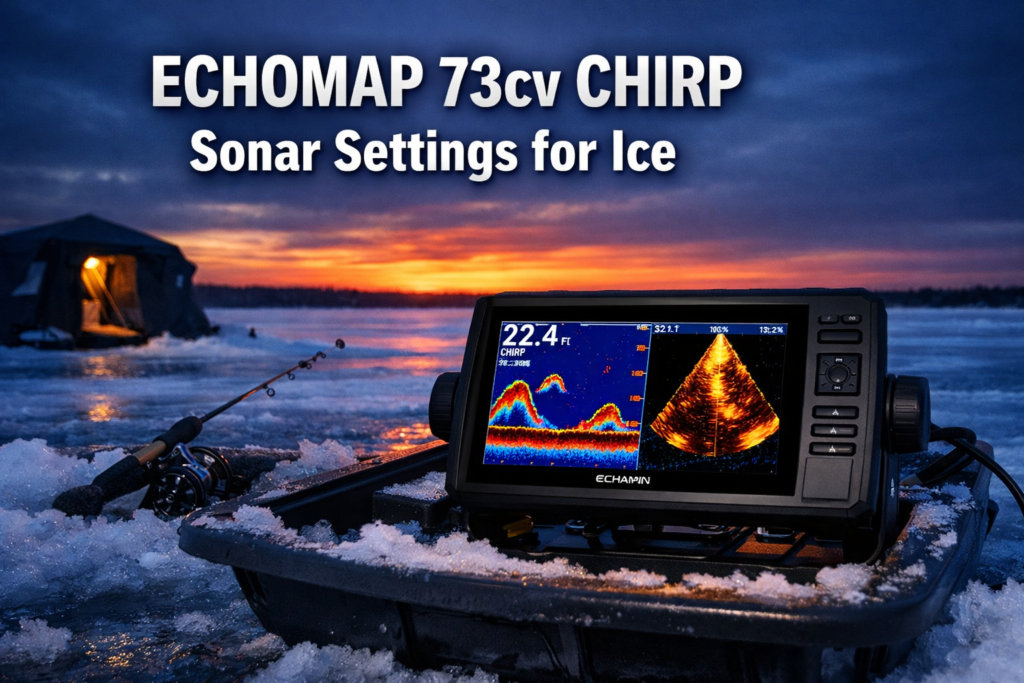
The Winning Setup: To achieve perfect target separation on your ECHOMAP 73cv CHIRP Sonar Settings for Ice, use these precise adjustments for 15-30ft depths:
- Frequency: Set to High CHIRP (150-240 kHz) to sharpen small jigs.
- Gain: Dial back to 60-70% to eliminate “ghosting” in the water column.
- A-Scope (Flasher): Always ON for zero-latency, real-time fish movement.
- Transducer Depth: Suspend the puck 6-8 inches below the ice to clear the slush line and prevent signal bounce.
Expert Insight for 2026: In the critical 15-30 foot “strike zone,” traditional sonar can struggle with clutter. By pairing these CHIRP settings with Panoptix LiveVü Down, you gain a massive tactical advantage. This depth range is the “sweet spot” where forward-facing sonar provides the clearest live-action feedback, allowing you to see a fish’s reaction to your jig before the strike.
Key Takeaways
- Use High CHIRP (150-220 kHz) for depths under 40 feet. Switch to Medium CHIRP only when you exceed that range.
- Set gain between 60-75% for 15-30 foot depths. Too high creates clutter that masks fish near bottom structure.
- Activate the A-scope flasher alongside your CHIRP sonar view for instant perch and crappie identification.
- The Panoptix PS22-IF performs best in the 20-30 foot range. Forward-facing sonar clarity drops noticeably past 35 feet.
- Narrow CHIRP (180-240 kHz, 25° cone) delivers superior target separation but covers less water column width (0.47x water depth).
- Wide CHIRP (140-200 kHz, 42° cone) covers more column (0.90x water depth) but trades resolution for range.
- Lower your Panoptix transducer 6-8 inches into the hole to reduce interference from ice and slush.
- Battery life on the PS22-IF bundle runs 7-9 hours from a 7 amp-hour battery during active use.
- Fish near bottom structure are harder to separate with Panoptix than with dedicated flasher units. Use your A-scope to confirm bottom targets.
- The ECHOMAP 73cv's split-screen mode lets you run CHIRP sonar and Panoptix LiveVü simultaneously for full-column coverage.

What Are the Best ECHOMAP 73cv CHIRP Settings for Ice Fishing in 15-30 Feet?
For 15-30 foot ice fishing depths, High CHIRP is the correct frequency range on the ECHOMAP 73cv. High CHIRP sweeps from 150-220 kHz (adjustable to 140-240 kHz), which produces sharper target separation and better bottom definition than Medium or Low CHIRP at these shallower depths.
Core Settings for 15-30 Foot Ice:
- Frequency: High CHIRP (150-220 kHz)
- Gain: 60-75% (start at 65% and adjust)
- Range: Set to 1.5x your actual depth. For 20 feet of water, set range to 30 feet so fish appear in the middle of the screen.
- Color Palette: Use a high-contrast palette (red/orange for strong returns, blue for weak). This separates panfish from bottom clutter.
- Scroll Speed: Increase to 75-80% for ice fishing. Fish move slowly in cold water, so faster scroll shows more history.
- A-Scope Flasher: Turn on. This gives you a real-time vertical signal bar that mirrors a traditional flasher display.
Common Mistake: Anglers leave gain at the factory default (around 50%) and miss suspended perch and crappie in the mid-column. Bump gain up until you see light clutter, then back off slightly. That edge is where fish signals appear cleanest.
Choose Narrow CHIRP if you need precise target separation between fish stacked tight above bottom structure. Choose Wide CHIRP if you want to locate fish across a broader cone before committing to a spot.
How Do CHIRP Frequency Cone Angles Affect Target Separation at 15-30 Feet?

CHIRP cone angle directly controls how much water column width you see versus how clearly you see individual targets. At 15-30 feet, the difference between wide and narrow cone matters for species like perch and crappie that school tight to structure.
| CHIRP Mode | Frequency Range | Cone Angle | Coverage Width at 25 ft | Resolution |
|---|---|---|---|---|
| Wide CHIRP | 140-200 kHz | 42° | ~22 feet | Lower |
| Full CHIRP | 150-220 kHz | ~35° | ~16 feet | Moderate |
| Narrow CHIRP | 180-240 kHz | 25° | ~12 feet | Higher |
What this means on the ice:
At 25 feet of depth, Wide CHIRP covers roughly 22 feet of bottom diameter. That helps you locate fish schools. But when perch stack within 2-3 feet of bottom, Wide CHIRP blends those signals together.
Narrow CHIRP at 25° covers about 12 feet of bottom diameter at the same depth. You lose some search coverage, but individual fish signals separate clearly from bottom returns. For crappie and perch ID in 15-30 feet, Narrow CHIRP is the better call once you've located the school.
Practical approach: Start with Full CHIRP to find fish. Once you mark a school, switch to Narrow CHIRP to count and separate individual targets before dropping your jig.
For more on reading perch and crappie at similar depths, see this guide on Garmin Panoptix PS22-IF beam settings for crappie and perch in 15-24 foot depths.
How Do You Integrate Panoptix with ECHOMAP 73cv CHIRP Sonar Settings for Ice?

The Panoptix PS22-IF pairs with the ECHOMAP UHD2 platform and connects to compatible ECHOMAP units to deliver LiveVü Forward and LiveVü Down views alongside your CHIRP sonar. The integration gives you two layers of information: CHIRP shows you what's directly below, Panoptix shows you what's approaching the hole.
Setting Up Panoptix for Ice Without a Pole Mount:
The PS22-IF uses a pole-free transducer system. Lower it directly into the hole using the included cable and bracket. No separate pole is required, which keeps your setup clean in tight shelters.
- Lower the transducer 6-8 inches below the ice surface
- Angle it slightly forward (15-20 degrees) for LiveVü Forward coverage
- Use LiveVü Down for direct below-hole fish detection
- The removable lens design lets you switch between narrow forward mode and wider down mode without changing transducers
Depth Performance:
Forward-facing sonar on the PS22-IF shows clear transmission from 20-35 feet. The 20-30 foot range is where forward-facing performance peaks. Past 35 feet, bottom definition degrades significantly, with usable bottom return dropping below 0.25 feet of resolution. For depths under 20 feet, rely more heavily on your CHIRP sonar and A-scope flasher rather than forward-facing Panoptix.
Split-Screen Setup on the ECHOMAP 73cv:
Run CHIRP sonar on the left panel and Panoptix LiveVü Down on the right. This gives you simultaneous coverage: CHIRP for depth and bottom reference, Panoptix for live fish movement. When a fish enters the Panoptix cone, you see it move before it appears on CHIRP. That lead time lets you adjust your jig presentation before the fish arrives directly below the transducer.
For deeper structure fishing where tip-ups complement your electronics setup, check out the best tip-up options for ice fishing in 2026.
How Do You Use the A-Scope Flasher for Perch and Crappie ID on the ECHOMAP 73cv?

The A-scope flasher on the ECHOMAP 73cv displays a real-time vertical signal bar on the right side of your sonar screen. It shows signal intensity at each depth as it happens, without the scroll delay of standard sonar history. For perch and crappie identification, this is your fastest read.
Reading the A-Scope for Species ID:
- Perch typically appear as a tight cluster of signals at a consistent depth. They hold in schools and don't scatter much vertically.
- Crappie show as individual arches or signals spread across a 3-5 foot depth band. They suspend more freely than perch.
- A thick, wide A-scope signal at the bottom edge usually indicates bottom structure or debris, not fish. A thin, distinct signal above bottom is a fish.
Gain and Color Settings for A-Scope Accuracy:
Set color gain so that the bottom return shows as a solid red/orange band. Fish signals should appear as yellow or green above that band. If fish signals blend into the bottom color, reduce gain by 5% increments until separation is clear.
Pairing A-Scope with Panoptix:
When a signal appears on your A-scope at 18-22 feet, check your Panoptix LiveVü Down panel. If the Panoptix shows a moving arch at the same depth, that's a live fish responding to your jig. A static A-scope signal without corresponding Panoptix movement is likely structure.
For jigging tactics that pair with this electronics setup, the guide on jumbo perch in 15-20 foot flats with jigging rigs and presentation tweaks covers cadence adjustments that produce results at these depths.
What Are the Biggest Mistakes Anglers Make with ECHOMAP 73cv CHIRP Sonar Settings for Ice?

Most anglers who struggle with target separation on the ECHOMAP 73cv make one of four repeatable errors. Fixing these settings takes under two minutes and changes what you see on screen immediately.
Mistake 1: Running gain too high High gain fills the screen with noise. Fish signals near bottom disappear into clutter. Start at 65% gain and increase only until you see the first light noise, then back off 3-5%.
Mistake 2: Using the wrong CHIRP range for depth Medium CHIRP is for 40-60+ feet. Using it at 20 feet reduces target separation. Keep High CHIRP engaged for all fishing in the 15-30 foot range.
Mistake 3: Setting range too wide If you're fishing 20 feet of water and your range is set to 100 feet, fish appear as tiny signals in the top fifth of the screen. Set range to 30-35 feet for 20-foot water. Fish fill the screen and separate clearly.
Mistake 4: Ignoring Panoptix transducer position Leaving the PS22-IF transducer at the ice surface creates interference from slush and ice crystals. Lower it 6-8 inches into the water for clean signal transmission.
Edge Case: Fish near bottom structure When perch hold within 1-2 feet of bottom, both CHIRP and Panoptix struggle to separate fish from structure returns. In this scenario, switch to Narrow CHIRP and reduce gain until the bottom return compresses to a thin line. Fish signals above that line become visible. Comparative testing has shown that Panoptix has reduced separation capability when fish are tight to bottom structure, so your A-scope becomes the primary tool in this situation.
For walleye anglers dealing with similar bottom-hugging behavior, deadsticking and subtle jigging techniques for mid-winter walleye address presentation adjustments that match what your sonar tells you.
If you're drilling multiple holes to find fish across a flat, pairing your electronics with the right auger matters. The StrikeMaster 40V Maven vs ION Alpha auger comparison covers which drill handles high-volume hole drilling in mid-winter conditions.
FAQ
Q: What CHIRP frequency should I use on the ECHOMAP 73cv for ice fishing under 30 feet? Use High CHIRP (150-220 kHz). This range provides the best target separation and bottom definition for depths under 40 feet. Switch to Medium CHIRP only when fishing deeper than 40-60 feet.
Q: Does the Panoptix PS22-IF work with the ECHOMAP 73cv specifically? Garmin launched the PS22-IF Ice Bundle paired with the ECHOMAP UHD2 73sv. Compatibility with the 73cv depends on your unit's software version and network port configuration. Check Garmin's current compatibility list before purchasing.
Q: What is the best depth range for Panoptix forward-facing sonar on ice? The 20-30 foot range produces the clearest forward-facing transmission. Bottom definition degrades past 35 feet, and signal clarity at depths under 15 feet is limited due to the cone angle geometry.
Q: How do I stop fish from blending into the bottom return on my ECHOMAP 73cv? Switch to Narrow CHIRP (25° cone angle) and reduce gain until the bottom return compresses to a thin colored band. Fish holding above bottom will separate as distinct signals above that line.
Q: How long does the Panoptix PS22-IF battery last during ice fishing? Real-world testing documents 7-9 hours of use from a 7 amp-hour battery during active ice fishing sessions.
Q: Should I use single frequency or CHIRP on the ECHOMAP 73cv for ice? CHIRP generally outperforms single frequency for target separation. However, some fish targets show up more clearly at fixed 200 kHz or 83 kHz. Test both on your specific body of water, as water clarity and fish behavior affect which produces cleaner returns.
Q: What does the A-scope flasher add that standard CHIRP sonar doesn't show? The A-scope shows real-time signal intensity without scroll delay. You see a fish enter your cone instantly, rather than waiting for the sonar history to scroll past. This is critical for jigging timing when fish approach quickly.
Q: Can I run CHIRP sonar and Panoptix at the same time on the ECHOMAP 73cv? Yes. Use the split-screen mode to display CHIRP sonar on one panel and Panoptix LiveVü Down on the other. This gives you simultaneous depth reference and live fish movement data.
Q: What cone angle works best for counting individual perch in a school? Narrow CHIRP at 25° cone angle provides the best individual target separation for counting fish in a school. Wide CHIRP at 42° covers more area but blends individual fish signals at close range.
Q: Is the Panoptix PS22-IF better than a traditional flasher for ice fishing? They serve different purposes. A traditional flasher gives faster real-time response for jigging. Panoptix adds forward-facing coverage and live fish movement visualization. Running both together, or using the A-scope flasher mode alongside Panoptix, gives you the advantages of each.
Conclusion
Dialing in your ECHOMAP 73cv CHIRP sonar settings for ice fishing in 15-30 foot depths comes down to three adjustments: set High CHIRP for the frequency range, tune gain to 65-70% so fish separate from bottom clutter, and activate the A-scope flasher for real-time perch and crappie identification. Add Panoptix LiveVü Down on a split screen and lower the transducer 6-8 inches into the hole for clean signal transmission.
The 20-30 foot range is where this entire system performs at its highest level. Forward-facing Panoptix gives you fish approach data before your jig even enters the strike zone. Your CHIRP sonar confirms depth and bottom position. The A-scope closes the loop with instant signal feedback while you work your presentation.
Start with these settings on your next outing. Adjust gain and range for your specific water conditions. Once you see fish separating cleanly from bottom structure on your screen, you'll know the system is dialed.
Kayak. Drill. Catch. Repeat.
See you on the water.
References
[1] Watch – https://www.youtube.com/watch?v=iotu1JBZ5NY
[3] Watch – https://www.youtube.com/watch?v=dObvXwRkjvM
[4] Garmin CHIRP Sonar Documentation – https://www8.garmin.com/manuals/webhelp/GUID-3E67C80C-0812-4EEC-BC60-699751B9CF6F/EN-US/GUID-578DD8C1-7DF5-4331-85E6-5948E750FACD.html


