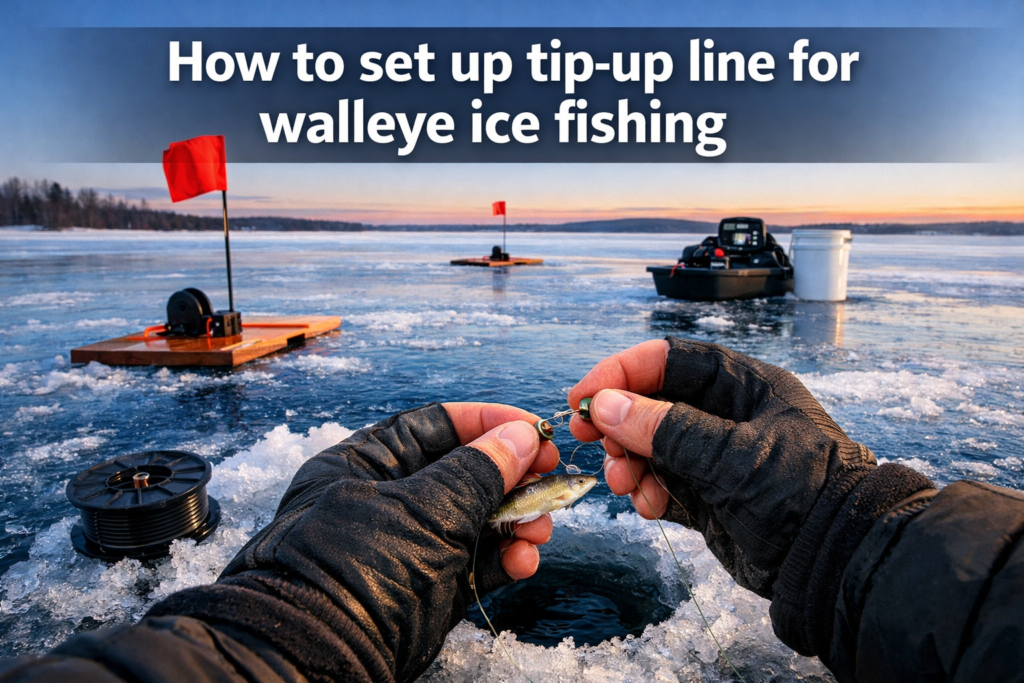

If you want more flags, fewer tangles, and cleaner hook-ups, you need a rig that matches how walleyes feed under the ice. That is the core of How to set up tip-up line for walleye ice fishing. A good tip-up line setup is simple, but every part matters, from spool line and leader to bait height and flag tension. I have seen skilled open-water anglers overbuild these rigs, then miss fish because the spool sticks or the bait sits too high. On hard water, precision wins.
FishOnYak.com is built for anglers who take rigging seriously. Our style is the same on the coast and on the ice. Rigging Mastery matters. Tactical Angling matters. Safety matters. Kayak. Drill. Catch. Repeat.
Key Takeaways
- Use braided line or dacron on the tip-up spool, then add a lighter fluorocarbon leader for stealth and bait movement.
- Keep your walleye bait close to bottom. Start 6 inches to 1 foot above bottom, then adjust by hole and light level.
- Space tip-ups to cover structure and depth changes, often in a shallow-to-deep line along a break.
- Set light flag tension, clear slush, and make sure line runs free off the spool before you walk away.
- When a flag trips, read the line first. If it pulls steady, give the fish a few seconds, then set the hook and hand-line smoothly.

How to set up tip-up line for walleye ice fishing, gear and rig choices
For target walleye, I keep the system clean. Walleye are not pike. They usually respond better to a subtle rig, lighter bait resistance, and less visible terminal gear. If you come from saltwater, think of this as downsizing without getting soft.
Core gear list for tip-ups for walleye
- Tip-ups or tipups with smooth spool rotation
- 30 to 50 lb dacron or braided line for the spool
- 6 to 10 lb fluorocarbon leader for neutral to pressured fish
- In pike-heavy water, some anglers step up leader strength
- Barrel swivel or small swivel
- Split shot
- Plain hook or small treble hook
- Live bait such as a minnow, fathead, shiner, or sucker
- Depth finder, flasher, or sounder
- Ice safety gear
Research-backed rigging starts with a visible, cold-friendly main line. Braided line and dacron handle freezing conditions better than straight nylon or light mono on the main spool, and they show line movement well against the ice. Farm and Fleet recommends 20 to 30 lb minimum for tip-up spool line, with heavier options for bigger fish and rough conditions. I usually fish 30 to 40 lb dacron on the main line because it handles well with gloves.
For the leader, walleye usually want less visibility. A monofilament or fluorocarbon leader gives the bait a cleaner look. Wind Rider notes that walleye are sensitive to visible line, especially in clear water, and recommends 12 to 20 lb leader material in some tip-up situations. For neutral walleyes, many anglers still scale lighter. If your lake has clean water and average fish, an 8 pound mono leader or fluorocarbon leader is a practical starting point. If you expect bigger walleyes, abrasive bottom, or stray pike, go heavier.
“Your spool line handles abuse. Your leader gets bites.”
Best hook size and bait choices
Hook size should match the bait, not your ego.
A reliable range for walleye:
- #6 to #8 plain hook for small fatheads or small shiner bait
- #8 to #10 treble hook when you need stronger holding power
- 10 treble hook for smaller bait in clear water
- Small treble for short-strike fish
- Avoid oversized hooks that kill bait action
For bait, I like:
- Fatheads or fathead minnows on pressured lakes
- Shiner bait or large shiners in stained water or when bigger walleyes are active
- Small sucker only when local forage supports it
- Perch-imitating bait profiles where perch are common forage
A single-hook setup is often the better rig for walleyes because it presents less hardware and lets the minnow swim more naturally. Save the heavy wire leader and oversized hooks for fishing for pike, not for most walleye fishing.
For more first-ice system details, read our Mastering Tip-Up Setups For First Ice Walleye. If you are building a full hardwater program, our Ice Fishing hub keeps the full system organized.
How to set up tip-up line for walleye ice fishing step by step
This is the rig I trust most often.
1. Load the spool right
Tie your tip-up line to the spool with an arbor knot. Then spool in a smooth, even wrap. Farm and Fleet specifically recommends wrapping the line evenly in a clockwise direction so the spool releases line cleanly on the strike.
Use enough line to cover your deepest planned set. Most anglers carry more than enough. The key is neat wraps, not random coils.
2. Tie in the swivel
At the end of your main line, tie a barrel swivel or small swivel. This does two things:
- Reduces line twist from a spinning minnow
- Gives you a clean connection point for a fluorocarbon leader
A standard improved clinch or Palomar works if tied cleanly. For cold hands, pick one knot and master it.
3. Add the leader
Tie on 18 to 36 inches of fluorocarbon. In clear water, a longer fluorocarbon leader often helps. In stained lakes or aggressive bites, shorter leaders work fine.
A good starting range:
| Water condition | Leader |
|---|---|
| Clear, pressured | 24 to 36 inches, fluorocarbon |
| Moderate stain | 18 to 24 inches |
| Pike mixed in | heavier fluorocarbon or accept bite-offs |
| Dirty water | visibility matters less, shorten for control |
4. Add weight
Pinch on one split shot above the hook. In most setups, place it about 6 inches to 12 inches above the hook. That gives you enough weight to keep the minnow down and still lets it move.
Use just enough weight. That phrase matters. Enough weight to keep the bait from riding up and tangling, but not so much that the minnow looks dead. If your bait is hooked through the middle of the back or hooked through the tail, the split shot helps control the swim and keeps the presentation in the strike zone.
5. Tie the hook
Now tie your plain hook or treble hook. For live bait, keep the hardware small.
Hook placement options:
- Through the lips for a forward-facing minnow in calm water
- Through the middle of the back for a steady horizontal bait
- Hooked through the tail when you want more flash and panic movement
If I am targeting walleyes with a shiner or fathead over a clean flat, I usually start with a plain hook through the back. If fish nip short, I switch to a small treble.
6. Mark the depth
Use a bobber stop, clip, depth marker, or even a simple knot system to mark the depth after you find bottom. Some anglers use tip-up markers built into the rig. Others mark the line with a bead or clip. The goal is simple. Mark the depth so reset speed is fast after each flag.

How to set up tip-up line for walleye ice fishing at the right depth and location
Rigging is half the job. Placement closes the deal.
Start with structure, not random holes
Drill tip-ups around:
- Bottom of the break
- Top of hump
- Inside turn
- Weed edge
- Transition from flat to deeper water
A shallow-to-deep formation is one of the best ways to locate scattered walleyes. MeatEater describes drilling from the shallowest fishable point out to deeper water, with each hole slightly deeper than the last [3]. That pattern is efficient and easy to read.
For early-ice, I often start on a clean break near a weed edge and set tip-ups from 8 to 20 feet of water. If I am on a basin edge in late winter, I shift more of the spread into deeper water.
Set the depth correctly
This is where many anglers miss.
Wind Rider recommends setting baits 6-12 inches off bottom as a standard starting point for active fish. In bright conditions or clear lakes, dropping the bait inches off bottom, even 2 to 3 inches, often gets more looks from fish pinned to the substrate.
My rule:
- Dawn, dusk, cloudy periods, start 1 foot off bottom
- Bright sun, clear water, start inches off bottom
- Aggressive fish on sonar, test 2 feet off bottom on one line
- If fish suspend over structure, stagger one bait higher in the water column
That gives you a clean starting spread.
Spread and spacing
Wind Rider notes that 50 to 100 yards apart covers water well, while 30 to 50 yards works better in wind, unfamiliar water, or when fishing with partners [2]. Keep all flags visible. That matters more than perfect geometry.
For example:
- One tipup right on top of a hump
- One on the side drop
- One at the base
- One near the weed edge
- One roaming hole on a nearby flat
This spread is great for target walleye on new water.
For depth control and fish location, electronics help. If you want a better visual read on how fish react to your bait, see our review of the Vexilar FS800IR Fish Scout underwater camera and our wireless underwater camera setup guide for ice fishing. For sonar-focused anglers, the Vexilar FLX-18 upgrade guide is worth your time.
Reading the flag, setting the hook, and avoiding common mistakes
A popped flag is where clean rigging pays you back.
What to do when the flag trips
Walk in steady. Don’t stomp in.
Check the spool first:
- If the spool is turning and line is leaving steady, the fish has the bait
- If line movement stops, be ready
- If the line twitches or goes slack, the fish might be repositioning the minnow
Wind Rider advises waiting about 3 to 5 seconds if line pulls steadily, giving the fish time to turn the bait. If movement turns erratic or stops, set immediately because the fish might be dropping it.
Then follow this sequence, which matches common hand-lining practice shown in video instruction [4]:
- Grab the line below the spool.
- Lay the tip-up on the ice.
- Pull slowly until you feel resistance.
- Set the hook with a quick, firm snap.
- Hand-line the fish smoothly.
This is not bass fishing. Do not rip. Walleye mouths are firm, but a controlled hookset wins more fish.
Common mistakes that cost fish
Spool line too light or wrong material
Light mono on the spool freezes, kinks, and hides subtle line movement. Dacron or braided line is the better main line choice [1].
Leader too heavy
A wire leader kills bites for walleyes in many situations. Unless pike are the main issue, avoid a wire leader.
Too much weight
If the sinker or split shot overpowers the bait, the minnow stops working. Use just enough weight to keep the bait down.
Bait set too high
Walleye often travel close to bottom. If you start 3 feet up in the water column over a flat, you miss fish.
Flag too tight
A light-biting fish should move the spool without fighting too much resistance. If you are afraid to set the trigger light because of wind, tighten the spread and use better placement rather than over-tensioning every flag.
Hole from freezing
Clear ice chunks and slush often. If the line catches at the hole from freezing, the fish feels resistance and drops the bait.
“Smooth spool, light trigger, bait near bottom. That formula gives you good success more often than fancy rigs.”

Tip-up rig / depth chart for walleye
Use this chart as a starting grid. Keep your first sets conservative. Then adjust after the first marks, first flag, or first missed fish.
| Condition | Typical depth to start | Target structure | Leader strength and visibility | Bait style |
|---|---|---|---|---|
| Low light / dawn | 6 inches to 1 foot off bottom | Weed edge, bottom of the break, top of hump | 8 to 10 lb fluorocarbon, low visibility | Live minnow, small shiner |
| Bright daytime / clear water | 2 to 6 inches off bottom | Inside turn, tight break, hard-bottom flat | 6 to 8 lb fluorocarbon, long leader | Small fathead or plain hook minnow |
| Bright daytime / stained water | 6 to 12 inches off bottom | Breakline, perch flat, transition edge | 8 to 10 lb fluorocarbon or pound mono leader | Shiner or active minnow |
| After dark / evening | 1 to 2 feet off bottom as a starting point | Shallow flat near break, weed edge, lip of hump | 8 to 10 lb fluorocarbon, moderate length | Larger shiners, lively bait |
Chart notes:
- Start here on first safe ice, low light, weed edge plus break.
- Go slightly higher for aggressive fish.
- Drop lower when fish hug bottom in clear lakes.
If you are also mixing in jig presentations near your set lines, our Lake of the Woods walleye jigging and deadsticking guide pairs well with this spread.
Interactive checklist, printable checklist, and article tools
Below is a complete engagement block built for this article. It includes the interactive checklist, printable one-page copy, a compact rig chart, expandable advanced tips, pro callouts, and a future mini-tool spec.
Walleye Tip-Up Setup Checklist
Interactive Walleye Tip-Up Setup Checklist
Follow each step from home to the ice. Check items as you go. Your progress saves in this browser.
0 of 0 steps done
Before you leave home
At the hole
Rig the tip-up
Set depth and spread
Final checks and safety
Printable one-page checklist copy
Portrait layout. Two columns. Keep line items short. Use empty square checkboxes on each line.
Title: Walleye Tip-Up Setup Checklist
Subheading: Follow this step-by-step list to avoid missed flags and tangles on the ice.
Section 1: Before you leave home
□ Pack tip-ups
□ Spool 30 to 50 lb tip-up line
□ Pack 6 to 10 lb fluorocarbon leaders
□ Pack swivels and split shot
□ Pack #6 to #10 hooks
□ Pack bait or legal soft plastics
□ Pack flasher or sounder
□ Pack ice safety gear
Section 2: At the hole
□ Drill on breaks or structure
□ Check ice in each direction
□ Find bottom with electronics
□ Note depth and cover
Section 3: Rig the tip-up
□ Spool line evenly
□ Tie swivel to main line
□ Add fluorocarbon leader
□ Pinch split shot above hook
□ Tie hook with clean knot
Section 4: Set depth and spread
□ Find bottom at each hole
□ Start bait 1 to 2 feet off bottom
□ Adjust depth across holes
□ Spread sets on key structure
□ Note each set depth
Section 5: Final checks and safety
□ Set light flag tension
□ Check free spool line flow
□ Clear slush from holes
□ Mark holes if needed
□ Review weather and route
Bottom brand area:
FishOnYak.com
Scan or visit FishOnYak.com for diagrams, depth chart, and advanced tips.
[QR code placeholder]
Layout notes: Use two columns. Add small icons for gear, rigging, depth, and safety. Keep font clean and bold. Leave wide margins for phone screenshots and home printing.
Tip-up rig and depth chart
Condition
Depth to start
Target structure
Leader
Bait style
Low light or dawn
6 to 12 inches off bottom
Weed edge, break, hump top
8 to 10 lb fluorocarbon, low visibility
Live minnow or small shiner
Bright day, clear water
2 to 6 inches off bottom
Inside turn, hard flat, tight break
6 to 8 lb fluorocarbon, longer leader
Fathead or subtle live bait
Bright day, stained water
6 to 12 inches off bottom
Breakline, flat edge, transition
8 to 10 lb fluorocarbon
Active shiner or medium minnow
Evening or after dark
1 to 2 feet off bottom
Shallow flat near break, weed edge
8 to 10 lb fluorocarbon, medium length
Larger shiner or lively minnow
Chart notes: Start with the low-light row on first safe ice. Go slightly higher for aggressive fish. Drop lower when fish sit tight to bottom in clear water.
Color scheme: Blue-gray base, white cells, red accent for starting row, green note callouts. Use small icons for sun, moon, weeds, and breakline.
Advanced tips and troubleshooting
Advanced: Fine-tune flag tension for wind vs calm days
- Start light for walleye. Increase tension only enough to stop false trips.
- On windy days, tighten spread distance before over-tightening every flag.
- Test each trip arm by pulling line by hand before walking away.
- Cold, sticky spools need less trip resistance and more spool cleaning.
Advanced: Adjusting for current and line angle
- Add a touch more split shot if current pushes bait off target.
- Keep the line close to vertical so depth marks stay honest.
- Shorten leader slightly when current spins bait too much.
- Recheck bottom often in current seams or neck-down areas.
Troubleshooting: False flags, missed fish, and what to adjust
- False flags often come from wind, sticky trip arms, or bait that is too large.
- Missed fish often point to too much tension, too much weight, or bait set too high.
- If bait twists line, add a better swivel or replace weak leader knots.
- If fish drop bait fast, switch to a smaller hook and a smaller minnow.
- If holes freeze fast, clear slush more often and reset depth marks.
Advanced: Spread strategy when fish roam
- Keep one set on the best structure and use the rest to search depth bands.
- Run a shallow-to-deep line until one depth produces repeated flags.
- After two or three bites, compress the spread around the active zone.
- Note every set depth so you can repeat the bite window fast.
Pro Tip: Tie the same knot every time on leaders. Cold hands make simple systems better.
Pro Tip: If one hole gets steady looks, copy that bait height on the next reset before changing bait color.
Pro Tip: Clear slush before every reset. Free spool matters more than fancy hardware.
Pro Tip: On a fresh lake, start wider. Once flags show a pattern, tighten the spread and fish the winning depth.
Markup suggestion for article use: Use semantic <details><summary> blocks for expandable tips. Use a cg-element-pro callout box after depth, knot, and spread sections. All content remains visible as plain HTML if JavaScript is off.
Future mini-app concept, rig recommendation tool
Input UI: Three simple selectors. Time of day, water clarity, and depth range. Use large pill buttons or dropdowns on mobile.
- Input 1: Morning, afternoon, evening, night
- Input 2: Clear, stained, murky
- Input 3: Shallow, mid, deep
Output: Leader strength and length, bait style and size, starting bait height off bottom.
Sample combinations:
- Evening + stained + shallow: 8 to 10 lb fluorocarbon, 24 inch leader, lively shiner, start 1 foot off bottom.
- Afternoon + clear + deep: 6 to 8 lb fluorocarbon, 30 inch leader, small fathead, start 3 to 6 inches off bottom.
- Morning + murky + mid: 8 to 10 lb fluorocarbon, 18 inch leader, active minnow, start 6 to 12 inches off bottom.
Embed later as a compact card below the depth chart. Keep one-tap inputs. Hide advanced fields behind a “More options” button so the page stays fast and clean.
Advanced field notes for seasoned anglers
If you are coming from saltwater, one thing transfers well. Pattern fast, then tighten your system. That is true in a marsh creek and on a frozen walleye lake.
Refine your set times
Wind Rider notes that low-light periods matter, especially sunset through evening, with checks timed around those feeding windows [2]. That matches what many of us see on the ice. I often get more flags in the last hour of legal light than in the previous three hours combined.
Match bait to mood
- Neutral fish, downsize to fatheads
- Roaming fish over perch forage, use a shiner
- Bigger bait if bigger walleyes are clearly active
- If perch or crappie keep pestering your line, move depth or bait size
Keep your system clean
The more moving parts you add, the more failure points you build. This is why I prefer one clean rig over a fancy setup with extra hardware. You want free spool, natural bait movement, and a fast reset.
If you are layering up for mobile hardwater days, our Professional Ice Fishing Float Suit Setup For Mobile Anglers and Best Ice Fishing Gloves 2026 guides help keep your hands working when you need to tie and hand-line clean.

Conclusion
How to set up tip-up line for walleye ice fishing comes down to a few disciplined choices. Use dacron or braided line on the spool. Add a clean fluorocarbon leader. Match hook size to bait. Set depth close to bottom. Spread your tip-ups over key structure. Then make sure every spool turns free and every flag trips light.
Start simple on your next trip:
- Rig three to five identical tip-ups.
- Set a shallow-to-deep spread.
- Start with bait 6 inches to 1 foot off bottom.
- Adjust one variable at a time.
- Track what produces.
That process gives you repeatable results. It is the same mindset we push at FishOnYak.com. Build a clean system. Fish with intent. Stay safe. See you on the water.
References
[1] Set Ice Fishing Tip Ups – https://www.farmandfleet.com/blog/set-ice-fishing-tip-ups/
[2] Ice Fishing Tip Ups Multi Line Tactics For Pike And Walleye – https://windrider.com/blogs/tips-and-tricks/ice-fishing-tip-ups-multi-line-tactics-for-pike-and-walleye
[3] 3 Tip Up Setups To Catch More Fish Through The Ice – https://www.themeateater.com/fish/ice-fishing/3-tip-up-setups-to-catch-more-fish-through-the-ice
[4] Watch – https://www.youtube.com/watch?v=5iMua_hyz1c

