Last updated: March 11, 2026
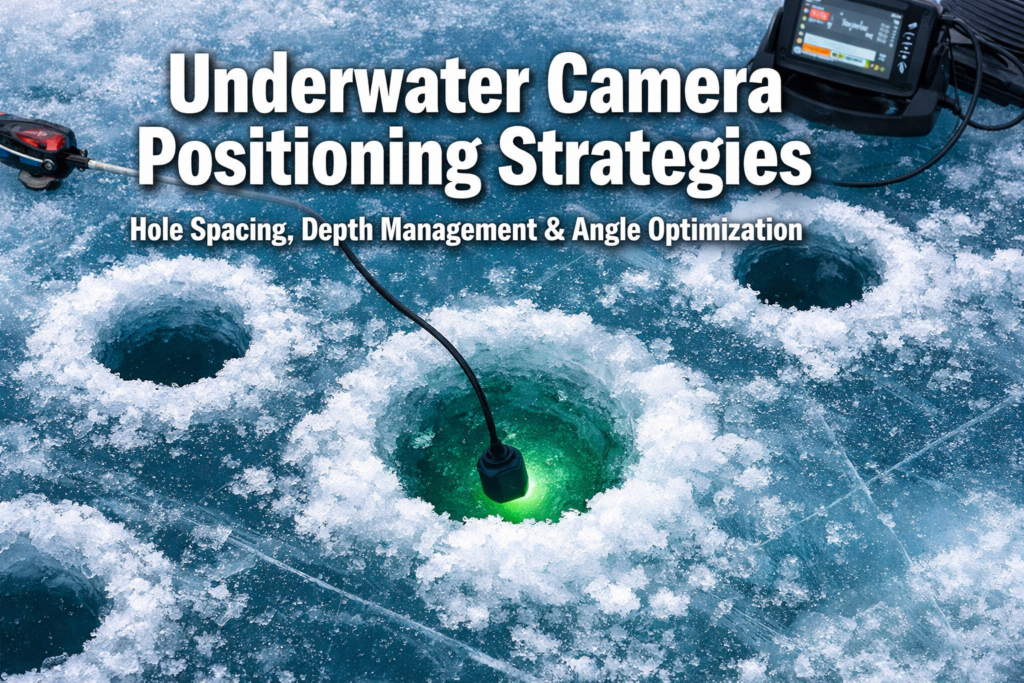
Quick Answer: Position your underwater camera 3 to 8 feet from your active fishing hole, lower it to the same depth zone where fish are holding (typically 1 to 3 feet off bottom for walleye and panfish), and angle the lens 15 to 30 degrees off vertical to capture horizontal fish movement. These three variables, hole spacing, depth management, and angle optimization, determine whether your camera shows you fish or shows you nothing.
Key Takeaways
- Space your camera hole 3 to 5 feet from your jigging hole in clear water, and 5 to 8 feet in stained or murky water.
- Lower the camera to the depth where your flasher or sonar marks fish activity, not to the bottom by default.
- Angle the camera lens horizontally or slightly downward (15 to 30 degrees) rather than pointing straight down for the best fish silhouettes.
- Wider field-of-view lenses (120 to 170 degrees) show more structure and fish movement per frame.
- Infrared (IR) cameras outperform visible-light models in low-visibility water because they reduce fish-spooking glare.
- Paired camera deployments (one near structure, one in open water) give you comparative data on where fish are staging.
- Adjust camera depth throughout the day as fish move vertically in response to light and pressure changes.
- Keep your camera cable taut and secured at the hole rim to prevent drift and spinning.

Why Does Hole Spacing Matter for Underwater Camera Positioning Strategies?
Hole spacing controls whether your camera captures fish behavior without interfering with your presentation. Place the camera too close to your jigging hole and you risk two problems: the camera housing spooks fish away from your bait, and the camera's light source (LED or IR) creates an unnatural glow right at the strike zone.
Clear water (visibility 6 feet or more): Drill your camera hole 3 to 5 feet from your active hole. In clear conditions, the camera picks up fish approaching your bait from several feet away. A wider field-of-view lens (120 degrees or more) covers the gap between camera and bait effectively.
Stained or murky water (visibility under 4 feet): Move the camera hole closer to 5 to 8 feet away, but angle the lens toward your bait. This sounds counterintuitive. The reason: in murky water, fish approach bait from shorter distances, and a camera placed too close creates a concentrated light zone that pushes cautious fish sideways. The extra spacing lets fish enter the frame naturally.
Structure fishing: When fishing near weed edges, rock piles, or drop-offs, position the camera hole on the structure side. Research on paired camera deployments shows that placing one camera at the edge of structure (facing outward toward open water) captures fish transitioning between cover and feeding zones. This approach mirrors the paired deployment method used in reef halo studies, where cameras at sandy halo edges facing reef captured the most meaningful fish behavior data.
For anglers who hole-hop frequently, a lightweight jacket designed for mobile ice fishing makes the constant drilling and repositioning far more manageable.
Common mistake: Drilling the camera hole directly adjacent (under 2 feet) to the fishing hole. The vibration from jigging transfers through the ice and shakes the camera housing, producing unstable footage and spooking fish in the immediate area.
How Deep Should You Position Your Underwater Camera?
Start at the depth where your sonar or flasher marks the most fish activity, then fine-tune from there. The default habit of lowering the camera straight to the bottom wastes visibility on empty water above.
Depth zones by species:
| Target Species | Typical Camera Depth | Reason |
|---|---|---|
| Walleye | 1 to 3 feet off bottom | Walleye cruise and feed in the lower third of the water column |
| Perch | 6 inches to 2 feet off bottom | Perch relate tightly to bottom structure |
| Crappie | Mid-column (suspended) | Crappie suspend at varying depths based on light |
| Pike | 2 to 5 feet below ice | Pike patrol upper water column near weed tops |
| Lake trout | 5 to 15 feet off bottom | Lakers roam open water and respond to vertical presentations |
NOAA researchers testing electronic monitoring cameras in the Gulf of Mexico positioned their units at 1.83 to 2.13 meters depth with an 18 to 33 degree outward angle for species identification purposes. While that research focused on commercial fishing, the principle applies: match camera depth to the zone where target species travel.
Adjust throughout the day. Fish move vertically. Morning and evening low-light periods push walleye and crappie higher in the column. Midday bright conditions push them deeper or tighter to cover. Check your camera depth every 30 to 45 minutes and reposition if the frame stays empty.
If you're running an IR-equipped camera for murky conditions, the Vexilar FS800IR Fish Scout handles depth changes well because its infrared system maintains visibility without blasting visible light that alters fish behavior.

What Camera Angle Produces Maximum Fish Visibility?
Angle the lens 15 to 30 degrees off vertical (tilted toward horizontal) for the best fish visibility. A camera pointed straight down shows the top of fish heads and the bottom substrate. That view tells you almost nothing about species, size, or behavior.
Horizontal or near-horizontal aiming produces fish silhouettes against the water column, making species identification and size estimation far easier. Experts recommend aiming cameras horizontally across the water rather than straight down, especially in murky conditions where fish silhouettes against lighter background water stand out more than fish against dark substrate.
Angle guidelines by situation:
- Shallow water (under 10 feet): Angle 20 to 30 degrees below horizontal. In shallow water, a near-horizontal camera covers more lateral distance and picks up fish cruising at your depth.
- Deep water (over 20 feet): Angle 15 to 20 degrees below horizontal. The slightly steeper angle compensates for reduced light penetration and keeps the frame focused on the productive zone near bottom.
- Weed flats: Point the camera horizontally along the weed edge. Fish patrol these edges, and a horizontal view captures them moving along the transition.
Field of view matters as much as angle. Cameras with 110 to 120 degree FOV, like the Sony Super HAD II CCD sensor found in the MarCum Recon 5+, capture a wider scene and reduce the need for precise aiming. Wider FOV lenses (up to 170 degrees) show even more of the surrounding water, though they introduce some barrel distortion at the frame edges.
For a direct comparison of cameras that handle angle and clarity challenges differently, check our Eyoyo vs FishPro vs FourQ head-to-head test or the Aqua-Vu HD71-125 Pro review.
Prevent camera spin. A spinning camera ruins your angle setup. Attach a small stabilizer weight 6 inches above the camera housing, or use a camera with a built-in fin. Some anglers clip a binder clip with a small piece of sheet metal to the cable as a makeshift stabilizer. Keep the cable taut from the hole rim to the camera.
How Do Water Clarity and Light Conditions Change Your Positioning Strategy?
Water clarity is the single biggest variable that forces you to adjust all three positioning factors (spacing, depth, and angle) at once.
Clear water (6+ feet visibility):
- Space camera 3 to 5 feet from fishing hole
- Use natural light when possible (turn off LEDs during daytime)
- Wider angles work because the camera picks up fish at distance
- Automatic exposure and color correction features help handle shifting light as clouds pass
Murky water (under 3 feet visibility):
- Move camera closer to the action (but keep minimum 3 feet from jigging hole)
- Switch to IR illumination to avoid spooking fish with visible light
- Narrow your expectations. You will see fish at 1 to 3 feet from the lens, not farther
- Angle the camera to aim across the brightest available light path (usually upward toward the hole)
For a breakdown of how different camera systems handle extreme cold and murky conditions, read our guide on how wireless underwater cameras handle extreme ice fishing temperatures.
Low-light and night fishing: IR cameras become essential. Visible LED systems create a bright zone that attracts some species (crappie, perch) but repels others (walleye, pike). If you target walleye at night, use an IR-only camera and position it 4 to 6 feet from your bait hole to avoid any residual glow interference.
What Is the Best Multi-Hole Camera Layout for Scouting?
When scouting a new area, drill a diamond or T-pattern of holes to cover the most water with the fewest deployments.
Diamond pattern (4 holes):
- Drill a center hole for your primary fishing line.
- Drill three surrounding holes at 5 feet distance, forming a triangle or diamond.
- Deploy the camera in each surrounding hole for 3 to 5 minutes.
- Identify which direction holds fish, structure, or bait activity.
- Move your jigging presentation toward the productive zone.
Linear pattern (for drop-offs and weed edges):
- Drill 3 to 4 holes in a line perpendicular to the suspected structure edge.
- Space holes 4 to 6 feet apart.
- Lower the camera in each hole, starting shallow and moving deep.
- Find the exact depth break where fish are staging.
This scouting approach pairs well with a reliable electric auger for thick ice since you will drill 6 to 10 holes before settling on a fishing spot.

Decision rule: Choose the diamond pattern on flats where fish direction is unknown. Choose the linear pattern when you already know a structural feature (drop-off, weed line, rock bar) exists and need to pinpoint the edge.
How Do You Align Camera Position with Bait Presentation?
Your camera should show your bait in the frame, or at minimum, show the zone where fish approach your bait. Alignment between camera and presentation is what separates useful footage from a nature documentary.
Step-by-step alignment process:
- Lower your bait to the target depth.
- Lower the camera in the adjacent hole to the same depth.
- Angle the camera lens toward the fishing hole.
- Check the monitor. If you see your bait, you are aligned.
- If you do not see your bait, adjust the camera angle 5 to 10 degrees and check again.
- Once aligned, secure the cable so the camera does not drift.
Tip-up alignment: When running tip-up setups for walleye, position the camera hole 3 to 4 feet from the tip-up hole and aim the lens at the bait depth. This lets you watch fish approach the live bait and understand their behavior before committing to a hookset.
Common mistake: Assuming the camera and bait are at the same depth because you lowered both to “the bottom.” Ice thickness, hole angle, and current all shift the actual position. Verify on the monitor.
Underwater Camera vs. Forward-Facing Sonar: When Does Each Win?
Forward-facing sonar (like Garmin LiveScope) detects fish without requiring light, making it effective in any water clarity. Underwater cameras show species detail, color, and behavior that sonar cannot. The two tools solve different problems.
| Factor | Underwater Camera | Forward-Facing Sonar |
|---|---|---|
| Species identification | Strong (visual confirmation) | Weak (shape-based guessing) |
| Murky water performance | Limited without IR | Strong (sound-based) |
| Fish behavior detail | High (feeding, aggression, posture) | Low (movement direction only) |
| Setup complexity | Requires separate hole and positioning | Mounts in fishing hole |
| Cost (entry level) | $80 to $300 | $1,500+ for quality units |
| Battery life in cold | 3 to 8 hours depending on model | Tied to main electronics |
For anglers on a budget, our best wireless underwater cameras under $300 guide covers options that deliver solid performance without the sonar price tag.
Choose a camera if: You need species ID, want to study fish reaction to specific lures, or fish clear to moderately clear water.
Choose sonar if: You fish exclusively in murky water, need real-time tracking of fast-moving fish, or prefer a single-hole setup.
Use both if: You compete in tournaments where identifying species and tracking movement both matter. Tournament-ready anglers often run a flasher, a camera, and a forward-facing sonar simultaneously, each covering a different information gap.
Underwater Camera Positioning Strategies: Frequently Asked Questions
How far apart should I drill my camera hole from my fishing hole? Drill 3 to 5 feet apart in clear water and 5 to 8 feet apart in murky water. This spacing prevents the camera from spooking fish near your bait while keeping fish in the camera's field of view.
Should I point my underwater camera straight down? No. Angle the lens 15 to 30 degrees off vertical (toward horizontal) to capture fish silhouettes and movement. A straight-down view shows the top of fish and substrate, which provides minimal useful information.
Do underwater camera lights scare fish? Visible LED lights attract some species (crappie, perch) and repel others (walleye). Use infrared illumination for light-sensitive species, especially during low-light or nighttime fishing [5].
What field of view is best for ice fishing cameras? A 120 to 170 degree field of view captures the widest scene and reduces the need for precise camera aiming. Sensors like the Sony Super HAD II CCD with 110-degree FOV offer a good balance of width and image quality.
How often should I reposition my camera during a session? Check camera footage every 30 to 45 minutes. If the frame stays empty, adjust depth first (fish move vertically throughout the day), then adjust angle, then consider moving to a new hole.
Does current affect camera positioning? Yes. Current pushes the camera housing downstream and changes your angle. In areas with noticeable current, add a heavier stabilizer weight and position the camera hole upstream of your fishing hole so the camera drifts toward your bait zone.
What depth should I set my camera for walleye? Position the camera 1 to 3 feet off the bottom. Walleye feed and cruise in the lower third of the water column during most conditions.
Is a single camera enough for tournament fishing? For casual fishing, one camera works fine. For tournament preparation, consider running two cameras in a paired deployment setup, one near structure and one in open water, to compare fish activity in different zones.
How do I stop my camera from spinning? Attach a stabilizer fin or weight 6 inches above the camera housing. Keep the cable taut from the hole rim to the camera. Some camera models include built-in anti-spin fins.
Do I need a separate hole for the camera? Yes. Running a camera and fishing line through the same hole tangles your line on the camera cable and limits your ability to angle the camera independently.
Putting Your Camera Strategy to Work
Effective underwater camera positioning comes down to three controlled variables: spacing, depth, and angle. Drill your camera hole at the right distance from your fishing hole based on water clarity. Lower the camera to the depth where fish are active, not to the bottom by default. Angle the lens toward horizontal for the most useful fish visibility. Adjust all three variables throughout the session as conditions and fish behavior shift.
Start with the spacing and angle guidelines above on your next outing. Run the camera for 5 minutes in each position before committing. Track what works in a small notebook or on your phone. Over a few sessions, you will build a positioning playbook specific to your home lakes and target species.
Kayak. Drill. Catch. Repeat.
See you on the water.
References
[1] Pmc8809566 – https://pmc.ncbi.nlm.nih.gov/articles/PMC8809566/
[2] Pro Secrets Underwater Fishing Cameras That Actually Show Whats Biting – https://www.canonoutsideofauto.ca/2025/03/11/pro-secrets-underwater-fishing-cameras-that-actually-show-whats-biting/
[3] Noaa 63251 Ds1 – https://repository.library.noaa.gov/view/noaa/63251/noaa_63251_DS1.pdf

