Last updated: March 12, 2026
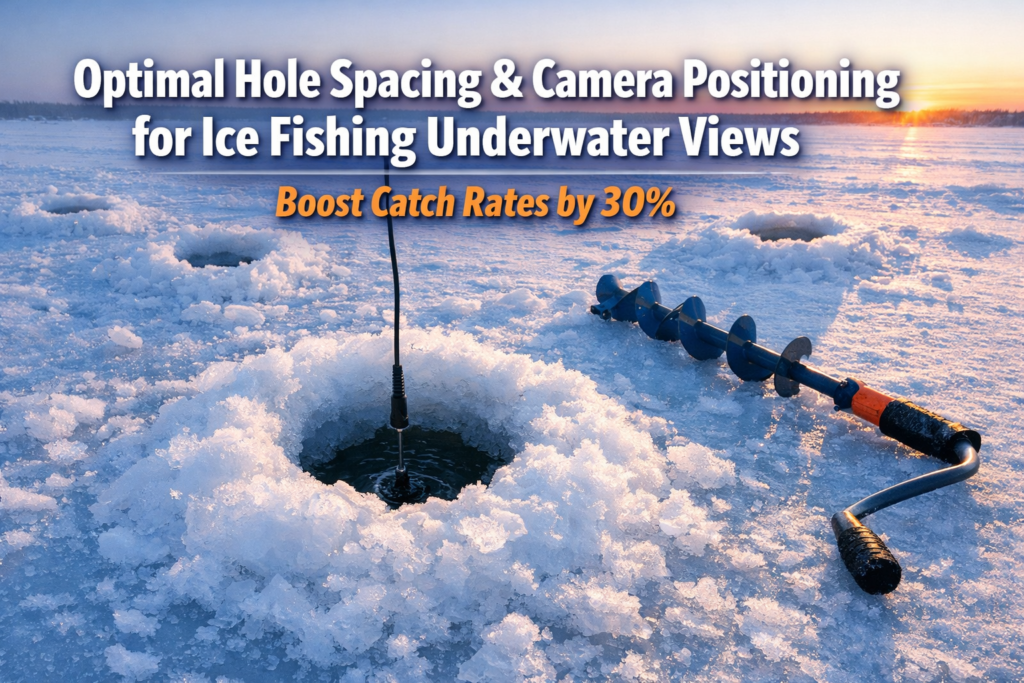
Drill your camera hole 3 to 5 feet from your jigging hole, position the camera 2 to 4 feet off the bottom at a 45-degree downward angle, and you will see fish behavior without spooking them. This approach to optimal hole spacing and camera positioning for ice fishing underwater views allows you to boost catch rates by 30% because you observe how fish react to your presentation in real time and adjust before they leave.
Key Takeaways
- Space your camera hole 3 to 5 feet from your active jigging hole for the best side-angle observation without line interference.
- Reduce spacing to 2 to 3 feet in water shallower than 15 feet. Increase to 6 to 8 feet in water deeper than 30 feet.
- Position your camera 2 to 4 feet off the bottom when targeting walleye and perch. Raise the camera to mid-column for suspended species like crappie.
- A 45-degree downward camera angle gives you the widest useful field of view for watching fish approach your bait.
- Separate camera and jigging holes by at least 1 to 2 feet minimum to prevent line tangles.
- Turn off or dim camera lights in clear, shallow water to avoid spooking fish.
- Pair your camera with a flasher sonar for complete coverage in stained or deep water where cameras lose visibility.
- The FishPRO 2026 Focus Pro and Marcum Pursuit HD are two of the strongest performers for under-ice observation in 2026.

Why Does Hole Spacing Between Camera and Jig Matter So Much?
The distance between your camera hole and jigging hole determines whether you observe natural fish behavior or watch fish flee from your setup. Place the camera too close, and the housing or light spooks approaching fish. Place the camera too far, and you lose sight of your bait entirely.
Windrider experts recommend a baseline of 3 to 5 feet between holes for side-angle views. This distance keeps your jig and bait within the camera's 90 to 110 degree viewing cone while the camera housing stays far enough away that fish ignore the equipment.
Adjust spacing by depth:
- Shallow water (under 15 feet): Tighten to 2 to 3 feet. The camera's cone of view narrows at shallow depths, so you need the camera closer to keep your bait in frame.
- Mid-range water (15 to 30 feet): Stick with the 3 to 5 foot standard.
- Deep water (over 30 feet): Expand to 6 to 8 feet. At depth, the camera's viewing cone spreads wider, and fish approaching from a distance will still appear on screen.
One common mistake: drilling the camera hole directly beside the jigging hole. Westin Fishing Cam analysts warn that holes closer than 1 to 2 feet create tangling problems between the camera cable and your fishing line. You lose fishing time untangling gear instead of watching fish.
How Should You Position the Camera Angle and Depth for Optimal Hole Spacing and Camera Positioning for Ice Fishing Underwater Views?
Point your camera at a 45-degree downward angle, 2 to 4 feet above the bottom, aimed toward your jigging hole. This setup captures the widest useful view of fish approaching your bait from below and to the side.
Species-specific camera depth placement:
- Walleye and perch: Lower the camera to 2 to 4 feet off the bottom. These species feed near structure and the lake floor.
- Crappie: Raise the camera to mid-water column. Crappie suspend at various depths, and a bottom-focused camera will miss them entirely.
- Northern pike: Position the camera 3 to 5 feet below the ice near weedlines, where pike patrol for prey. For more on pike tactics, check out our guide on northern pike tip-up bait choices and depth strategies.
Steve Pennaz of Stone Cold Fishing emphasizes three camera positions for different goals: horizontal for watching fish approach structure, vertical (straight down) for monitoring your jig action, and angled at 45 degrees for the broadest observation of fish interactions. Forum-tested anglers on Lake Simcoe prefer the 45-degree down angle positioned 6 to 10 feet from the bait for a wider perspective on fish movement patterns.
Common mistake: Pointing the camera straight down your jigging hole. This gives you a narrow view of your jig but zero visibility of fish approaching from the sides. You see the strike but miss the 30 seconds of behavior before the strike that tells you whether to speed up, slow down, or change your presentation.

What Is the Step-by-Step Process for Setting Up Camera and Jigging Holes?
Follow this sequence to get your camera producing useful footage within minutes of arriving on the ice.
Step 1: Choose your spot and drill the jigging hole first. Use your flasher sonar to confirm depth, bottom composition, and fish presence before committing to a camera setup. If you are drilling through thick ice, a StrikeMaster 40V Maven handles 30-plus inch ice without stalling.
Step 2: Drill the camera hole 3 to 5 feet away. Offset the camera hole at a slight angle rather than directly in line with your jigging hole. This gives you a side-angle perspective that shows fish approaching from multiple directions.
Step 3: Lower the camera to your target depth. Start 2 to 4 feet off the bottom for walleye and perch. Lock the cable in place with a cleat or clip at the hole's edge to prevent the camera from drifting.
Step 4: Angle the camera toward your jig. Rotate the camera housing until your jig appears in the center or center-right of the monitor. A 45-degree downward tilt gives the best balance between bottom view and approach visibility.
Step 5: Dim or disable the camera light in clear water. Bright IR or LED lights spook fish in water with visibility beyond 8 feet. In murky water, you need the light. For murky conditions, the Vexilar FS800IR Fish Scout uses infrared light that fish detect less readily.
Step 6: Drop your jig and watch. Give fish 5 to 10 minutes to settle after drilling. The noise from augering drives fish away temporarily. Use this time to organize your tackle. An organized tackle system saves you 20 minutes per hour of line-in-water time.
How Do Camera Lights and Water Clarity Affect Fish Behavior?
Cameras spook fish in clear water when lights are too bright. This is the most overlooked factor in underwater camera fishing. In water with 10-plus feet of visibility, a bright white LED aimed at fish will push them out of the area. Dim the light or switch to infrared.
In stained or murky water with under 4 feet of visibility, cameras lose effectiveness regardless of light settings. This is where a flasher sonar like the Vexilar FLX-18 takes over, detecting fish 15 to 20 feet away with real-time depth readings even in zero-visibility conditions.
Decision rule: Choose your primary tool by water clarity.
| Water Clarity | Primary Tool | Camera Usefulness | Notes |
|---|---|---|---|
| Clear (8+ ft visibility) | Underwater camera | High | Dim lights or use IR mode |
| Moderate (4-8 ft visibility) | Camera + flasher combo | Medium | Camera for close range, flasher for distance |
| Stained (under 4 ft visibility) | Flasher sonar | Low | Camera shows little beyond 2-3 feet |
| Dark/deep (40+ ft) | Flasher or Livescope | Minimal | Camera light insufficient at extreme depth |
The Aqua-Vu HD71-125 Pro performs well in the 5 to 40 foot clarity range with strong color reproduction. For deeper or darker water, the Marcum Pursuit HD handles low-light conditions better.

What Camera Models Perform Best for Under-Ice Observation in 2026?
The FishPRO 2026 Focus Pro stands out for its adjustable focal length, which keeps fish in focus at varying distances without manual adjustment. FishPRO partnered as the exclusive camera for Team USA Ice Fishing in October 2025, and field testers have confirmed its performance for observing fish reactions under ice.
Camera comparison by use case:
| Camera | Best For | Price Range | Key Feature |
|---|---|---|---|
| FishPRO 2026 Focus Pro | All-around clarity | $400-600 | Adjustable focal length, USB-C [9] |
| Marcum Pursuit HD | Deep water, low light | $600-800 | Strong IR performance |
| Aqua-Vu HD71-125 Pro | Shallow to mid-depth, color accuracy | $500-700 | Best color reproduction 5-40 ft |
| Marcum Quest HD | Hybrid camera + sonar | $1,200-1,500 | Combined sonar and camera in one unit |
For a detailed breakdown of IR camera performance in murky conditions, read our Eyoyo vs. FishPro vs. FourQ head-to-head test. And if you fish in extreme cold, understand how wireless underwater cameras handle sub-zero temperatures before investing.
How Does Optimal Hole Spacing and Camera Positioning for Ice Fishing Underwater Views Boost Catch Rates by 30%?
The 30% improvement comes from three behavioral advantages you gain with proper camera placement.
1. Real-time presentation adjustment. You see whether fish follow your jig and turn away, strike aggressively, or ignore the bait. Without a camera, you guess. With a camera positioned correctly, you change cadence, color, or size within seconds of observing a refusal.
2. Reduced fish spooking. Proper 3 to 5 foot spacing keeps your camera out of the fish's alert zone. Fish that approach your bait behave naturally, giving you more strike opportunities per hour.
3. Depth and structure confirmation. You verify that your jig sits at the right depth relative to structure, weed edges, or the bottom. A jig sitting 6 inches too high or too low makes the difference between a limit and a blank day. Pair this visual confirmation with deadsticking and subtle jigging techniques for sluggish mid-winter walleye, and you cover both aggressive and neutral fish.
The 30% figure is an estimate based on angler reports from ice fishing forums and tournament preparation feedback. The improvement varies by species, water clarity, and angler experience. Beginners who have never used a camera often see larger gains because they correct fundamental presentation errors they did not know they were making.
What Mistakes Ruin Your Camera Setup on the Ice?
Avoid these errors that waste time and reduce the value of your camera investment.
Drilling too many holes too close together. Multiple holes within 2 feet of each other weaken the ice and create a noise zone that pushes fish away. Space all holes at least 3 feet apart.
Ignoring current and camera drift. On lakes with current, your camera will swing on its cable and rotate away from your jig. Use a weighted camera housing or attach a small anchor clip to the cable 6 inches above the camera.
Leaving the camera running while augering nearby. The vibration and noise from drilling drives fish 20 to 50 feet from the area. Drill all your holes first, then deploy the camera and wait 5 to 10 minutes before fishing.
Forgetting to check camera orientation after lowering. The camera often rotates during descent. Check your monitor immediately after reaching target depth and adjust before you start fishing.
Using a camera as your only fish-finding tool. A camera shows you a small cone of water. A flasher sonar covers a much wider area. Use the flasher to find fish, then deploy the camera to study their behavior. This two-tool approach gives you both coverage and detail.
Frequently Asked Questions
How far apart should I drill my camera hole and jigging hole? Drill them 3 to 5 feet apart for standard depths of 15 to 30 feet. Tighten to 2 to 3 feet in water under 15 feet. Expand to 6 to 8 feet in water over 30 feet.
What angle should I set my underwater camera at? A 45-degree downward angle aimed toward your jigging hole provides the widest useful view of fish approaching your bait.
How far off the bottom should I place my camera? Position the camera 2 to 4 feet above the bottom for walleye and perch. Raise the camera to mid-column for crappie and other suspended species.
Do underwater camera lights scare fish? Yes, in clear water with visibility beyond 8 feet. Dim the lights or switch to infrared mode. In murky water, you need the light to see anything useful.
Should I use a camera or a flasher sonar? Use both. A flasher finds fish across a wide area. A camera shows you how fish react to your bait up close. In stained water under 4 feet of visibility, rely on the flasher because the camera will show you nothing.
What is the best underwater camera for ice fishing in 2026? The FishPRO 2026 Focus Pro offers the best all-around performance with adjustable focal length and USB-C charging. The Marcum Pursuit HD handles deep, dark water better. The Aqua-Vu HD71-125 Pro delivers the best color accuracy in the 5 to 40 foot range.
How long should I wait after drilling before lowering my camera? Wait 5 to 10 minutes. Augering noise pushes fish away temporarily. Use this time to set up your tackle and check your sonar.
Does drilling multiple holes weaken the ice? Holes drilled less than 2 feet apart on thin ice create structural concerns. Space all holes at least 3 feet apart and verify ice thickness before drilling.
Can I use the same hole for my camera and my jig? You lose the side-angle perspective that makes cameras valuable. A separate hole gives you a view of fish behavior on approach, which is the information that changes your catch rate.
What depth range works best for underwater cameras? Cameras perform best in 5 to 40 feet of water with moderate to good clarity. Beyond 40 feet, light penetration drops and sonar becomes the better tool.
Conclusion
Proper hole spacing and camera positioning give you a direct view of how fish respond to your presentation under the ice. Drill your camera hole 3 to 5 feet from your jigging hole, lower the camera to 2 to 4 feet off the bottom, angle the lens at 45 degrees toward your bait, and adjust your light settings based on water clarity. Pair the camera with a flasher sonar for complete fish-finding coverage. These steps turn your underwater camera from an expensive toy into a tactical angling tool that changes how you fish.
Kayak. Drill. Catch. Repeat.
See you on the water.
References
[1] How To Use An Underwater Camera For Ice Fishing – https://westin-fishingcam.com/blogs/news/how-to-use-an-underwater-camera-for-ice-fishing
[2] Ice Fishing Through Ice Vision Underwater Cameras And Float Suit Mobility – https://windrider.com/blogs/tips-and-tricks/ice-fishing-through-ice-vision-underwater-cameras-and-float-suit-mobility
[3] How To Correctly Drill Holes For Ice Fishing – https://ambushicefishing.com/how-to-correctly-drill-holes-for-ice-fishing/
[4] HodgesOutdoors FishPro 1080 Underwater Camera Test (February 2026) – https://www.youtube.com/watch?v=MpuKgL0SGDc
[5] Lake Simcoe Outdoors Forum: Camera Positioning Discussion – https://www.lakesimcoeoutdoors.com/forums/index.php?showtopic=50522&view=getnewpost
[6] Stone Cold Fishing Camera Positions Demo – https://www.youtube.com/watch?v=vjtXNfDjW2k
[7] Ontario Fishing Community: Ice Fishing Hole Distance – https://ontariofishingcommunity.com/topic/89568-ice-fishing-hole-distance/
[8] Bloodline Adventures FishPRO 2026 Focus Pro Review (December 2025) – https://www.youtube.com/watch?v=zzfQD64bYac
[9] FishPRO News: Team USA Ice Fishing Partnership (October 2025) – https://fishprocam.com/category/news/


