Last updated: March 16, 2026
Quick Answer
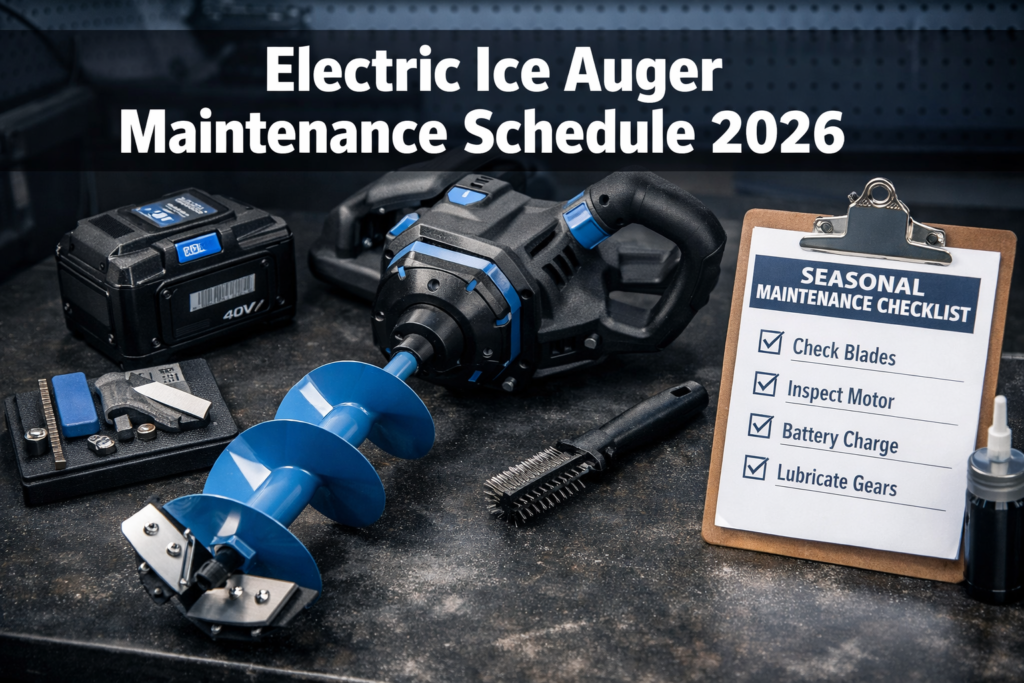
A proper 8-inch electric ice auger maintenance schedule covers three phases: pre-season preparation before the ice forms, in-season care after every outing, and off-season storage once the season ends. Follow this schedule and your auger will drill cleanly through 24 to 30 inches of ice for multiple seasons without a mid-trip failure. Skip it and you risk dead batteries, dull blades, and a motor that quits when the fish are biting.
Key Takeaways
- Charge your lithium battery to 50-60% for long-term storage, not 100%
- Inspect and sharpen blades before the first trip of the season and after every 40-50 holes drilled
- Test the battery under load before the season starts, not at the lake
- Wipe the motor housing and blade assembly dry after every outing to prevent corrosion
- Store the auger vertically with the blade guard on to protect cutting edges
- Never leave a lithium battery in a vehicle overnight in sub-zero temperatures
- Lubricate the drive shaft and blade connections with silicone spray at the start and end of each season
- Run a full charge cycle on the battery once per month during off-season storage
- Check all mounting hardware and connection points before the first trip of the year
- Keep a spare charged battery on the ice for sessions longer than three hours

What Does a Complete 8-Inch Electric Ice Auger Maintenance Schedule Cover?
The 8-inch electric ice auger maintenance schedule covers three distinct phases tied to the fishing calendar: pre-season, in-season, and off-season. Each phase targets specific components: the lithium battery pack, the cutting blades, the motor housing, and the drive assembly. Electric augers have fewer moving parts than gas models, which eliminates carburetor cleaning and fuel stabilizer steps, but the battery and motor require their own discipline.
If you're weighing whether electric is right for your setup, our Electric vs Gas Ice Auger Pros and Cons for Beginners guide breaks down the full comparison. For this article, the focus is strictly on keeping your electric auger performing at its best across the full year.
Why the 8-inch size matters for maintenance: An 8-inch blade diameter creates more resistance per rotation than a 6-inch blade. That means the motor works harder per hole, and the battery drains faster in thick ice. Blade sharpness has a direct impact on battery life. A dull blade forces the motor to draw more current, which reduces your total hole count per charge.
Pre-Season Maintenance: What to Do Before the Ice Forms
Pre-season maintenance is the most important phase of the 8-inch electric ice auger maintenance schedule. Complete every step in this phase before you load the auger into your vehicle for the first trip of 2026.
According to FishUSA's pre-season checklist, electric augers require testing each battery under load by spinning the auger in a controlled environment, checking charging systems and mounting hardware, and reviewing manufacturer storage and charging guidelines for lithium packs.
Pre-Season Checklist:
- Battery inspection: Remove the battery pack and inspect the casing for cracks, swelling, or corrosion at the terminals. A swollen battery is a safety issue. Replace it before use.
- Charge test: Charge the battery to 100% and note how long it takes. If charge time is significantly shorter than the manufacturer's spec, battery capacity has degraded.
- Load test: Attach the auger to the battery and run it in open air for 30 seconds. Listen for grinding, hesitation, or unusual noise from the motor.
- Blade inspection: Run your fingernail across each blade edge. A sharp blade catches your nail. A dull blade slides across it. Dull blades need sharpening or replacement before the season.
- Drive shaft lubrication: Apply silicone spray to the drive shaft connection points. Do not use WD-40, which attracts dirt and degrades rubber seals over time.
- Hardware check: Tighten all bolts and connection points on the auger body. Vibration from drilling loosens hardware over a season.
- Blade guard inspection: Check the blade guard for cracks. A cracked guard is a hand injury waiting to happen.
- Charging cable check: Inspect the charging cable for fraying or bent pins. A damaged cable delivers inconsistent charge to the battery.
“Test your battery under load before the season, not on the ice. A battery that fails at the lake costs you the whole day. A battery that fails in the garage costs you nothing.”
For anglers pairing their auger with a full shelter setup, the Otter Vortex Pro Monster Cabin with StrikeMaster 40V Maven review covers how power pairing affects performance in 30-plus inch ice.

In-Season Maintenance: What to Do After Every Outing
In-season care is the daily discipline that prevents small problems from becoming season-ending failures. The 8-inch electric ice auger maintenance schedule for the in-season phase focuses on three areas: the battery, the blades, and the motor housing.
After Every Trip:
- Wipe the entire auger body with a dry cloth before storing it. Ice shavings melt into water, and water corrodes metal components and degrades electrical connections.
- Remove the battery pack from the auger body. Store the battery separately at room temperature. Lithium-ion batteries lose capacity faster when stored in cold vehicles.
- Inspect the blade edges visually after each trip. Look for nicks, chips, or rolled edges from contact with rocks, gravel, or hard bottom ice.
- Reinstall the blade guard before transport. This protects the blade edges and protects anyone handling the auger.
Every 40-50 Holes:
Blade sharpness degrades with use. An 8-inch blade set drilling through hard, granular ice wears faster than blades cutting through soft, wet ice. Sharpen or replace blades every 40 to 50 holes as a baseline, or sooner if you notice the auger slowing down or the motor laboring.
Battery Management on the Ice:
- Keep the battery inside your jacket or in an insulated pouch between holes when temperatures drop below 10°F. Cold reduces lithium battery output significantly.
- Carry a spare charged battery for sessions longer than three hours or when drilling through ice thicker than 20 inches.
- Never charge a battery that is still cold from outdoor use. Let it warm to room temperature first, then charge it.
Common In-Season Mistake: Leaving the battery attached to the auger between trips. This allows the battery management system to draw a small parasitic current, which drains the pack over days. Always disconnect the battery after each outing.
| Interval | Task |
|---|---|
| After every trip | Wipe dry, remove battery, inspect blades, replace guard |
| Every 40-50 holes | Sharpen or replace blades |
| Every 10 trips | Check drive shaft lubrication, inspect all hardware |
| Monthly | Full charge cycle on battery if auger sits unused |
How Do You Care for a Lithium Battery in an 8-Inch Electric Auger?
Lithium-ion batteries are the core of any modern electric auger. Treat them correctly and they deliver consistent power for multiple seasons. According to Rapala's lithium technology guide, lithium-ion batteries have become the preferred choice for modern ice augers, with improvements in battery technology and motor power making them the standard across the industry.
Key battery care rules:
- Store between 40°F and 70°F whenever possible
- Never fully discharge the battery before recharging. Charge when the indicator shows 20-30% remaining.
- For storage longer than 30 days, charge to 50-60% capacity. A full charge held for months degrades cell chemistry.
- Run a full charge and discharge cycle once per month during off-season storage to keep the battery management system calibrated.
- Inspect terminals monthly for oxidation. Clean with a dry cotton swab if needed.
The ION Gen2 achieved a 23% weight reduction to 17 lbs while improving battery technology for increased longevity. That weight reduction matters when you're drilling 30 holes in a session. Protecting that battery investment starts with proper storage habits.
For anglers also managing power systems for fish finders and cameras, our guide on Portable Power Solutions for Garmin ECHOMAP 73cv Panoptix Bundle covers battery management across multiple devices on a single ice trip.

Off-Season Storage: How to Protect Your Electric Auger Until Next Season
Off-season storage is where most anglers lose years of auger life. The off-season phase of the 8-inch electric ice auger maintenance schedule requires specific steps for the battery, blades, and motor that differ from in-season habits.
According to IceForce's off-season care guide, proper end-of-season maintenance directly determines whether your auger performs at full capacity when the ice returns. MarcumTech's off-season storage guide confirms that lithium-powered ice gear requires specific storage protocols to maintain battery health through the warm months.
Off-Season Storage Checklist:
- Clean the entire auger with a damp cloth, then dry it completely before storage
- Remove the blade assembly and apply a light coat of oil to the blade surfaces to prevent rust
- Store blades with the guard installed, or wrap them in a blade sock if available
- Lubricate the drive shaft and all connection points with silicone spray
- Remove the battery and store it separately at 50-60% charge in a climate-controlled space
- Store the auger vertically in a dry location, away from direct sunlight and moisture
- Place the auger in a padded bag or case if available to protect the motor housing
- Tag the auger with the date of last service and blade condition for reference next pre-season
What to avoid in storage:
- Do not store the battery in a garage that reaches temperatures above 90°F in summer. Heat degrades lithium cell chemistry faster than cold.
- Do not store the auger horizontally with the blade guard off. Blade edges contact the floor and dull over months.
- Do not leave the battery fully charged for the entire off-season. A battery held at 100% for six months loses measurable capacity.
For a parallel reference on gas auger storage protocols, our Gas Ice Auger Off-Season Storage Maintenance Checklist covers the fuel and carburetor steps that electric auger owners skip entirely. That comparison highlights one of the clearest advantages of electric: the off-season routine is significantly simpler.

What Are the Most Common Electric Auger Maintenance Mistakes?
Most auger failures trace back to a small number of repeated mistakes. Knowing them helps you avoid the mid-season breakdowns that ruin a good day on the ice.
Mistake 1: Charging a cold battery immediately after use A lithium battery pulled from -15°F air needs 30 to 60 minutes at room temperature before charging. Charging a cold battery stresses the cells and reduces long-term capacity.
Mistake 2: Ignoring blade condition until the auger slows down By the time the motor is laboring, the blades have been dull for dozens of holes. Dull blades force higher current draw, which accelerates battery drain and adds heat stress to the motor.
Mistake 3: Storing the battery at 100% charge for the off-season A fully charged lithium battery held at high state of charge for months degrades faster than one stored at 50-60%.
Mistake 4: Using WD-40 on drive shaft components WD-40 is a water displacer, not a lubricant. It attracts dirt and breaks down rubber seals. Use silicone spray or a dedicated auger lubricant instead.
Mistake 5: Skipping the pre-season load test A battery that reads full on the indicator but fails under load is a common failure mode in older packs. Test under actual load conditions before the season, not at the lake [5].
For anglers who are new to ice fishing and building their gear knowledge from the ground up, pairing your auger knowledge with solid ice safety protocols is the foundation of every safe outing.
Blade Maintenance: When to Sharpen and When to Replace
Blade condition is the single factor that most directly affects how hard your motor works. Sharp blades cut clean. Dull blades grind and push, which draws more current and generates more heat in the motor.
Sharpen when:
- The fingernail test shows the blade slides rather than catches
- You notice the auger taking longer per hole than it did at the start of the season
- You see visible rolling or micro-chipping on the blade edge
Replace when:
- Blades show deep nicks or chips that sharpening cannot remove
- The blade is bent or the cutting angle is visibly off
- Sharpening has removed so much material that the blade is noticeably thinner than spec
Most 8-inch electric auger blade sets are designed for user replacement without special tools. Keep a spare blade set in your gear bag. A blade swap on the ice takes under five minutes and saves the trip.
The Eskimo E40 electric auger's variable speed trigger is a useful tool for blade longevity. Starting at lower speed when breaking through the first inch of ice reduces impact stress on the cutting edges. Finish at full speed once the blade is engaged in the ice column.
FAQ: 8-Inch Electric Ice Auger Maintenance Schedule
How often should I sharpen the blades on an 8-inch electric ice auger? Sharpen or replace blades every 40 to 50 holes as a baseline. Sharpen sooner if the auger slows down or the motor sounds like it's working harder than usual.
What charge level should I store a lithium ice auger battery at? Store lithium batteries at 50-60% charge for any storage period longer than 30 days. A full charge held for months degrades cell chemistry faster.
Can I leave my electric auger battery in the car overnight in winter? No. Sub-zero temperatures reduce lithium battery capacity and accelerate long-term degradation. Store the battery indoors at room temperature between trips.
How do I know if my electric auger battery needs replacement? Signs include charge time significantly shorter than spec, reduced hole count per charge, swelling of the battery casing, or failure under load even when the indicator shows full charge.
What lubricant should I use on an electric ice auger drive shaft? Use silicone spray. Avoid WD-40, which attracts dirt and breaks down rubber seals over time.
How do I maintain blade sharpness during the off-season? Apply a light coat of oil to the blade surfaces before storage, install the blade guard, and store in a dry location. This prevents rust and protects the cutting edge for the next season.
Do electric augers need less maintenance than gas augers? Yes. Electric augers eliminate carburetor cleaning, fuel stabilizer treatment, spark plug replacement, and pull-cord maintenance. The main maintenance focus shifts to battery care and blade condition.
What is the best way to transport an 8-inch electric auger? Transport with the blade guard installed, battery disconnected, and the auger secured so it cannot shift during transit. Blade contact with hard surfaces dulls edges and creates safety hazards.
How do I test my battery under load before the season? Attach the battery to the auger and run it in open air for 30 seconds at full speed. A healthy battery maintains consistent speed throughout. A degraded battery slows noticeably within 15 to 20 seconds.
Should I charge the battery monthly during off-season storage? Yes. Run a full charge and discharge cycle once per month to keep the battery management system calibrated and prevent deep discharge.
Conclusion
A consistent 8-inch electric ice auger maintenance schedule is the difference between an auger that drills 500 holes across three seasons and one that fails in year two. The three-phase approach, pre-season preparation, in-season care after every outing, and off-season storage, covers every component that determines performance and lifespan.
Start your 2026 season with a full pre-season inspection. Test the battery under load. Check the blades before the first trip. Lubricate the drive shaft. Then maintain that discipline through the season with post-trip wipe-downs and blade checks every 40 to 50 holes. When the ice goes out, store the battery at 50-60% charge, oil the blades, and put the auger in a dry, climate-controlled space.
Your auger is a tool that earns its keep when it drills clean and fast. Keep it sharp, keep the battery healthy, and it will be ready every time the ice calls.
Kayak. Drill. Catch. Repeat.
See you on the water.
References
[1] Ice Auger Selection Power Vs Manual For Float Suit Mobility – https://windrider.com/blogs/tips-and-tricks/ice-auger-selection-power-vs-manual-for-float-suit-mobility
[2] 4 Tips For Properly Storing Your Razr Ice Auger During The Off Season – https://www.razrpowr.com/post/4-tips-for-properly-storing-your-razr-ice-auger-during-the-off-season
[3] 8 Ion Electric Battery Powered Ice Auger Product Review Tips And Recommendations For Use And Battery Life – https://mix108.com/8-ion-electric-battery-powered-ice-auger-product-review-tips-and-recommendations-for-use-and-battery-life/
[4] Ice Fishing Pre Season Checklist – https://www.fishusa.com/learn/ice-fishing-pre-season-checklist/
[5] The Offseason Storing Your Ice Fishing Gear – https://marcumtech.com/the-offseason-storing-your-ice-fishing-gear/
[6] Off Season Care Will Ensure Auger Performance Next Winter – https://blog.iceforce.com/tips/off-season-care-will-ensure-auger-performance-next-winter/


