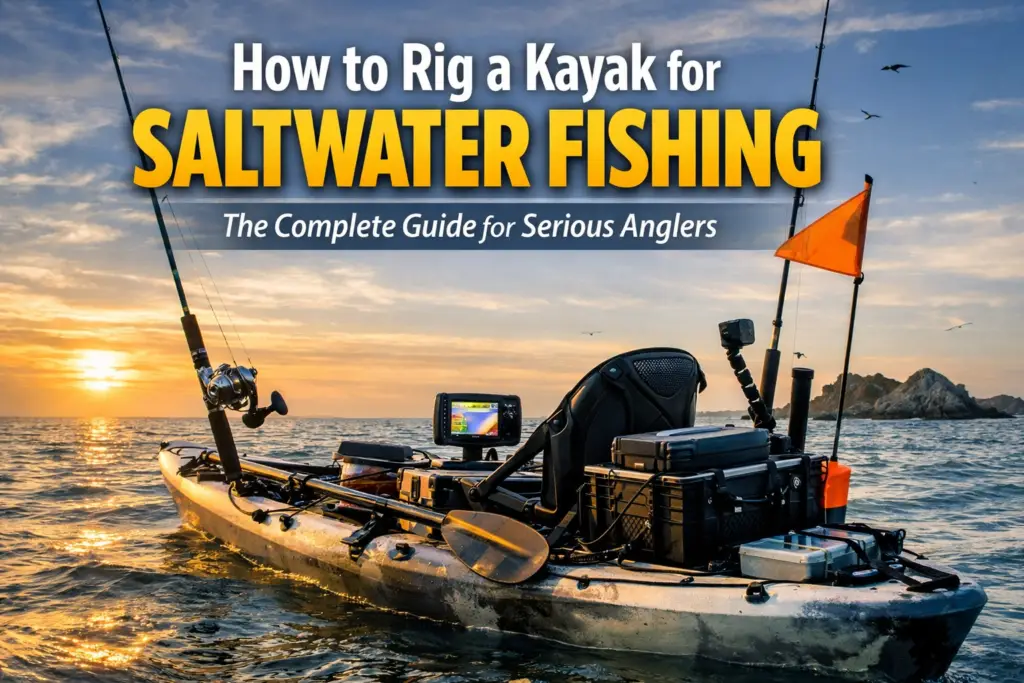
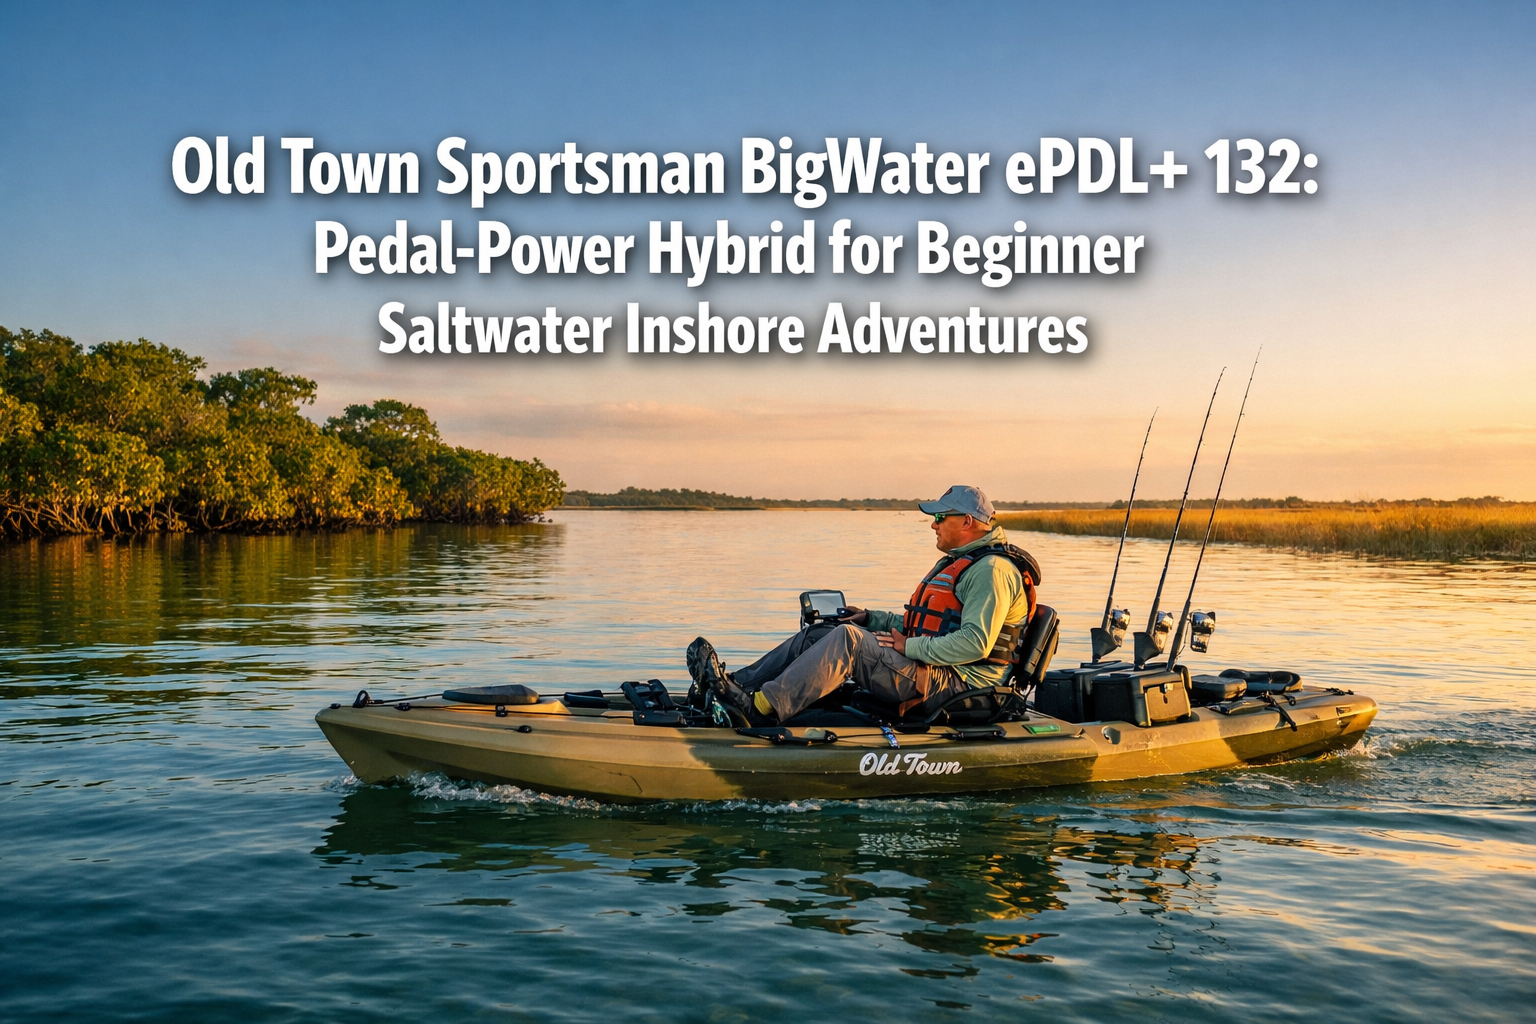
I'll never forget the first time I took my kayak into saltwater without proper rigging. Twenty minutes into my trip, my paddle floated away while I fought a bull redfish, my tackle box slid overboard in the chop, and I had no idea where I'd find fish without electronics. That expensive lesson taught me everything about how to rig a kayak for saltwater fishing the hard way. After a decade of refining my setup and learning from countless hours on the water, I've developed a systematic approach to rigging that maximizes fishing success while keeping you safe in the marine environment.
Whether you're transitioning from freshwater kayak fishing or upgrading from a basic setup, understanding how to rig a kayak for saltwater fishing properly transforms your entire angling experience. The saltwater environment demands specific equipment, strategic placement, and redundant systems that freshwater simply doesn't require. This comprehensive guide walks you through every essential component, from rod holders and fish finders to safety equipment and tackle organization, giving you the knowledge to outfit your fishing kayak like a seasoned professional.
Key Takeaways
- Rod holder placement is critical: Install 2-4 rod holders in strategic positions—flush-mount holders in gunwales for trolling, adjustable holders near the seat for active fishing, and a holder behind you for landing fish
- Electronics multiply your success: A quality fish finder with GPS and sonar capabilities helps you locate structure, identify bait schools, and mark productive fishing spots in saltwater environments
- Safety systems are non-negotiable: Anchor trolley systems, paddle leashes, VHF radios, and proper PFDs aren't optional—they're essential equipment that can save your life in changing ocean conditions
- Organized tackle storage increases time on the water: Waterproof stowaway boxes, milk crate systems with PVC pipe rod holders, and bungee cord securing keep your fishing gear accessible and protected from saltwater corrosion
- Customize based on target species: Your rigging setup should adapt depending on target species and fishing environment—inshore flounder fishing requires different equipment than offshore pelagic fishing
Understanding the Fundamentals of Saltwater Kayak Fishing Rigging

Before diving into specific components, let's establish what rigging a kayak actually means. Rigging refers to the process of outfitting your kayak with the equipment, accessories, and systems necessary to fish effectively and safely. Unlike a traditional boat, every item on your yak must serve multiple purposes, remain lightweight, and withstand the corrosive saltwater environment.
The foundation of any proper saltwater kayak fishing setup starts with your vessel selection. Sit-on-top kayaks dominate the saltwater scene for good reason—they're self-bailing, stable, and provide ample rigging space. Brands like Ocean Kayak, Old Town, and others manufacture fishing-specific models with built-in features like scupper holes, tankwell storage areas, and pre-installed mounting tracks.
The Three Pillars of Kayak Rigging
Every successful fishing kayak build rests on three fundamental pillars:
- Fishing functionality – Rod holders, tackle storage, and bait management systems
- Electronics and navigation – Fish finders, GPS units, and communication devices
- Safety and stability – Anchor systems, paddle management, and emergency equipment
A kayak angler who neglects any of these pillars compromises their entire setup. I've seen fishermen with $2,000 worth of electronics but no VHF radio or proper anchor trolley—that's a recipe for disaster when weather changes or you drift into boat traffic.
Saltwater Versus Freshwater Rigging Differences
Saltwater kayak fishing demands specific considerations that freshwater anglers often overlook:
- Corrosion resistance: Every metal component must be stainless steel, anodized aluminum, or marine-grade plastic
- Redundant systems: Offshore kayak fishing requires backup equipment—extra paddle, secondary anchor line, duplicate terminal tackle
- Increased storage: Saltwater fish species often require larger lures, heavier reel setups, and more diverse bait options
- Enhanced safety gear: VHF radios, PLBs (personal locator beacons), and high-visibility flags become essential rather than optional
The saltwater environment is unforgiving. I learned this when a cheap steel bolt on my rod holder rusted through after just three trips, dumping my favorite rod and reel into deeper water during a mackerel run. Now I inspect every fastener, swivel, and connection point before each season.
Essential Rod Holders and Mounting Systems for Your Fishing Kayak
Rod holders represent the single most important rigging component for any kayak angler. The right configuration allows you to troll multiple lines, keep rods secure while paddling, and quickly access your gear when fish strike. After testing dozens of configurations, I've developed a proven rod holder system that works across different fishing scenarios.
Types of Rod Holders for Saltwater Applications
Flush-mount rod holders install directly into your kayak's gunwales or deck. These permanent fixtures provide the most secure hold and work perfectly for trolling applications. When I'm running pilchard spreads for Spanish mackerel, my flush-mount holders keep two rods at the perfect angle while I paddle between fishing spots. The downside? They require drilling into your hull, which some anglers hesitate to do.
Adjustable rod holders like Scotty or RAM mounts offer incredible versatility. These systems attach to mounting tracks or directly to your kayak using clamp systems. You can adjust the angle, rotate the position, and remove them entirely when not needed. I keep two Scotty holders mounted near my seat for active fishing—when a flounder hits my Gulp bait, I can grab the rod instantly without twisting around.
Horizontal rod storage behind your seat keeps backup rods accessible but out of the way. I use a simple PVC pipe holder mounted to my milk crate that secures two rods horizontally. This prevents tangle issues and protects my reel from spray while keeping them ready for quick species changes.
Strategic Rod Holder Placement
The optimal rod holder configuration depends on your fishing style, but here's my proven four-holder setup:
| Position | Holder Type | Primary Use | Angle |
|---|---|---|---|
| Port gunwale | Flush-mount | Trolling, live bait | 45° outward |
| Starboard gunwale | Flush-mount | Trolling, secondary line | 45° outward |
| Right side of seat | Adjustable (Scotty) | Active casting/jigging | Vertical to 30° |
| Behind seat (crate) | PVC horizontal | Rod storage, backup rods | Horizontal |
This configuration lets me troll two lines while paddling, keeps my active rod within arm's reach, and stores backups safely. When targeting different fish species, I simply adjust the Scotty holder angle—vertical for popping cork presentations on speckled trout, or angled for casting soft plastics at grass beds.
Installation Best Practices
When installing rod holders on your kayak for fishing, follow these critical steps:
- Plan before drilling: Use painter's tape to mark positions and test accessibility while seated
- Use marine sealant: Every hole you drill becomes a potential leak point—seal with marine-grade silicone
- Reinforce mounting points: Add backing plates or PVC reinforcement behind thin plastic hulls
- Test under load: Secure a rod and reel, then simulate fighting a fish to verify the holder won't fail
I made the mistake of installing holders too far forward on my first kayak. They looked great and balanced the weight perfectly, but I couldn't reach them while seated. I ended up re-drilling everything six inches closer—a frustrating waste of time that proper planning would have prevented.
Rod Holder Accessories and Modifications
Enhance your rod holder system with these additions:
- Rod leashes: Coiled lanyards that attach your rod to the kayak prevent loss during rough water or when landing fish
- Gimbal pins: Add these to flush-mount holders for big-game offshore fishing when you need to stand and fight pelagic species
- Foam inserts: Protect rod grips and reduce rattle in oversized holders
- Flag holders: Dual-purpose mounts that hold safety flags when not fishing
The YakAttack company makes excellent accessories specifically designed for kayak fishing applications. Their Omega rod holders have become my go-to recommendation for anglers serious about their rigging setup.
Installing Fish Finders, Electronics, and Navigation Systems

A quality fish finder transforms your kayak from a floating platform into a precision fishing machine. Modern sonar technology reveals bottom structure, identifies bait schools, marks productive fishing spots, and helps you navigate safely back to launch. After fishing both with and without electronics, I can confidently say a fish finder is the second-best investment you'll make (after the kayak itself).
Choosing the Right Fish Finder for Kayak Applications
Not all fish finders suit kayak fishing. You need compact units with these essential features:
GPS capability – Mark waypoints for productive structure, record routes to fishing spots, and navigate in low visibility. I have over 200 waypoints saved around my home waters—oyster beds, drop-offs, artificial reefs, and launch points. This GPS data is invaluable when exploring new areas or returning to proven locations.
Down imaging or side imaging sonar – Traditional sonar shows fish arches, but imaging technology reveals the type of ground, structure details, and bait concentrations. When I'm searching for flounder in shallow water, side imaging shows me exactly where sand transitions to rough ground—prime ambush points.
Compact screen size – 5-7 inch displays provide excellent visibility without overwhelming your limited deck space. Larger screens drain batteries faster and create more wind resistance while paddling.
Transducer mounting options – Kayak-specific transducers mount in scupper holes or attach to adjustable arms. The Humminbird brand offers excellent kayak transducer kits that install without drilling.
Fish Finder Mounting and Installation
I mount my fish finder on a RAM ball system attached to a track near my right hip. This position keeps the screen visible while paddling and fishing, protected from paddle drips, and accessible for adjusting settings. Here's my installation process:
Power supply: Use a waterproof 12V battery in a sealed box stored in your tankwell. I get 12-15 hours of runtime from a small sealed lead-acid battery, enough for multiple trips. Connect with waterproof marine connectors and run cables through the kayak's internal channels when possible.
Transducer placement: Scupper-mount transducers work brilliantly on sit-on-top kayaks. The transducer sits in the scupper hole, suspended in water while you fish, and removes easily for transport. Ensure the transducer faces forward and sits level when the kayak is in water.
Screen positioning: Angle your display to minimize sun glare. I tilt mine slightly forward and use a sun shade during bright conditions. The screen should be readable without taking your eyes off the water for extended periods.
Cable management: Secure all cables with zip ties or bungee cord to prevent tangle with your paddle, anchor line, or fishing line. Nothing's more frustrating than hooking your fish finder cable while casting.
Using Your Fish Finder Effectively
Simply having a fish finder doesn't guarantee success—you must interpret the data correctly:
- Mark structure immediately: When you locate productive bottom features, save a waypoint before you start fishing
- Adjust sensitivity for conditions: Calm waters allow higher sensitivity; reduce it in rough conditions to filter noise
- Learn to identify species: Different fish species create distinct sonar signatures—tight schools near bottom often indicate baitfish like mullet or minnow, while larger individual marks suggest predators
- Use depth contours for navigation: Follow depth lines to locate drop-offs, channels, and transition zones where fish concentrate
I spend time on the water studying my sonar even when fish aren't biting. Understanding what the seabed looks like in different areas—sand, grass, shell bottom, or rough ground—helps me predict where target species will hold depending on tide and weather conditions.
Additional Electronics Worth Considering
Beyond your primary fish finder, consider these electronics:
VHF radio: Essential safety equipment for offshore kayak trips. Program in emergency channels and local weather frequencies. A handheld VHF costs $100-150 and could save your life if conditions deteriorate or you need assistance.
Action camera: GoPro or similar cameras mounted on your kayak document catches, record fishing techniques, and provide evidence of that trophy fish. Plus, reviewing footage helps you identify mistakes and improve your presentation.
LED navigation lights: Required by law for low-light fishing in many jurisdictions. Battery-powered bow and stern lights make you visible to boat traffic during dawn and dusk—prime feeding times for many saltwater fish species.
Anchor Systems, Paddle Management, and Stability Solutions
Proper anchoring and paddle management separate experienced kayak anglers from frustrated beginners. The ability to hold position in current, manage your paddle while fighting fish, and maintain stability in rough conditions directly impacts your fishing success and safety.
The Anchor Trolley System Explained
An anchor trolley is perhaps the most valuable rigging addition you can make to your kayak for fishing. This simple pulley system allows you to adjust your anchor point from bow to stern, controlling exactly how your kayak positions relative to wind and current.
Here's why this matters: When you anchor from a fixed point, your kayak weathervanes—it swings around that anchor point based on wind and current direction. With an anchor trolley, you pull the anchor line forward or backward along your kayak's rail, positioning the boat at any angle. This lets you face structure, present bait naturally in current, and maintain casting position regardless of conditions.
Installing an anchor trolley requires:
- Two pad eyes or pulleys mounted at bow and stern
- 15-20 feet of marine-grade rope or cord
- A cleat or cam cleat for securing the trolley line
- Carabiners for attaching your anchor line
I run my anchor trolley along the port (left) side of my kayak. When I reach a fishing spot, I drop anchor, then adjust the trolley to position my kayak perpendicular to current—perfect for presenting live bait to cruising fish or casting parallel to structure.
Anchor Selection and Deployment
Kayak anchors differ significantly from boat anchors. You need enough weight to hold position without adding excessive bulk. My anchor selection varies by environment:
Folding grapnel anchors (3-5 lbs): Perfect for inshore fishing over rough ground, oyster beds, or around structure. The folding arms prevent snagging and collapse for compact storage.
Mushroom anchors (3-4 lbs): Ideal for soft mud or sand bottoms in calm waters. These don't hold as well in current but work great for shallow water fishing spots.
Stake-out poles: In water less than 6 feet deep, a fiberglass or aluminum pole pushed into the bottom provides instant anchoring without rope or deployment hassle. I use a YakAttack ParkNPole for grass flats fishing—it's faster than deploying an anchor and allows quick repositioning when stalking tailing fish.
Anchor line length should be 3-4 times the water depth. In 10 feet of water, deploy 30-40 feet of line for proper holding angle. I mark my anchor line every 10 feet with colored zip ties so I know exactly how much line I've deployed—crucial information for reading depth and structure.
Paddle Leashes and Management
Your paddle is your engine, your rudder, and your emergency backup. Losing it means you're drifting helplessly, potentially into dangerous conditions. Every kayak angler needs a reliable paddle leash system.
I use a coiled paddle leash attached to a bungee cord rigging point near my seat. The coiled design extends when I need to paddle but retracts to stay out of the way while fishing. This lets me drop the paddle instantly when a fish strikes without worrying about it floating away.
Alternative paddle management includes:
- Paddle clips mounted on your gunwales for temporary securing
- Horizontal paddle parks across your lap for quick access
- Bungee cord paddle holders on your deck for hands-free fishing
Never, and I mean never, fish without a paddle leash. I watched a fellow fisherman lose his paddle in faster tides near an inlet. By the time he reeled in his fish and grabbed his spare paddle, he'd drifted a quarter mile and nearly into a rock jetty. A $15 leash would have prevented a dangerous situation.
Stability Modifications for Standing
Some fishing techniques—sight fishing, poling shallow water, or fighting large fish—benefit from standing capability. While most kayaks aren't designed for standing, you can improve stability:
Outrigger systems: Inflatable or rigid outriggers attach to your kayak's sides, dramatically increasing stability. These work well for sight fishing in calm waters but add width that makes transport and storage more challenging.
Wider kayak selection: Purpose-built fishing kayaks like certain Ocean Kayak models offer 36+ inch widths specifically for standing stability. If you fish calm waters and inshore environments regularly, consider a wider platform.
Proper weight distribution: Keep heavy items (batteries, tackle, coolers) low and centered in your kayak. I store my battery and main tackle in the tankwell, keeping the center of gravity low for maximum stability.
Practice in calm waters: Before attempting to stand in fishing conditions, practice in protected areas. Learn your kayak's balance point and develop the leg strength to maintain position while casting or fighting fish.
I primarily fish from a seated position, standing only for sight fishing in shallow water during calm conditions. The trade-off between stability and maneuverability makes standing unnecessary for most saltwater kayak fishing applications.
Tackle Storage, Bait Management, and Gear Organization

Efficient tackle storage and bait management systems keep your fishing gear accessible, protected from saltwater corrosion, and organized for quick species changes. After years of refinement, I've developed a storage system that maximizes my limited kayak space while keeping everything I need within arm's reach.
The Milk Crate System
A milk crate secured in your tankwell provides the foundation for tackle storage and organization. This simple addition offers mounting points for rod holders, storage for tackle boxes, and a stable platform for accessories. Here's how I rig my crate:
Base setup: Use a standard plastic milk crate (available at Bass Pro, tackle shops, or online). Secure it to your tankwell with bungee cords running through the crate and around your kayak's scupper holes or deck rigging. The crate should sit firmly without sliding but remain removable for transport.
PVC pipe rod holders: Cut 3-4 pieces of PVC pipe (2-3 inch diameter, 12 inches long) and mount them vertically in the crate's corners using zip ties or bolts. These hold backup rods horizontally, keeping them accessible but out of the way. I keep my light spinning setup for casting soft plastics and my heavier conventional outfit for live bait fishing.
Tackle box storage: Waterproof stowaway boxes from Plano fit perfectly in milk crate compartments. I organize mine by technique:
- Box 1: Terminal tackle (hooks, swivels, weights, leaders)
- Box 2: Artificial lures (soft plastics, jig heads, topwater plugs)
- Box 3: Live bait rigging (popping cork, floats, specialized hooks)
Accessory mounting: Attach pliers holders, measuring boards, and tool clips to the crate's exterior using zip ties or small carabiners. Everything should have a designated spot to prevent loss and speed up rigging.
Waterproof Storage Solutions
Saltwater destroys electronics, corrodes tackle, and ruins anything not properly protected. My waterproof storage strategy includes:
Dry bags: Keep extra clothing, first aid supplies, and emergency gear in waterproof dry bags stored in the bow hatch or tankwell. I use different colored bags for different contents—orange for safety gear, blue for personal items, green for fishing tools.
Sealed tackle boxes: Plano and other manufacturers make waterproof stowaway boxes with gasket seals. These protect terminal tackle from corrosion and keep small items organized. I replace all standard tackle boxes with waterproof versions after losing an entire box of jig heads to rust.
Phone and electronics protection: A waterproof phone case or dry bag keeps your communication device functional. I mount mine on a lanyard around my neck for quick access to camera, GPS apps, and emergency calling.
Live Bait Management
When fishing with live bait like pilchard, mullet, or minnow, proper bait management extends their lifespan and increases your catch rate:
Bait bucket placement: Secure a bait bucket in a scupper hole or tankwell. Some kayaks have built-in bait wells, but most anglers use aftermarket buckets designed for scupper mounting. Ensure adequate water flow to keep bait oxygenated.
Bait alternatives: In situations where live bait isn't practical, keep fresh dead bait on ice in a small cooler, or rely on artificial alternatives like Gulp baits that mimic scent and action of live offerings.
Bait rigging station: Dedicate a small cutting board or rigging mat in your lap area for preparing bait. This prevents hooks, knives, and bait slime from contaminating your entire kayak.
I primarily use artificial lures for kayak fishing—they're less maintenance, don't require special storage, and work exceptionally well for most target species. When I do use live bait for specific applications like targeting big flounder or inshore reds, I keep it simple with a small bucket and minimal rigging.
Catch Storage and Fish Care
Proper fish care ensures quality table fare and supports conservation:
Stringers: Attach fish to a stringer clipped to your kayak for temporary storage. Keep the stringer short to prevent fish from dragging under your hull or attracting sharks.
Coolers: Small soft-sided coolers fit in tankwells or bow hatches. Fill with ice before launching and add fish as you catch them. This preserves meat quality far better than stringers.
Measuring boards: Mount a measuring board on your crate or deck to quickly verify legal sizes. I use a waterproof adhesive ruler along my gunwale—it's always accessible and doesn't take up storage space.
Catch and release tools: Dehooking tools, lip grippers, and rubberized nets minimize handling stress on released fish. Keep these attached to your PFD or crate for instant access.
Organizing for Different Fishing Scenarios
My tackle organization adapts depending on target species and location:
Inshore light tackle: Minimal gear focused on soft plastics, popping cork rigs, and topwater plugs for speckled trout, redfish, and flounder
Offshore pelagic fishing: Heavier tackle, metal lures, wire leaders, and larger hooks for Spanish mackerel, king mackerel, and other fast-moving species
Bottom fishing: Specialized terminal tackle including heavier weights, circle hooks in various hook sizes, and cut bait rigging for targeting bottom-dwelling fish species in deeper water
I keep a “core kit” that stays in my kayak year-round, then add species-specific tackle based on seasonal patterns and planned fishing spots. This prevents overloading my yak with unnecessary gear while ensuring I'm prepared for likely scenarios.
Safety Equipment and Emergency Preparedness
Saltwater kayak fishing involves inherent risks that proper safety equipment and emergency preparedness significantly mitigate. I've experienced equipment failures, sudden weather changes, and unexpected currents that could have turned dangerous without proper safety gear. This section covers the non-negotiable safety equipment every saltwater kayak angler must carry.
Personal Flotation Devices (PFDs)
A quality PFD isn't just legally required—it's your primary safety equipment. I wear a fishing-specific PFD every moment I'm on the water, regardless of conditions or my swimming ability.
Fishing PFD features to prioritize:
- High-back design: Allows comfortable sitting against kayak seats without the PFD riding up
- Multiple pockets: Store safety knife, whistle, strobe light, and small tackle items
- Rod holder compatibility: Some PFDs include built-in rod holders or pliers sheaths
- Bright colors: High-visibility orange or yellow makes you easier to spot in emergencies
I use a NRS fishing PFD with six pockets, reflective trim, and a hydration bladder pocket. The investment in a comfortable, feature-rich PFD pays dividends in safety and convenience during long days on the water.
PFD maintenance: Rinse with fresh water after each saltwater trip, inspect buckles and zippers regularly, and replace any PFD showing wear or damage. A compromised PFD provides false security—potentially more dangerous than no PFD at all.
Communication and Signaling Devices
When conditions deteriorate or emergencies arise, communication capabilities can save your life:
VHF radio: A handheld VHF radio provides direct communication with Coast Guard, marine patrol, and nearby vessels. Program emergency channel 16 and local weather channels. I keep mine in a waterproof case attached to my PFD for instant access.
Whistle: A simple whistle attached to your PFD creates attention-getting sound that carries farther than shouting. Use it to signal distress or alert boat traffic to your presence.
Strobe light: A waterproof LED strobe light makes you visible in low-light conditions or emergencies. I carry one in my PFD pocket and have a larger unit mounted on my kayak for extended visibility.
Cell phone: While not reliable offshore, a cell phone in a waterproof case provides emergency communication in many inshore areas. Don't rely on it as your primary safety communication, but keep it charged and accessible.
Personal Locator Beacon (PLB): For offshore kayak fishing beyond VHF range, a PLB transmits your GPS coordinates to rescue services via satellite. These devices cost $250-400 but provide ultimate emergency backup for serious offshore anglers.
Weather Awareness and Planning
Saltwater conditions change rapidly. What starts as calm waters can become dangerous big swell or boat traffic challenges within hours. My weather planning protocol includes:
Pre-launch forecast review: Check NOAA marine forecasts, wind predictions, and tide tables before every trip. I won't launch if winds exceed 15 mph or if afternoon thunderstorms are forecast.
On-water weather monitoring: Monitor VHF weather channels periodically during your trip. Watch for changing cloud patterns, sudden wind shifts, or distant lightning.
Exit strategy planning: Always know your route back to launch and have alternative landing sites identified. I mark safe landing beaches and boat ramps on my GPS for emergency situations.
Tide awareness: Understand how tides affect your fishing spots. Getting caught in an outgoing tide near an inlet can create dangerous current and rough water. Time your trips to work with tides rather than against them.
I've cut trips short dozens of times due to changing weather. It's frustrating to leave fish biting, but no catch is worth risking your safety in deteriorating conditions.
Essential Safety Gear Checklist
Every saltwater kayak should carry this safety equipment:
✅ Coast Guard-approved PFD (worn at all times)
✅ Whistle (attached to PFD)
✅ VHF radio (handheld, waterproof)
✅ Safety knife (accessible on PFD or within reach)
✅ Strobe light or flashlight (waterproof LED)
✅ First aid kit (waterproof container)
✅ Sun protection (sunscreen, hat, long sleeves)
✅ Hydration (2+ liters of water)
✅ Emergency shelter (space blanket or emergency bivy)
✅ Spare paddle (secured to kayak)
✅ Anchor and line (appropriate for conditions)
✅ Paddle leash (prevents paddle loss)
✅ Bilge pump or sponge (for water removal)
This gear takes up minimal space but provides comprehensive emergency preparedness. I store most items in a waterproof dry bag in my bow hatch, with critical items (knife, whistle, strobe) attached to my PFD.
Self-Rescue Techniques
Despite best preparation, capsizes happen. Practice these self-rescue techniques in calm, shallow water before you need them in real conditions:
Wet exit: Practice exiting your kayak underwater if you capsize in a sit-inside model. Stay calm, push away from the kayak, and surface away from the hull.
Re-entry methods: Learn to climb back onto your sit-on-top kayak from the water. I practice the “scramble” method—approach from the side, pull yourself onto the deck, then rotate into the seat.
Paddle float rescue: A paddle float (inflatable bag that attaches to your paddle blade) provides stability for re-entry. Practice deploying it and using it as an outrigger while climbing back aboard.
Assisted rescue: If fishing with partners, practice T-rescue and other assisted techniques where one kayaker helps another re-enter their boat.
I practice self-rescue techniques at the beginning of each season. Muscle memory developed in calm practice conditions becomes invaluable during actual emergencies when stress and fatigue compromise decision-making.
Advanced Rigging Techniques and Customization

Once you've mastered the fundamental rigging components, these advanced techniques and customizations optimize your fishing kayak for specific applications and personal preferences.
Custom Track Systems and Modular Mounting
Track systems transform your kayak into a modular platform where accessories move, adjust, and swap based on fishing needs. I installed YakAttack GearTrac along both gunwales of my kayak, creating mounting points for:
- Rod holders that slide fore and aft for optimal positioning
- Camera mounts that adjust for different filming angles
- Accessory mounts that swap between fish grippers, cup holders, and tool organizers
- Electronics mounts that reposition based on sun angle and fishing style
The beauty of track systems is flexibility. My kayak rigging for inshore flounder fishing looks completely different than my setup for offshore mackerel trolling—all without permanent modifications or drilling new holes.
Installation tips for track systems:
- Use marine sealant under tracks to prevent water intrusion
- Space mounting bolts every 6-8 inches for secure attachment
- Install tracks parallel to your kayak's centerline for consistent accessory alignment
- Consider track placement carefully—you can't easily relocate them once installed
Lighting Systems for Night Fishing
Some of the best fishing happens during low-light periods when predators feed aggressively. Proper lighting enhances safety and fishing effectiveness:
Navigation lights: LED bow and stern lights make you visible to boat traffic. I use battery-powered lights that clip to my kayak and run for 8+ hours on a single charge.
Underwater lights: Submersible LED lights attract bait fish, which in turn attract predators. I mount a green LED light near my kayak's stern for night fishing—the bait concentration it creates is remarkable.
Headlamps: A quality headlamp with red and white LED options lets you rig tackle, land fish, and navigate without destroying your night vision. Red light preserves night vision while white light provides maximum illumination when needed.
Glow sticks: Attach glow sticks to rod tips for visual bite indicators during night fishing. When a rod tip bobs or bends, the glowing stick makes it immediately visible.
Pedal Drive Conversions and Propulsion Upgrades
Hands-free propulsion revolutionizes kayak fishing by eliminating the need to constantly switch between paddle and rod. Pedal drive systems like those from Hobie or Old Town allow you to maintain position, troll effectively, and keep your hands free for fishing.
I fished from a paddle kayak for years before upgrading to a pedal drive model. The difference is transformative—I can work a topwater plug while maintaining perfect trolling speed, or fight a fish while pedaling to stay positioned over structure.
Pedal drive considerations:
- Shallow water limitations: Pedal drives require 2-3 feet of depth; they're less suitable for extreme shallow water fishing
- Weight and transport: Pedal kayaks weigh 20-30 pounds more than comparable paddle models
- Cost: Pedal drive kayaks cost $1,500-4,000, significantly more than paddle versions
- Maintenance: Pedal systems require regular freshwater rinsing and occasional bearing replacement
If your budget allows and you fish frequently, a pedal drive kayak is worth every penny. If not, a well-rigged paddle kayak remains highly effective—I caught hundreds of fish before upgrading to pedals.
Specialized Rigging for Specific Species
Customize your kayak rigging based on your target species and fishing techniques:
Sight fishing setup (redfish, bonefish, tarpon):
- Elevated seat or standing platform for visibility
- Push pole or stake-out pole for stealthy positioning
- Minimal deck clutter to reduce noise
- Polarized sunglasses and sun protection
Trolling setup (mackerel, kingfish, pelagic species):
- Multiple flush-mount rod holders for spread trolling
- Rod leashes to prevent loss during strikes
- Planer boards or outriggers to spread lines
- Quick-release clips for instant rod access
Bottom fishing setup (snapper, grouper, reef species):
- Heavy-duty rod holders for big fish
- Large cooler for catch storage
- Robust anchor system for holding over structure
- Cut bait rigging station and tools
Fly fishing setup:
- Stripping basket to manage fly line
- Elevated seat for casting clearance
- Minimal deck rigging to prevent line tangle
- Rod holders designed for fly rod dimensions
I maintain a “base rig” that works for general fishing, then add species-specific components based on my target for each trip. This modular approach prevents permanent modifications that limit versatility.
DIY Modifications and Budget-Friendly Rigging
You don't need expensive commercial products for effective kayak rigging. Many of my most useful modifications cost under $20 in materials:
PVC rod holders: Cut PVC pipe to length, mount with stainless steel hose clamps—total cost under $10 for multiple holders
Milk crate tackle center: Free or low-cost crate plus zip ties creates comprehensive tackle storage
Pool noodle bumpers: Cut pool noodles lengthwise and attach to gunwales for paddle protection and noise reduction
Bungee cord deck rigging: Marine-grade bungee cord and pad eyes create versatile deck storage for gear, nets, and accessories
Homemade anchor: Fill a mesh bag with chain and add a carabiner—effective anchor for under $15
The kayak fishing community shares countless DIY rigging ideas online. I've learned as much from fishing magazine articles and YouTube videos as from expensive trial and error. Start with basic rigging, identify your specific needs through time on the water, then customize accordingly.
Maintenance, Care, and Longevity of Your Rigging
Saltwater aggressively attacks kayak rigging components. Proper maintenance extends the lifespan of your equipment and prevents failures during critical fishing moments.
Post-Trip Cleaning Protocol
After every saltwater trip, I follow this cleaning routine:
Immediate rinse: Spray down your entire kayak, rigging, and accessories with fresh water while still at the launch. This initial rinse removes the majority of salt before it crystallizes and causes corrosion.
Detailed cleaning: At home, thoroughly rinse all rigging components, paying special attention to:
- Rod holder mechanisms and adjustment points
- Track systems and mounting hardware
- Fish finder transducers and cable connections
- Anchor trolley pulleys and rope
- Bungee cord attachment points
- Scupper plugs and drain holes
Lubrication: Apply marine-grade lubricant to moving parts, adjustment mechanisms, and metal-to-metal contact points. I use a silicone-based spray that doesn't attract dirt or grit.
Inspection: Check all rigging components for wear, corrosion, or damage. Replace any questionable items before your next trip—a $5 bungee cord replacement is cheaper than losing a $200 rod.
Seasonal Maintenance Tasks
Beyond post-trip cleaning, perform these seasonal maintenance tasks:
Spring preparation (before fishing season):
- Inspect and replace any corroded hardware
- Test all electronic devices and replace batteries
- Check PFD for wear and proper flotation
- Verify anchor line condition and length markings
- Organize and restock tackle boxes
- Apply UV protectant to kayak hull and rigging
Mid-season check (peak fishing period):
- Tighten all mounting bolts and screws
- Replace worn bungee cords
- Clean and lubricate rod holders
- Update GPS waypoints and electronics software
- Inspect paddle for cracks or damage
Fall storage preparation:
- Deep clean entire kayak and rigging system
- Remove batteries from electronics
- Store in climate-controlled area if possible
- Loosen bungee cords to prevent permanent stretching
- Apply protective coating to metal components
Component Replacement Schedule
Even with excellent maintenance, rigging components have finite lifespans:
| Component | Replacement Interval | Signs of Wear |
|---|---|---|
| Bungee cords | 1-2 years | Permanent stretching, fraying |
| Rod leashes | 2-3 years | Coil memory loss, attachment wear |
| Anchor line | 3-5 years | Fraying, stiffness, UV damage |
| Scupper plugs | 1-2 years | Cracking, poor seal |
| PFD | 5-10 years | Foam compression, torn fabric |
| VHF battery | 1-3 years | Reduced runtime, charging issues |
| Fish finder transducer | 5+ years | Erratic readings, physical damage |
I keep a “rigging replacement fund” where I set aside $10-20 after each fishing trip. This accumulates into a budget for replacing worn components before they fail, preventing the frustration of equipment problems during prime fishing conditions.
Storage Best Practices
Proper storage between trips protects your investment:
Indoor storage: Store your kayak indoors or under cover to minimize UV exposure. Direct sunlight degrades plastic hulls and rigging components over time.
Proper support: Use kayak-specific racks or cradles that support the hull without creating pressure points. Improper storage causes warping and stress cracks.
Electronics removal: Remove fish finders, batteries, and sensitive electronics between trips. Store in climate-controlled environments to prevent moisture damage.
Vertical vs. horizontal: I store my kayak vertically on wall-mounted J-hooks to save garage space. Horizontal storage on saw horses works equally well if you have the room.
Cover protection: Use a kayak cover or tarp to prevent dust accumulation and provide additional UV protection during extended storage periods.
My kayak is eight years old with original rigging still functioning perfectly because of consistent maintenance and proper storage. Friends who skip maintenance replace kayaks every 3-4 years due to preventable damage and component failure.
Conclusion: Building Your Perfect Saltwater Fishing Kayak
Learning how to rig a kayak for saltwater fishing transforms your angling experience from frustrating equipment struggles to focused fishing success. The rigging system I've outlined—strategic rod holder placement, quality electronics, comprehensive safety equipment, organized tackle storage, and proper maintenance—represents years of refinement and lessons learned on the water.
Your perfect rigging setup will evolve as you gain experience and identify your specific needs. Start with the fundamentals: secure rod holders, basic fish finder, essential safety gear, and organized tackle storage. As you spend more time on the water, you'll discover which customizations enhance your fishing style and which accessories provide minimal value.
Your action plan for rigging success:
- Assess your current setup – Identify gaps in your rigging against the components discussed in this guide
- Prioritize safety first – Ensure you have proper PFD, communication devices, and emergency equipment before adding fishing accessories
- Install core fishing components – Add rod holders, basic tackle storage, and paddle management systems
- Add electronics strategically – Invest in a quality fish finder once you've mastered basic kayak fishing skills
- Customize for your fishery – Adapt your rigging based on target species, fishing locations, and personal preferences
- Maintain religiously – Implement post-trip cleaning and seasonal maintenance to protect your investment
The beauty of kayak fishing lies in its accessibility and customization potential. Whether you're fishing inshore grass flats for speckled trout, working offshore structure for pelagic species, or exploring calm waters for flounder, a properly rigged fishing kayak gives you the platform to succeed.
I encourage you to join the kayak fishing community—local clubs, online forums, and fishing magazine resources provide endless knowledge sharing and camaraderie. Some of my best rigging ideas came from conversations with fellow kayak anglers at the boat ramp or through online fishing tips exchanges.
Now it's time to get on the water. Take what you've learned about how to rig a kayak for saltwater fishing, apply it to your setup, and experience the incredible fishing opportunities that await. Every trip will teach you something new about your rigging, your fishery, and yourself as an angler. That continuous learning and improvement is what makes saltwater kayak fishing endlessly rewarding.
Tight lines and safe paddling! 🎣
<!DOCTYPE html>
<html lang="en">
<head>
<meta charset="UTF-8">
<meta name="viewport" content="width=device-width, initial-scale=1.0">
<title>Kayak Fishing Rigging Checklist & Budget Calculator</title>
<style>
.cg-rigging-container {
max-width: 900px;
margin: 0 auto;
font-family: 'Segoe UI', Tahoma, Geneva, Verdana, sans-serif;
background: linear-gradient(135deg, #667eea 0%, #764ba2 100%);
padding: 30px;
border-radius: 15px;
box-shadow: 0 10px 40px rgba(0,0,0,0.2);
}
.cg-rigging-header {
text-align: center;
color: white;
margin-bottom: 30px;
}
.cg-rigging-header h2 {
margin: 0 0 10px 0;
font-size: 28px;
text-shadow: 2px 2px 4px rgba(0,0,0,0.3);
}
.cg-rigging-header p {
margin: 0;
font-size: 16px;
opacity: 0.9;
}
.cg-rigging-tabs {
display: flex;
gap: 10px;
margin-bottom: 20px;
}
.cg-rigging-tab {
flex: 1;
padding: 12px;
background: rgba(255,255,255,0.2);
border: none;
color: white;
font-size: 16px;
font-weight: bold;
cursor: pointer;
border-radius: 8px;
transition: all 0.3s ease;
}
.cg-rigging-tab:hover {
background: rgba(255,255,255,0.3);
}
.cg-rigging-tab.active {
background: white;
color: #667eea;
}
.cg-rigging-content {
background: white;
padding: 25px;
border-radius: 10px;
min-height: 400px;
}
.cg-rigging-section {
display: none;
}
.cg-rigging-section.active {
display: block;
}
.cg-rigging-category {
margin-bottom: 25px;
border-bottom: 2px solid #e0e0e0;
padding-bottom: 15px;
}
.cg-rigging-category:last-child {
border-bottom: none;
}
.cg-rigging-category h3 {
color: #667eea;
margin: 0 0 15px 0;
font-size: 20px;
display: flex;
align-items: center;
}
.cg-rigging-category-icon {
margin-right: 10px;
font-size: 24px;
}
.cg-rigging-item {
display: flex;
align-items: center;
padding: 10px;
margin-bottom: 8px;
background: #f8f9fa;
border-radius: 6px;
transition: all 0.2s ease;
}
.cg-rigging-item:hover {
background: #e9ecef;
}
.cg-rigging-checkbox {
width: 20px;
height: 20px;
margin-right: 12px;
cursor: pointer;
accent-color: #667eea;
}
.cg-rigging-item-label {
flex: 1;
font-size: 15px;
color: #333;
}
.cg-rigging-item-price {
font-weight: bold;
color: #667eea;
margin-left: 10px;
min-width: 80px;
text-align: right;
}
.cg-rigging-summary {
background: linear-gradient(135deg, #667eea 0%, #764ba2 100%);
color: white;
padding: 20px;
border-radius: 10px;
margin-top: 20px;
}
.cg-rigging-summary-row {
display: flex;
justify-content: space-between;
margin-bottom: 10px;
font-size: 16px;
}
.cg-rigging-summary-total {
font-size: 24px;
font-weight: bold;
padding-top: 15px;
border-top: 2px solid rgba(255,255,255,0.3);
margin-top: 10px;
}
.cg-rigging-progress {
margin-top: 20px;
}
.cg-rigging-progress-label {
display: flex;
justify-content: space-between;
margin-bottom: 8px;
font-size: 14px;
color: #666;
}
.cg-rigging-progress-bar {
width: 100%;
height: 30px;
background: #e0e0e0;
border-radius: 15px;
overflow: hidden;
position: relative;
}
.cg-rigging-progress-fill {
height: 100%;
background: linear-gradient(90deg, #667eea 0%, #764ba2 100%);
transition: width 0.3s ease;
display: flex;
align-items: center;
justify-content: center;
color: white;
font-weight: bold;
font-size: 14px;
}
.cg-rigging-reset {
width: 100%;
padding: 12px;
margin-top: 15px;
background: rgba(255,255,255,0.2);
border: 2px solid white;
color: white;
font-size: 16px;
font-weight: bold;
cursor: pointer;
border-radius: 8px;
transition: all 0.3s ease;
}
.cg-rigging-reset:hover {
background: white;
color: #667eea;
}
@media (max-width: 600px) {
.cg-rigging-container {
padding: 15px;
}
.cg-rigging-tabs {
flex-direction: column;
}
.cg-rigging-item {
flex-wrap: wrap;
}
.cg-rigging-item-price {
width: 100%;
text-align: left;
margin-left: 32px;
margin-top: 5px;
}
}
</style>
</head>
<body>
<div class="cg-rigging-container">
<div class="cg-rigging-header">
<h2>🎣 Kayak Fishing Rigging Planner</h2>
<p>Plan your setup and estimate your total investment</p>
</div>
<div class="cg-rigging-tabs">
<button class="cg-rigging-tab active" onclick="switchTab('essentials')">Essential Gear</button>
<button class="cg-rigging-tab" onclick="switchTab('advanced')">Advanced Setup</button>
<button class="cg-rigging-tab" onclick="switchTab('safety')">Safety Equipment</button>
</div>
<div class="cg-rigging-content">
<div id="essentials" class="cg-rigging-section active">
<div class="cg-rigging-category">
<h3><span class="cg-rigging-category-icon">🎣</span>Rod Holders & Mounting</h3>
<div class="cg-rigging-item">
<input type="checkbox" class="cg-rigging-checkbox" data-price="45" onchange="updateTotal()">
<span class="cg-rigging-item-label">Flush-Mount Rod Holders (2)</span>
<span class="cg-rigging-item-price">$45</span>
</div>
<div class="cg-rigging-item">
<input type="checkbox" class="cg-rigging-checkbox" data-price="65" onchange="updateTotal()">
<span class="cg-rigging-item-label">Scotty Adjustable Rod Holders (2)</span>
<span class="cg-rigging-item-price">$65</span>
</div>
<div class="cg-rigging-item">
<input type="checkbox" class="cg-rigging-checkbox" data-price="15" onchange="updateTotal()">
<span class="cg-rigging-item-label">PVC Rod Holder (DIY)</span>
<span class="cg-rigging-item-price">$15</span>
</div>
<div class="cg-rigging-item">
<input type="checkbox" class="cg-rigging-checkbox" data-price="25" onchange="updateTotal()">
<span class="cg-rigging-item-label">Rod Leashes (3)</span>
<span class="cg-rigging-item-price">$25</span>
</div>
</div>
<div class="cg-rigging-category">
<h3><span class="cg-rigging-category-icon">📦</span>Storage & Organization</h3>
<div class="cg-rigging-item">
<input type="checkbox" class="cg-rigging-checkbox" data-price="20" onchange="updateTotal()">
<span class="cg-rigging-item-label">Milk Crate System</span>
<span class="cg-rigging-item-price">$20</span>
</div>
<div class="cg-rigging-item">
<input type="checkbox" class="cg-rigging-checkbox" data-price="45" onchange="updateTotal()">
<span class="cg-rigging-item-label">Waterproof Tackle Boxes (3)</span>
<span class="cg-rigging-item-price">$45</span>
</div>
<div class="cg-rigging-item">
<input type="checkbox" class="cg-rigging-checkbox" data-price="30" onchange="updateTotal()">
<span class="cg-rigging-item-label">Dry Bags (2)</span>
<span class="cg-rigging-item-price">$30</span>
</div>
<div class="cg-rigging-item">
<input type="checkbox" class="cg-rigging-checkbox" data-price="15" onchange="updateTotal()">
<span class="cg-rigging-item-label">Bungee Cord Deck Rigging</span>
<span class="cg-rigging-item-price">$15</span>
</div>
</div>
<div class="cg-rigging-category">
<h3><span class="cg-rigging-category-icon">⚓</span>Anchor & Paddle Systems</h3>
<div class="cg-rigging-item">
<input type="checkbox" class="cg-rigging-checkbox" data-price="55" onchange="updateTotal()">
<span class="cg-rigging-item-label">Anchor Trolley System (Complete)</span>
<span class="cg-rigging-item-price">$55</span>
</div>
<div class="cg-rigging-item">
<input type="checkbox" class="cg-rigging-checkbox" data-price="35" onchange="updateTotal()">
<span class="cg-rigging-item-label">Folding Grapnel Anchor (3.5 lb)</span>
<span class="cg-rigging-item-price">$35</span>
</div>
<div class="cg-rigging-item">
<input type="checkbox" class="cg-rigging-checkbox" data-price="15" onchange="updateTotal()">
<span class="cg-rigging-item-label">Paddle Leash</span>
<span class="cg-rigging-item-price">$15</span>
</div>
<div class="cg-rigging-item">
<input type="checkbox" class="cg-rigging-checkbox" data-price="85" onchange="updateTotal()">
<span class="cg-rigging-item-label">Stake-Out Pole</span>
<span class="cg-rigging-item-price">$85</span>
</div>
</div>
</div>
<div id="advanced" class="cg-rigging-section">
<div class="cg-rigging-category">
<h3><span class="cg-rigging-category-icon">📡</span>Electronics</h3>
<div class="cg-rigging-item">
<input type="checkbox" class="cg-rigging-checkbox" data-price="350" onchange="updateTotal()">
<span class="cg-rigging-item-label">Fish Finder with GPS (Humminbird/Garmin)</span>
<span class="cg-rigging-item-price">$350</span>
</div>
<div class="cg-rigging-item">
<input type="checkbox" class="cg-rigging-checkbox" data-price="75" onchange="updateTotal()">
<span class="cg-rigging-item-label">RAM Mounting System</span>
<span class="cg-rigging-item-price">$75</span>
</div>
<div class="cg-rigging-item">
<input type="checkbox" class="cg-rigging-checkbox" data-price="65" onchange="updateTotal()">
<span class="cg-rigging-item-label">12V Battery & Waterproof Case</span>
<span class="cg-rigging-item-price">$65</span>
</div>
<div class="cg-rigging-item">
<input type="checkbox" class="cg-rigging-checkbox" data-price="45" onchange="updateTotal()">
<span class="cg-rigging-item-label">Action Camera & Mount</span>
<span class="cg-rigging-item-price">$45</span>
</div>
</div>
<div class="cg-rigging-category">
<h3><span class="cg-rigging-category-icon">🔧</span>Advanced Rigging</h3>
<div class="cg-rigging-item">
<input type="checkbox" class="cg-rigging-checkbox" data-price="120" onchange="updateTotal()">
<span class="cg-rigging-item-label">YakAttack Track System (6 ft)</span>
<span class="cg-rigging-item-price">$120</span>
</div>
<div class="cg-rigging-item">
<input type="checkbox" class="cg-rigging-checkbox" data-price="85" onchange="updateTotal()">
<span class="cg-rigging-item-label">Elevated Seat Riser</span>
<span class="cg-rigging-item-price">$85</span>
</div>
<div class="cg-rigging-item">
<input type="checkbox" class="cg-rigging-checkbox" data-price="55" onchange="updateTotal()">
<span class="cg-rigging-item-label">Rudder System</span>
<span class="cg-rigging-item-price">$55</span>
</div>
<div class="cg-rigging-item">
<input type="checkbox" class="cg-rigging-checkbox" data-price="35" onchange="updateTotal()">
<span class="cg-rigging-item-label">Scupper-Mount Bait Bucket</span>
<span class="cg-rigging-item-price">$35</span>
</div>
</div>
<div class="cg-rigging-category">
<h3><span class="cg-rigging-category-icon">💡</span>Lighting Systems</h3>
<div class="cg-rigging-item">
<input type="checkbox" class="cg-rigging-checkbox" data-price="45" onchange="updateTotal()">
<span class="cg-rigging-item-label">LED Navigation Lights (Bow & Stern)</span>
<span class="cg-rigging-item-price">$45</span>
</div>
<div class="cg-rigging-item">
<input type="checkbox" class="cg-rigging-checkbox" data-price="65" onchange="updateTotal()">
<span class="cg-rigging-item-label">Underwater LED Light</span>
<span class="cg-rigging-item-price">$65</span>
</div>
<div class="cg-rigging-item">
<input type="checkbox" class="cg-rigging-checkbox" data-price="35" onchange="updateTotal()">
<span class="cg-rigging-item-label">Waterproof Headlamp</span>
<span class="cg-rigging-item-price">$35</span>
</div>
</div>
</div>
<div id="safety" class="cg-rigging-section">
<div class="cg-rigging-category">
<h3><span class="cg-rigging-category-icon">🦺</span>Personal Safety</h3>
<div class="cg-rigging-item">
<input type="checkbox" class="cg-rigging-checkbox" data-price="85" onchange="updateTotal()">
<span class="cg-rigging-item-label">Fishing-Specific PFD</span>
<span class="cg-rigging-item-price">$85</span>
</div>
<div class="cg-rigging-item">
<input type="checkbox" class="cg-rigging-checkbox" data-price="15" onchange="updateTotal()">
<span class="cg-rigging-item-label">Safety Knife & Whistle</span>
<span class="cg-rigging-item-price">$15</span>
</div>
<div class="cg-rigging-item">
<input type="checkbox" class="cg-rigging-checkbox" data-price="25" onchange="updateTotal()">
<span class="cg-rigging-item-label">LED Strobe Light</span>
<span class="cg-rigging-item-price">$25</span>
</div>
<div class="cg-rigging-item">
<input type="checkbox" class="cg-rigging-checkbox" data-price="35" onchange="updateTotal()">
<span class="cg-rigging-item-label">First Aid Kit (Waterproof)</span>
<span class="cg-rigging-item-price">$35</span>
</div>
</div>
<div class="cg-rigging-category">
<h3><span class="cg-rigging-category-icon">📻</span>Communication</h3>
<div class="cg-rigging-item">
<input type="checkbox" class="cg-rigging-checkbox" data-price="125" onchange="updateTotal()">
<span class="cg-rigging-item-label">Handheld VHF Radio (Waterproof)</span>
<span class="cg-rigging-item-price">$125</span>
</div>
<div class="cg-rigging-item">
<input type="checkbox" class="cg-rigging-checkbox" data-price="35" onchange="updateTotal()">
<span class="cg-rigging-item-label">Waterproof Phone Case</span>
<span class="cg-rigging-item-price">$35</span>
</div>
<div class="cg-rigging-item">
<input type="checkbox" class="cg-rigging-checkbox" data-price="285" onchange="updateTotal()">
<span class="cg-rigging-item-label">Personal Locator Beacon (PLB)</span>
<span class="cg-rigging-item-price">$285</span>
</div>
</div>
<div class="cg-rigging-category">
<h3><span class="cg-rigging-category-icon">🛟</span>Emergency Equipment</h3>
<div class="cg-rigging-item">
<input type="checkbox" class="cg-rigging-checkbox" data-price="45" onchange="updateTotal()">
<span class="cg-rigging-item-label">Spare Paddle</span>
<span class="cg-rigging-item-price">$45</span>
</div>
<div class="cg-rigging-item">
<input type="checkbox" class="cg-rigging-checkbox" data-price="25" onchange="updateTotal()">
<span class="cg-rigging-item-label">Bilge Pump & Sponge</span>
<span class="cg-rigging-item-price">$25</span>
</div>
<div class="cg-rigging-item">
<input type="checkbox" class="cg-rigging-checkbox" data-price="15" onchange="updateTotal()">
<span class="cg-rigging-item-label">Emergency Shelter (Space Blanket)</span>
<span class="cg-rigging-item-price">$15</span>
</div>
<div class="cg-rigging-item">
<input type="checkbox" class="cg-rigging-checkbox" data-price="35" onchange="updateTotal()">
<span class="cg-rigging-item-label">Paddle Float</span>
<span class="cg-rigging-item-price">$35</span>
</div>
</div>
</div>
<div class="cg-rigging-summary">
<div class="cg-rigging-summary-row">
<span>Items Selected:</span>
<span id="itemCount">0</span>
</div>
<div class="cg-rigging-summary-row">
<span>Essential Gear:</span>
<span id="essentialTotal">$0</span>
</div>
<div class="cg-rigging-summary-row">
<span>Advanced Setup:</span>
<span id="advancedTotal">$0</span>
</div>
<div class="cg-rigging-summary-row">
<span>Safety Equipment:</span>
<span id="safetyTotal">$0</span>
</div>
<div class="cg-rigging-summary-row cg-rigging-summary-total">
<span>Total Investment:</span>
<span id="grandTotal">$0</span>
</div>
<button class="cg-rigging-reset" onclick="resetAll()">Reset All Selections</button>
</div>
<div class="cg-rigging-progress">
<div class="cg-rigging-progress-label">
<span>Setup Completion</span>
<span id="progressPercent">0%</span>
</div>
<div class="cg-rigging-progress-bar">
<div class="cg-rigging-progress-fill" id="progressBar" style="width: 0%">0%</div>
</div>
</div>
</div>
</div>
<script>
function switchTab(tabName) {
// Update tab buttons
const tabs = document.querySelectorAll('.cg-rigging-tab');
tabs.forEach(tab => tab.classList.remove('active'));
event.target.classList.add('active');
// Update content sections
const sections = document.querySelectorAll('.cg-rigging-section');
sections.forEach(section => section.classList.remove('active'));
document.getElementById(tabName).classList.add('active');
}
function updateTotal() {
const essentialCheckboxes = document.querySelectorAll('#essentials .cg-rigging-checkbox:checked');
const advancedCheckboxes = document.querySelectorAll('#advanced .cg-rigging-checkbox:checked');
const safetyCheckboxes = document.querySelectorAll('#safety .cg-rigging-checkbox:checked');
let essentialTotal = 0;
let advancedTotal = 0;
let safetyTotal = 0;
essentialCheckboxes.forEach(cb => {
essentialTotal += parseFloat(cb.dataset.price);
});
advancedCheckboxes.forEach(cb => {
advancedTotal += parseFloat(cb.dataset.price);
});
safetyCheckboxes.forEach(cb => {
safetyTotal += parseFloat(cb.dataset.price);
});
const grandTotal = essentialTotal + advancedTotal + safetyTotal;
const totalItems = essentialCheckboxes.length + advancedCheckboxes.length + safetyCheckboxes.length;
// Update display
document.getElementById('essentialTotal').textContent = '#039; + essentialTotal; document.getElementById('advancedTotal').textContent = '#039; + advancedTotal; document.getElementById('safetyTotal').textContent = '#039; + safetyTotal; document.getElementById('grandTotal').textContent = '#039; + grandTotal; document.getElementById('itemCount').textContent = totalItems; // Update progress bar (out of 35 total items) const totalPossibleItems = 35; const progressPercent = Math.round((totalItems / totalPossibleItems) * 100); document.getElementById('progressBar').style.width = progressPercent + '%'; document.getElementById('progressBar').textContent = progressPercent + '%'; document.getElementById('progressPercent').textContent = progressPercent + '%'; } function resetAll() { const allCheckboxes = document.querySelectorAll('.cg-rigging-checkbox'); allCheckboxes.forEach(cb => { cb.checked = false; }); updateTotal(); } // Initialize on load updateTotal(); </script> </body> </html> References
[1] National Oceanic and Atmospheric Administration (NOAA). “Marine Weather Services.” National Weather Service, 2026.
[2] U.S. Coast Guard. “Federal Requirements for Recreational Boats.” Department of Homeland Security, 2026.
[3] American Canoe Association. “Kayak Fishing Safety Guidelines.” ACA Safety Education, 2025.
[4] Humminbird Marine Electronics. “Fish Finder Technology Guide.” Johnson Outdoors Marine Electronics, 2026.
[5] YakAttack Inc. “Kayak Rigging Installation Manual.” YakAttack Product Documentation, 2025.


