Last updated: February 22, 2026
Key Takeaways
- A spud bar is the single most effective and affordable tool for testing ice thickness before you commit your weight to early-season ice.
- Four inches of clear, solid ice is the widely accepted minimum for safe foot travel. Anything less means you turn around.
- Spudding every two to three steps ahead of your path gives you real-time feedback on ice integrity, something no auger or chisel provides as effectively.
- Two anglers died on January 18, 2026, after falling through thin ice on the Oswegatchie River in Clifton, NY. A 6-year-old survived by walking back to shore. Early-season ice demands respect.
- Pairing spud bar technique with personal flotation, ice picks, and a fishing partner creates a layered safety system that gives you the best chance of self-rescue.
Quick Answer

Spudding techniques and ice safety protocols are essential skills for early-season anglers because first ice is unpredictable, inconsistent, and deadly when misjudged. A spud bar, weighing 10 to 13 pounds, allows you to strike the ice 5 to 6 feet ahead of your position and gauge thickness by feel and sound. If the bar punches through on a single strike, the ice is too thin. You stop, back up, and find a different route. Combine this with a life jacket, ice picks on a neck lanyard, and a partner walking 10 feet behind you, and you have a functional safety system for the most dangerous weeks of the ice fishing season.
What Is Spudding and Why Does Every Early-Season Angler Need to Know This Skill?
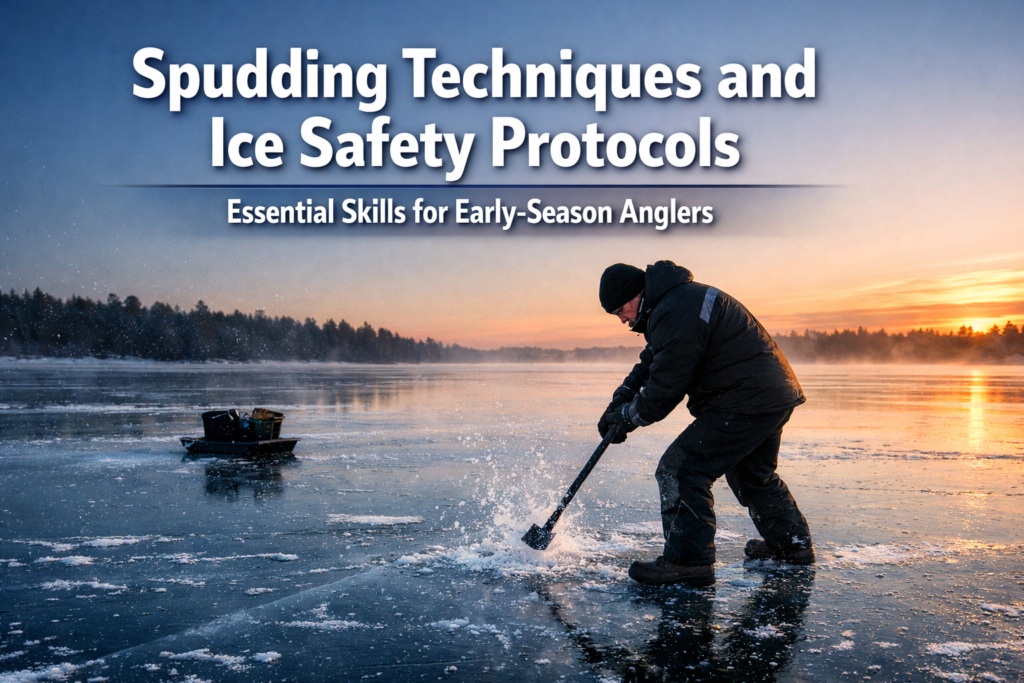
Spudding is the act of striking ice with a heavy, chisel-tipped steel bar to test its strength before walking on it. This is the oldest and most reliable method of ice assessment for anglers who fish during the first weeks of ice formation.
How spudding works: You lift a spud bar to about chest height and drive the chisel end into the ice surface 5 to 6 feet ahead of where you stand. The feedback is immediate. Solid ice absorbs the blow with a firm, ringing sound. Weak ice cracks, splinters, or lets the bar punch straight through.
A spud bar delivers roughly 15 to 20 pounds of force per square inch on impact, according to a January 2026 guide published by WindRider. That force is enough to expose ice under 4 inches thick without penetrating ice that meets the safe minimum. This makes the spud bar a binary safety test: if the bar goes through, you do not proceed.
Why this matters in 2026: On January 18, 2026, two men, Bryan P. LaPlante (33) and Michael J. Booth (48), fell through thin ice while fishing on Chaumet Point connected to the Oswegatchie River in Clifton, New York. Both died. A 6-year-old child who was with them survived by walking back to shore. Events like this reinforce why spudding techniques and ice safety protocols are essential skills for early-season anglers, not optional extras.
Nebraska Game and Parks issued guidance on January 27, 2026, urging anglers to use spud bars or chisels to check ice while advancing to fishing spots. They also recommended wearing life jackets during early-season outings. Connecticut issued similar reminders in mid-February 2026 as rising temperatures created variable conditions.
The bottom line: you do not walk onto early-season ice without testing it first. A spud bar is the tool that makes that test reliable.
How Thick Does Ice Need to Be for Safe Foot Travel?

Four inches of clear, solid ice is the minimum thickness for a single angler on foot. This figure comes from the New York Department of Environmental Conservation, whose Commissioner Amanda Lefton reiterated the standard in a December 2025 advisory.
Here is the general ice thickness guideline used across northern states:
| Ice Thickness | Safe For |
|---|---|
| Under 4 inches | Stay off. No exceptions. |
| 4 inches clear ice | One person on foot |
| 5 to 6 inches | Snowmobile or ATV |
| 8 to 12 inches | Small car or truck |
| 12 to 15 inches | Medium truck |
“Clear ice” matters. White or opaque ice, sometimes called snow ice, forms when slush freezes on the surface. Snow ice is roughly half as strong as clear ice. If you measure 4 inches but the top 2 inches are white and slushy, you effectively have 3 inches of load-bearing ice. That is not enough.
Where ice is weakest on any lake:
- Near river inlets and outlets where current flows beneath the surface
- Around bridge pilings, docks, and bubblers
- Over springs or areas of groundwater upwelling
- Under snow cover, which insulates the ice and slows thickening
- Along shorelines with southern sun exposure
Check out the FishOnYak.com blog for additional seasonal safety content as conditions change through winter and spring.
Common mistake: Trusting a single measurement. Ice thickness varies across a lake, sometimes dramatically within 20 feet. Spud as you go. Measure at multiple points. Treat every outing as a new assessment.
Spudding Techniques and Ice Safety Protocols: Essential Skills for Early-Season Anglers, Step by Step
Here is the process for safe spudding, broken into a repeatable sequence you follow from the moment you leave shore.
Step 1: Gear Up Before You Step On
Put on your personal flotation device (PFD) before you touch the ice. Hang ice picks around your neck on a short lanyard. Strap on ice cleats. These three items form your Fluid Safety baseline.
Step 2: Start From Shore
Begin spudding at the shoreline edge where the ice meets land. Shore ice is often the weakest because of wave action and temperature fluctuation. Strike the ice 5 to 6 feet ahead of you. Listen and feel.
Step 3: Read the Strike
- One hard strike, bar bounces off: Ice is solid at that point. Advance two steps.
- One hard strike, bar penetrates or cracks radiate outward: Stop. Back up slowly. Do not proceed.
- Two hard strikes needed to penetrate: Ice is marginal. You are at or near the 4-inch threshold. Proceed with extreme caution or choose a different path.
Step 4: Advance in a Pattern
Move forward two to three steps after each confirmed solid strike. Then strike again. Repeat. This creates a tested path. Conservation Warden Matthew Groppi, featured in a December 2025 instructional video, advises spudding every single step on early ice. That is the most conservative and safest approach.
Step 5: Measure Periodically
After spudding open a test hole, use a tape measure or ice thickness gauge to confirm depth. Do this every 50 to 100 feet, and always when you notice a change in ice color or snow cover.
Step 6: Mark Your Path
Some anglers use small flags or markers to indicate their tested route. This helps on the return trip and alerts other anglers to a verified safe path.
Edge case: Pressure ridges. These are areas where ice sheets collide and buckle. Spud bars outperform chisels at pressure ridges because their weight (10 to 13 pounds) provides enough force to test the jumbled, layered ice. A lighter chisel at 5 pounds does not give you the same feedback in these conditions.
For anglers who value the DIY approach to rigging and preparation, this step-by-step method fits the same mindset. Tactical angling starts before you drill a hole. Learn more about the FishOnYak.com approach to preparation on the About page.
Spud Bar vs. Ice Chisel vs. Auger: Which Tool Do You Need for Spudding Techniques and Ice Safety Protocols?

A spud bar is the best primary safety tool for early-season ice. An auger is the best hole-making tool. A chisel sits in between but excels at neither role as well as the dedicated tools.
| Feature | Spud Bar | Ice Chisel | Hand Auger |
|---|---|---|---|
| Weight | 10 to 13 lbs | 4 to 6 lbs | 6 to 10 lbs |
| Primary use | Ice testing and safety | Precise hole chiseling | Drilling fishing holes |
| Ice testing ability | Excellent. Weight provides clear feedback from 5-6 ft away. | Moderate. Lighter weight gives less definitive feedback. | Poor. Not designed for impact testing. |
| Hole making | Functional but rough. Makes irregular holes. | Good for small, clean holes in thin ice. | Excellent. Clean, round holes. |
| Cost | $20 to $60 | $15 to $40 | $40 to $100 (hand), $200 to $500+ (powered) |
| Portability | Heavy but simple. No moving parts. | Light and easy to carry. | Bulkier. Powered models need batteries or fuel. |
Choose a spud bar if: You fish early season or late season when ice conditions are variable. You want a tool that doubles as a walking stick and a safety probe. Daryl Bauer of Nebraska Game and Parks has called the spud bar the best and cheapest safety tool available, recommending that every angler own one.
Choose an auger if: You fish mid-season on established ice and need clean holes for tip-ups or jigging. Electric augers like the Eskimo E40i (approximately $500) or the Ion Alpha Plus are popular, but they serve a completely different purpose than a spud bar.
Choose an ice chisel if: You want a lighter option for chipping and shaping holes in thin ice. Understand that a 5-pound chisel will not give you the same safety feedback as a 12-pound spud bar when testing slush layers or pressure ridges. WindRider experts noted in January 2026 that spud bars outperform chisels specifically at first ice, last ice, and on pressure ridges.
Decision rule: Bring the spud bar every time you fish early season. Bring the auger when you know the ice is established and you need efficient hole production. The chisel is a secondary tool, not a replacement for either.
Pro fisherman Troy Peterson, owner of Mr. Bluegill Guide Service, stressed in February 2026 that spud bars are basic safety gear. He pairs his spud bar with ice picks for a dual-purpose setup: probing and self-rescue.
What Safety Gear Should You Carry Beyond the Spud Bar?
A spud bar tests the ice ahead of you. The rest of your safety kit protects you if you go through despite testing. Here is the complete early-season safety loadout.
Personal flotation device (PFD). Wear a Type III PFD or a float suit. A float suit combines insulation with buoyancy, keeping you afloat and reducing heat loss if you break through. Conservation Warden Groppi recommends float suits specifically because they buy you 5 to 10 minutes of functional movement in cold water, enough time for self-rescue.
Ice picks (also called ice claws). These are two spiked handles connected by a cord, worn around your neck. If you fall through, you grab the picks and drive the spikes into the ice surface to pull yourself out. Without picks, wet gloves on smooth ice make self-rescue nearly impossible.
Ice cleats. Strap-on traction devices for your boots. They prevent slipping on bare ice and give you stability while spudding.
Throw rope. A 50-foot throw bag allows a partner to reach you from a safe distance. The partner stays on tested ice and throws the bag to the person in the water.
Whistle. Attached to your PFD. Sound carries far across a frozen lake. If you go through and your partner is out of sight, a whistle is your signal.
Dry bag with spare clothes. Hypothermia sets in fast. A small dry bag with a base layer, hat, and gloves gives you a change option after a cold water event.
Communication device. A fully charged phone in a waterproof case, or a two-way radio. Cell service is unreliable on remote lakes.
This layered approach to safety is what we call Fluid Safety at FishOnYak.com. Each piece of gear addresses a different failure point. The spud bar prevents the fall. The PFD keeps you afloat. The picks get you out. The dry clothes keep you alive after. Visit our services page to learn about coaching programs that cover ice safety fundamentals.
Common mistake: Carrying safety gear in a sled behind you. If you fall through, your sled and gear stay on the surface while you are in the water. Wear your PFD and picks on your body at all times.
How Do You Practice Spudding Before Heading Out on Thin Ice?

Practice spudding on shore ice or in a controlled environment before your first early-season trip. The technique requires rhythm, and you want that rhythm to be automatic when conditions are stressful.
Practice drill 1: Shore ice test. Find a shallow area near shore where the water is knee-deep or less. Wear your PFD. Walk out and spud the ice, listening for the difference between solid strikes and breakthrough strikes. If the bar goes through, you are in shallow water. This builds your ear for the sound of safe versus unsafe ice.
Practice drill 2: Parking lot simulation. Some anglers practice the lifting and striking motion in a parking lot or backyard. Use a piece of plywood on the ground as your target. Focus on lifting the bar to chest height, keeping your arms slightly bent, and driving the chisel tip straight down. Avoid swinging the bar in an arc, which reduces accuracy and increases fatigue.
Practice drill 3: Self-rescue drill. In a controlled setting with a partner, practice using ice picks to pull yourself onto a flat surface from a kneeling position. This simulates pulling yourself out of a hole. The motion is: kick your legs to get horizontal, drive the picks into the surface, and pull with your arms while kicking.
Who should practice: Every angler. Tournament-ready competitors and safety-conscious beginners benefit equally from muscle memory. If you are transitioning from saltwater kayak fishing to ice fishing, the environment is different but the discipline is the same. Preparation saves lives. Explore the FishOnYak.com homepage for resources on building your multi-season angling skills.
What Are the Biggest Mistakes Anglers Make on Early-Season Ice?
Mistake 1: Following someone else's tracks. Another angler's footprints do not mean the ice is safe for you. Ice conditions change hour by hour with temperature, wind, and sun exposure. Spud your own path.
Mistake 2: Trusting ice color alone. Clear ice is stronger than white ice, but color is not a thickness measurement. You need to physically test and measure.
Mistake 3: Fishing alone without telling anyone. Always fish with a partner on early-season ice. If you go alone, leave a detailed plan with someone on shore: where you are going, when you expect to return, and what to do if you do not check in.
Mistake 4: Ignoring weather changes. A warm front, rain, or strong wind during your trip changes ice conditions in real time. If temperatures rise above freezing during your outing, shorten your trip and spud more frequently on the return.
Mistake 5: Overloading gear on thin ice. A sled full of gear adds weight. On marginal ice, distribute your load. Walk light. Make multiple trips if needed.
Mistake 6: Skipping the spud bar because you brought an auger. An auger drills a hole. A spud bar tells you whether the ice ahead of you will hold your weight. These are different functions. Bring both.
The January 2026 tragedy in Clifton, New York, is a reminder that early-season ice does not forgive mistakes. Two experienced adults died. A child survived because he turned around and walked back to shore. Sometimes the safest decision is to not go further. Read more about building a safety-first mindset on our About page.
How Do Conditions in February 2026 Affect Your Spudding Strategy?

February 2026 has brought variable conditions across the northern United States. Connecticut issued safety reminders in mid-February as rising temperatures weakened ice that had formed earlier in the season. Nebraska Game and Parks emphasized spud bar use as ice formation remained inconsistent through late January.
What to expect on February ice:
- Thaw-freeze cycles. Daytime temperatures above freezing weaken the top layer of ice. Overnight refreezing creates a hard crust that masks soft ice underneath. Spud through the crust to test the structural ice below.
- Snow cover. Snow insulates ice and slows growth. Areas with heavy snow cover will have thinner ice than wind-swept, bare sections of the same lake.
- Current areas. River mouths, inlets, and narrows remain dangerous through the entire season. Spud aggressively near any moving water.
- Rain events. Rain on ice creates standing water that weakens the surface. If you see water pooling on the ice, test thoroughly before crossing those areas.
Tactical approach for February 2026: Start every outing by spudding from shore. Test ice at 10-foot intervals for the first 50 feet. Once you confirm consistent thickness above 4 inches, you shift to testing every two to three steps. If you encounter a change in ice color, snow depth, or surface texture, increase your testing frequency immediately.
For the multi-season adventurer who fishes saltwater in summer and ice in winter, this kind of environmental reading transfers directly from tidal analysis to ice assessment. The variables change, but the discipline of reading conditions before committing stays the same. Kayak. Drill. Catch. Repeat, no matter the season. Check out the FishOnYak.com blog for more seasonal transition content.
Early-Season Spudding Checklist
Use this checklist before every early-season outing.
Before you leave home:
- Charge your phone and place it in a waterproof case
- Pack your spud bar, ice picks, PFD, ice cleats, throw rope, whistle, and dry bag
- Check weather conditions and temperature trends for the past 48 hours
- Tell someone your fishing plan, location, and expected return time
- Confirm you have a fishing partner or that someone knows you are going solo
At the lake:
- Put on your PFD and ice picks before stepping on the ice
- Strap on ice cleats
- Begin spudding at the shoreline
- Test ice every two to three steps for the first 100 feet
- Measure ice thickness at your first test hole. Confirm 4 inches of clear ice minimum.
- Measure again every 50 to 100 feet or when conditions change
- Mark your tested path with flags or markers
During your trip:
- Monitor weather and temperature changes
- Re-test ice if you move to a new area of the lake
- Stay off ice near inlets, outlets, and current areas unless you have confirmed safe thickness
- Keep your PFD and picks on your body at all times
Returning to shore:
- Follow your tested path back
- Spud again if conditions have changed (temperature rise, wind shift, sun exposure)
- Report ice conditions to other anglers or local fishing groups
This checklist reflects the same Rigging Mastery mindset that FishOnYak.com applies to kayak setup and tournament preparation. Preparation is the work that happens before the fishing starts. Visit our contact page to connect with our coaching team for personalized guidance.
FAQ
Q: How heavy should a spud bar be for effective ice testing? A: A spud bar between 10 and 13 pounds provides enough force to test ice reliably. Lighter bars (under 8 pounds) do not deliver sufficient impact to give clear feedback on marginal ice.
Q: How far ahead should you strike the ice when spudding? A: Strike 5 to 6 feet ahead of where you stand. This keeps you on tested ice while probing the untested surface in front of you.
Q: Does a spud bar replace an ice auger? A: No. A spud bar tests ice safety. An auger drills clean fishing holes. Bring both on early-season trips.
Q: What does it mean if the spud bar goes through on one strike? A: The ice at that point is too thin to support your weight. Stop, back up on your tested path, and find a different route or leave the ice entirely.
Q: Is white ice safe to walk on? A: White or snow ice is roughly half as strong as clear ice. If you measure 4 inches of white ice, treat it as 2 inches of structural support. That is not safe for foot travel.
Q: Should you wear a life jacket on the ice? A: Yes. Nebraska Game and Parks, the New York DEC, and multiple state agencies recommend wearing a PFD on early-season ice. A float suit is even better because it adds insulation.
Q: How often should you measure ice thickness during an outing? A: Measure at your first test hole and then every 50 to 100 feet, or whenever you notice a change in ice color, snow cover, or surface conditions.
Q: Is it safe to follow another angler's tracks on the ice? A: No. Ice conditions change with temperature, wind, and sun exposure. Another person's path from hours or days ago does not reflect current conditions. Test your own path.
Q: What is the difference between a spud bar and an ice chisel? A: A spud bar weighs 10 to 13 pounds and is designed for heavy impact testing. An ice chisel weighs 4 to 6 pounds and is better for precise hole shaping. The spud bar is the superior safety tool because of its weight and the force it delivers.
Q: When should you stop fishing and leave the ice? A: Leave if temperatures rise above freezing during your trip, if you hear cracking sounds, if you see water pooling on the surface, or if your spud bar penetrates ice that was previously solid.
Q: How do you perform self-rescue if you fall through? A: Stay calm. Turn toward the direction you came from (that ice held your weight). Kick your legs to get horizontal. Drive your ice picks into the solid ice surface. Pull yourself forward while kicking. Roll away from the hole. Do not stand up until you are on confirmed thick ice.
Q: Do you need a spud bar in mid-winter when ice is thick? A: On established mid-winter ice with confirmed thickness above 8 inches, a spud bar is less critical for safety testing. But early season, late season, and any time near current or variable conditions, the spud bar is essential.
Key Takeaways
- A spud bar weighing 10 to 13 pounds is the most reliable and affordable tool for testing early-season ice.
- Strike the ice 5 to 6 feet ahead of your position and advance only after confirming a solid strike.
- Four inches of clear ice is the minimum for safe foot travel. White ice is roughly half as strong.
- Wear a PFD and ice picks on your body at all times on early-season ice.
- Fish with a partner. Walk 10 feet apart in single file so only one person is on any given section of ice.
- Spud every two to three steps on first ice. Increase frequency near current, color changes, or snow cover transitions.
- Measure ice thickness with a tape at multiple points during every outing.
- Weather changes during your trip alter ice conditions in real time. Monitor and adjust.
- Practice spudding technique and self-rescue drills before the season starts.
- The safest decision on questionable ice is to turn around. No fish is worth your life.
See you on the water.


