")
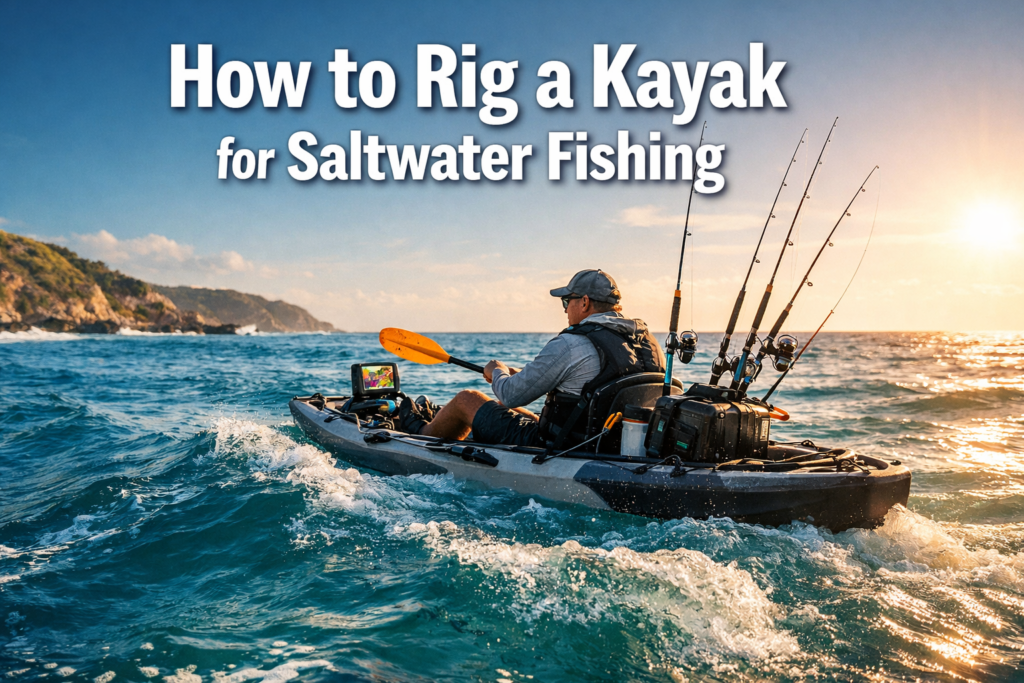
You launched at first light. The tide was right. The bait was fresh. Then your rod holder failed on the first wave, your fish finder lost power at mile two, and your tackle crate shifted hard enough to list the yak. You caught nothing. You know that session. We know it too.
Learning how to rig a kayak for saltwater fishing is the difference between a productive day on the water and an expensive, frustrating mess. The ocean does not forgive sloppy setups. Saltwater corrodes hardware, waves test every mount, and distance from shore turns small gear failures into serious safety problems. This guide covers every layer of a tournament-ready saltwater kayak setup, from hull selection to electronics waterproofing, so you get out on the water prepared.
Key Takeaways
- Choose a sit-on-top kayak with a minimum 30-inch beam and 400-pound weight capacity for stable saltwater fishing.
- Mount rod holders at a 15-to-30-degree angle behind the cockpit on your non-paddle side first.
- Install a fish finder with CHIRP sonar and protect all electronics with dedicated waterproofing systems.
- Wear your PFD every time. Carry a VHF radio, whistle, and signaling device on open water. [1]
- Use a modular crate system in the tankwell to keep tackle organized and weight centered low in the hull.
Choosing the Right Kayak for Saltwater Fishing
")
Before rigging a single rod holder, you need the right platform. Rigging a fishing kayak that is wrong for saltwater is like building a house on sand.
Sit-On-Top vs. Sit-Inside for Ocean Kayak Fishing
Sit-on-top kayaks dominate saltwater fishing for one reason: self-rescue. When a wave flips you, a sit-on-top drains through scupper holes and rights itself. A sit-inside fills with water and becomes a liability offshore.
For ocean kayak fishing, target these specifications:
| Feature | Minimum Spec | Recommended Spec |
|---|---|---|
| Beam (Width) | 28 inches | 32-36 inches |
| Weight Capacity | 350 lbs | 450-500 lbs |
| Length | 12 feet | 13-14 feet |
| Hull Type | Flat or Pontoon | Pontoon or Cathedral |
| Tankwell | Present | Large, open, with bungee |
| Scupper Holes | Present | Pluggable scuppers |
A wider hull gives you kayak stability when you stand to sight-fish on the flats or fight a big fish. A longer hull tracks straighter in current and chop, which reduces fatigue on long paddles to offshore structure.
Hull Material and Weight Distribution
Polyethylene hulls handle abuse and UV exposure well. They are heavy, which actually helps kayak weight distribution in wind. Thermoform hulls are lighter and stiffer, which improves speed. Carbon fiber is tournament-grade but expensive.
Weight distribution matters more than most anglers realize. Keep heavy gear, your battery, cooler, and anchor, low and centered. High weight raises your center of gravity and makes the yak feel tippy in swells. Place your fish finder battery in the front hatch or under the seat, not on a rear milk crate.
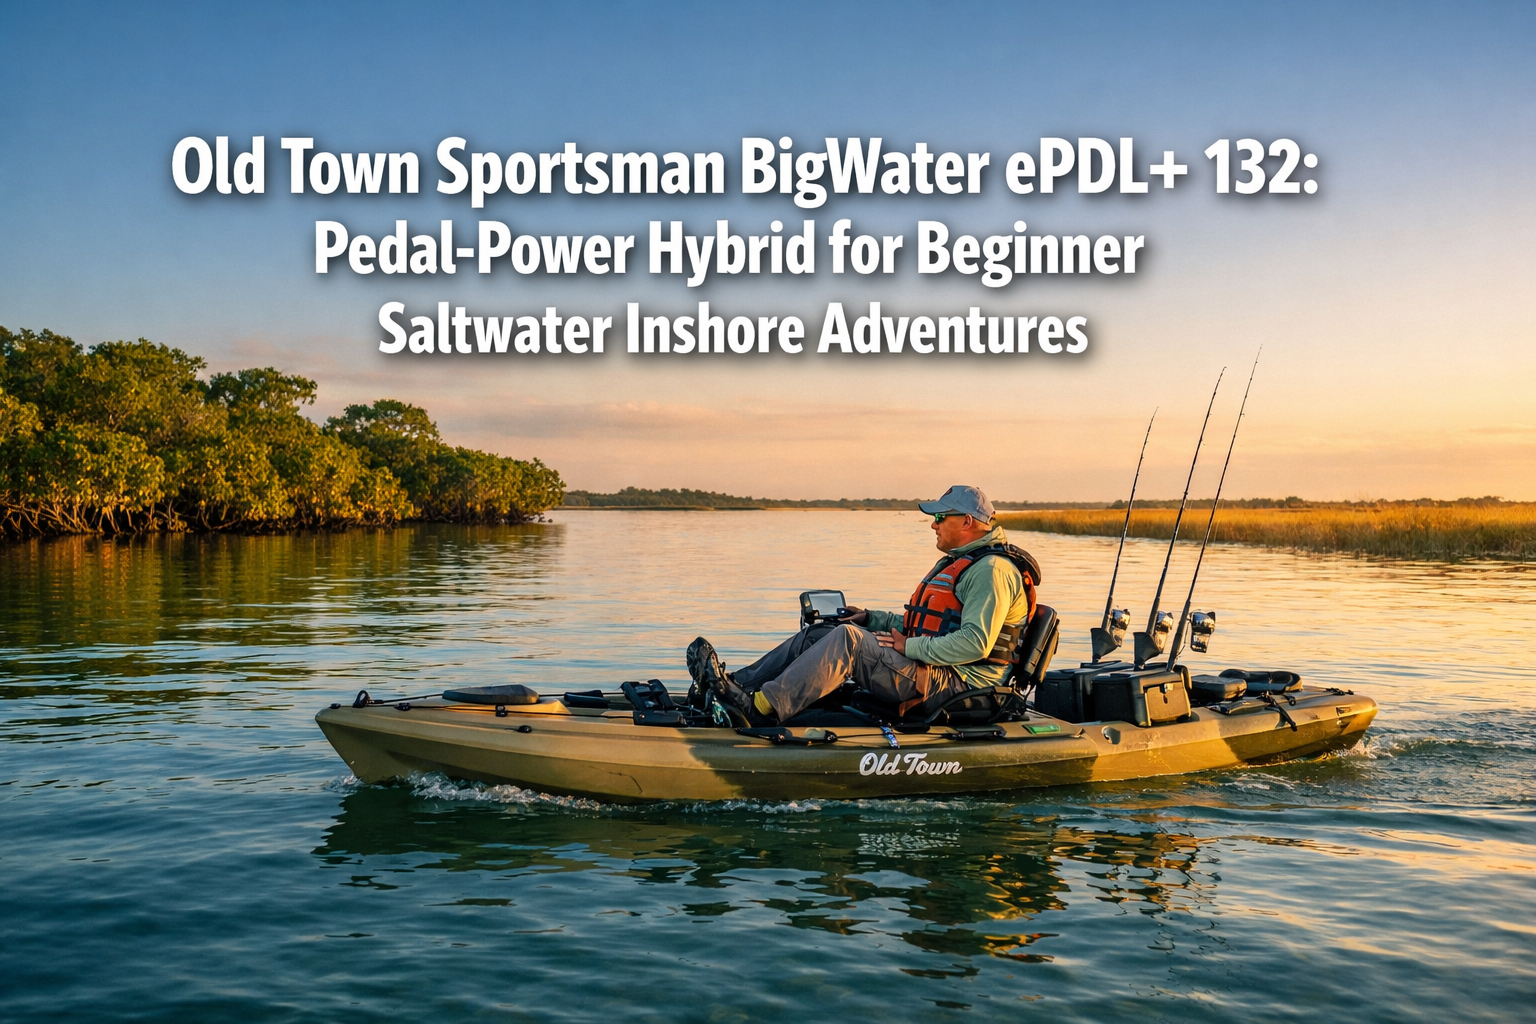
Popular platforms in 2026 include the Old Town Sportsman PDL 120, the Hobie Mirage Pro Angler 14, and the Native Watercraft Titan Propel 13.5. Each offers a wide beam, integrated rod holders, and a large tankwell for crate systems.
How to Rig a Kayak for Saltwater Fishing: Essential Gear and Mounting
This is where the build happens. Kayak fishing rigging in saltwater requires corrosion-resistant hardware, secure mounts, and a logical layout that keeps gear accessible while fighting a fish.
Rod Holder Placement and Angles
Mount rod holders at a 15-to-30-degree angle, angled outward from the hull centerline. This keeps rod tips clear of your paddle stroke and positions rods for a quick grab. [5]
Place flush-mount rod holders behind the cockpit, two on each side. Use YakAttack GearTrac or Scotty mounting systems, which allow you to slide and reposition holders without drilling new holes. When you mount rod holders, use stainless steel hardware and marine-grade sealant on every penetration point. Saltwater finds every unsealed hole and corrodes the foam core beneath.
For a basic saltwater kayak setup, start with:
- Two flush-mount rod holders behind the seat for trolling rods
- One adjustable RAM-mount rod holder at the bow for a rigged rod you access often
- One YakAttack PanFish Camera Mount doubling as a rod holder on the right side of the kayak for your primary casting rod
Rod and Reel Configuration for Saltwater
Use a medium-action spinning rod for finesse presentations like live shrimp, small jigs, and plastic worms. Pair it with a 2500-size spinning reel built from corrosion-resistant materials, brass gears, stainless steel bail wire, and a graphite or composite rod blank. [2]
For larger lures targeting pelagic species, redfish over 30 inches, or tarpon, step up to a medium-heavy baitcaster on a 7-foot rod. [4]
Your line system: spool braided mainline in 20-to-30-pound test, then attach a 2-foot, 30-pound fluorocarbon leader using a double uni knot. The braid gives you sensitivity and zero stretch for hooksets. The fluorocarbon leader disappears in clear saltwater and handles abrasion from structure and fish mouths. [2]
Fish Finder Installation and Electronics Waterproofing
A fish finder with CHIRP sonar and GPS changes how you fish open water. Side-imaging sonar lets you scan structure 60 feet to each side without paddling over it and spooking fish. Split-screen navigation shows your position and depth simultaneously, which keeps you safe when fog rolls in. [3]
The Humminbird Helix 7 CHIRP SI GPS G4 is a strong choice for kayak anglers in 2026. It offers side imaging, GPS mapping, and a bright screen readable in direct sunlight.
Electronics waterproofing: a step-by-step approach competitors skip.
- Run all wiring through the hull using a Hobie or YakGear cable port with a rubber grommet. Never leave an open hole.
- Use self-amalgamating tape over every connector junction. This tape fuses to itself and creates a watertight seal without adhesive that saltwater dissolves.
- Mount your battery in a waterproof stowaway box or a sealed dry box inside the front hatch. A 12V 10Ah lithium battery runs a fish finder for 8-plus hours and weighs under 3 pounds.
- Seal the transducer cable entry point with marine-grade silicone, not standard household caulk. Saltwater degrades standard caulk within one season.
- Mount the display unit on a RAM Mount with a locking knob. A loose display that bounces off during a surf launch is gone.
Install the transducer inside the hull using the shoot-through method if your hull is polyethylene under 3/4 inch thick. Fill the mount area with a small pool of water or mineral oil, press the transducer flat against the inside of the hull, and epoxy it in place. You lose about 10 percent of sonar sensitivity, but you eliminate the risk of losing an external transducer to debris or a capsize.
Tackle Storage and the Crate System
A milk crate or purpose-built kayak crate in the tankwell is the most efficient tackle storage system for saltwater kayak fishing. [3]
Build your crate system around these components:
- A YakGear Angler's Crate as the base structure
- Two Plano Guide Series waterproof tackle boxes inside the crate, one for lures, one for rigs and terminal tackle
- A rod holder tube mounted to the crate side for spare rods
- Bungee cord laced through the crate and hooked to the tankwell cleats to secure it against wave action
Store lures in waterproof containers. A wave-induced capsize sends everything overboard. Waterproof tackle boxes float and keep your investment dry. [3]
Use a dry box for your phone, keys, and wallet. A Pelican 1060 Micro Case costs under $20 and survives full submersion. Clip it to a deck pad eye with a carabiner so it stays with the yak if you swim.
Anchor Trolley and Position Control
An anchor trolley is one of the most underrated pieces of fishing kayak equipment. It runs a loop of cord from bow to stern along the side of the yak, with a ring that slides to any position. You clip your anchor line to the ring and slide it to the bow or stern to control the angle your yak faces into wind or current.
Mount the anchor trolley on your non-paddle side to avoid tangles during your stroke. YakAttack and YakGear both make complete anchor trolley kits with all hardware for under $40.
For shallow water flats fishing, replace the anchor with a Power-Pole Micro Anchor or a simple stakeout pole. Drive the pole into the bottom and clip your trolley ring to it. The yak holds position silently, which is critical when targeting redfish and snook in skinny water.
Safety Gear and Surf Launch Techniques for Ocean Kayak Fishing
")
Kayak fishing safety is not optional gear. It is the foundation of every trip. Offshore and coastal conditions change fast. Being prepared means you come home.
Essential Safety Gear for Ocean Kayak Fishing
Wear your PFD. A properly fitted life jacket worn on your body, not stored under a bungee cord, is the single most important piece of fishing gear on the yak. [1] Choose an inflatable PFD with a built-in harness for open water. It gives you full range of motion for casting and paddling while providing Coast Guard-approved flotation.
Your safety kit for every saltwater trip:
- PFD worn at all times [1]
- VHF marine radio in a waterproof case, clipped to your PFD
- Whistle or air horn attached to your PFD zipper [1]
- Paddle leash: a 36-inch fabric-wrapped leash attached to a deck pad eye keeps your paddle with the yak during a capsize [3]
- Signal mirror and waterproof flashlight for low-visibility conditions
- Float plan filed with someone onshore who knows your launch point, destination, and expected return time
- Knife mounted on your PFD shoulder strap for cutting tangled lines in an emergency
A VHF radio gives you access to Channel 16, the international distress frequency, and NOAA weather broadcasts. A phone works until it gets wet or loses signal offshore. A VHF works when nothing else does.
Surf Launch Techniques: Getting Through the Break
The surf launch is where most kayak anglers lose gear, capsize, or get hurt. Preparation and timing prevent all three.
Before you launch:
- Secure every loose item. Tuck your paddle leash onto your wrist. Clip your PFD. Close your dry box.
- Study the break from shore for at least five minutes. Identify the lull between sets.
- Position your yak perpendicular to the waves, bow pointing directly into the surf.
The launch sequence:
- Wade out to knee depth, keeping the yak beside you.
- When a set passes and the lull begins, climb on quickly and paddle hard.
- Keep your paddle strokes powerful and your bow aimed straight into any incoming waves.
- Punch through whitewater by leaning forward and driving the bow under the foam, not over it.
- Once through the break, take a breath and check that all gear is still secured.
Preventing equipment loss during surf launches is about redundancy. Every rod in a holder has a leash to the yak. Your crate is bungeed down. Your tackle boxes are latched and inside the crate. Your fish finder is locked on its RAM mount. Nothing should be loose.
On the return through the surf, angle slightly and time your run to ride a wave in rather than fight it. Brace your paddle flat on the water surface on your downwave side to prevent a broach.
Advanced Wave Navigation Strategies
Reading swell and tide is a skill that takes time on the water to build. In 2026, free tools like Windy.com and PredictWind give you swell height, period, and direction overlaid on a map. A 3-foot swell with a 12-second period is manageable. A 3-foot swell with a 6-second period is steep, choppy, and physically demanding.
Paddle into the wind on your way out. You will be tired on the return, and a tailwind pushes you home. Fighting a headwind at the end of a long session in big water is dangerous and exhausting.
Tide affects where fish hold and how safely you navigate inlets and shallow bars. A falling tide drains baitfish off the flats and concentrates predators at drop-offs. An incoming tide pushes bait into mangroves and creek mouths. Analyze the tide before every trip and plan your fishing spots around it.
Maintenance, Budgeting, and Legal Considerations for Saltwater Kayak Fishing
Most guides stop at the gear list. This section covers what keeps your rig functional season after season and what you need to know before you launch legally.
Cleaning and Maintaining a Saltwater Fishing Kayak
Saltwater destroys gear faster than anything else in fishing. A proper post-trip cleaning routine extends the life of every component on your yak.
Post-trip maintenance checklist:
- Rinse the entire kayak with fresh water immediately after every saltwater session. Pay attention to scupper holes, rod holder tubes, and any crevice where salt water pools.
- Flush rod holders with fresh water and dry them upside down.
- Remove all stainless steel hardware annually and inspect for pitting. Replace any hardware showing white corrosion.
- Rinse and dry your fish finder display, transducer cable, and battery connections. Apply a thin coat of corrosion inhibitor like Corrosion X to all electrical connections.
- Wipe down the hull with a UV protectant spray to prevent polyethylene from becoming brittle.
- Rinse your paddle and check the ferrule for grit that causes wear.
- Inspect your PFD bladder and inflation mechanism after every trip.
Store the yak out of direct sunlight when not in use. UV degradation weakens polyethylene hulls and fades thermoform surfaces. A kayak cart makes moving the yak from your vehicle to storage easier on your back and the hull.
Budget-Friendly Rigging Alternatives
A full tournament-ready saltwater kayak setup costs $3,000 to $8,000. A functional, safe rig for coastal fishing costs far less if you prioritize correctly.
Budget rigging priorities (spend here first):
- PFD: $60-$120 for a quality inflatable. Do not cut corners.
- Paddle leash: $15-$25. Prevents losing a $200-$400 paddle.
- VHF radio: $80-$150 for a handheld waterproof unit.
- Rod holders: $20-$40 per flush-mount holder. YakAttack and Scotty are reliable.
- Waterproof tackle storage: $30-$60 for Plano Guide Series boxes.
Where to save money:
- Use a repurposed milk crate as your tankwell crate. Line it with a yoga mat cut to size. Total cost: $5.
- Buy a used fish finder. A Garmin Striker 4 with GPS runs under $100 new and performs well for inshore fishing.
- Use a $10 carabiner and paracord anchor trolley instead of a branded kit for your first season.
Where not to save money:
- PFD and safety gear
- Rod holder mounting hardware (cheap screws corrode and fail)
- Transducer mounts (a lost transducer costs more than a quality mount)
Insurance and Legal Considerations for Ocean Kayak Fishing
This topic gets almost no coverage in kayak fishing guides. It matters.
In most U.S. states, kayaks under 16 feet used for fishing in coastal waters require registration. Check your state's Department of Motor Vehicles or Fish and Wildlife agency for current requirements. Registration fees range from $10 to $50 per year.
If you fish in federal waters beyond 3 nautical miles, a federal fishing license is required in addition to your state saltwater fishing license. Regulations on species, bag limits, and size minimums vary by region and change annually. Check NOAA FishWatch or your state agency before targeting species like mackerel, tarpon, or snook.
Kayak fishing insurance is available through companies like Markel and Foremost. A basic policy covering liability and equipment loss for a $3,000 kayak setup runs $100-$200 per year. If you fish tournaments or guide clients, liability coverage is worth carrying.
Some launch sites, particularly state parks and managed coastal areas, require a launch permit or day-use fee. Research your launch point before arrival to avoid fines.
Expert Tips for Tournament-Ready Kayak Angler Performance
")
Rigging mastery is not just about the hardware. How you use your setup determines your results on the water.
Modular Rigging Systems for Adaptability
The best kayak anglers in 2026 build modular rigs that change with the fishing environment. A GearTrac system from YakAttack lets you slide rod holders, camera mounts, and electronics mounts to any position along the track without tools.
For inshore flats fishing targeting redfish and snook in shallow water, remove the fish finder to reduce weight and move quietly. Swap it for a GoPro camera mount on the bow to document the catch. For offshore fishing targeting pelagic species, add the fish finder, a second rod holder for a trolling rod, and a heavier anchor setup.
A modular rig adapts in under 10 minutes at the launch site. A fixed rig forces you to fish one way regardless of conditions.
Psychological Preparation for Challenging Marine Conditions
Tournament kayak anglers talk about gear constantly. Few talk about mental preparation. Offshore fishing from a kayak in 2-to-3-foot swells for six hours is physically and mentally demanding.
Before a challenging session, visualize the launch sequence, the paddle out, and the return through the surf. Identify the moments that make you anxious, the first big wave, the moment you lose sight of shore, the sound of the wind picking up, and practice controlled breathing through each one.
Set a hard turnaround time before you launch. When the time comes, turn around. Fish do not bite when you are too tired to paddle safely.
Gear Placement Strategy for Fighting a Fish
When fighting a big fish from a kayak, your gear placement either helps or hurts you. [5]
Position your net in front of you, angled toward your dominant landing side. A net stored behind the seat requires you to reach back while controlling a fish, which destabilizes the yak. Clip the net handle to a bungee cord on the bow deck so it is always within reach.
Keep your paddle across your lap or in a paddle holder behind the seat when fighting a fish. A paddle floating away from you during a long fight is a serious problem. The paddle leash prevents this.
Clear the cockpit of loose tackle before you start a session. A treble hook on the floor of the cockpit during a violent fight with a big redfish or tarpon is a trip to the emergency room.
Environmental Impact of Kayak Fishing Gear
Kayak anglers access areas that powerboats cannot reach. That access comes with responsibility.
Use lead-free weights where regulations require it, and consider switching entirely. Tungsten weights perform better than lead in most applications and pose no toxicity risk to wildlife.
Carry a small mesh bag on your yak for collecting trash you find on the water. Monofilament line left on the water kills birds and marine mammals. Collect it and dispose of it in designated monofilament recycling bins at launch sites.
Barbless hooks reduce injury to released fish. For catch-and-release targeting species like tarpon, use a dehooker tool to release the fish without lifting it from the water.
The Complete Saltwater Kayak Rigging Checklist
Use the interactive checklist below to track your build progress. Check each item as you acquire and install it. Your progress saves automatically so you pick up where you left off.
Saltwater Kayak Rigging Checklist | FishOnYak.com
🎣 Saltwater Kayak Rigging Checklist
Track your build phase by phase. Progress saves automatically.
FishOnYak.com — Kayak. Drill. Catch. Repeat.
0 of 30 items complete — 0%
Phase 1: The Bare Essentials — Safety & Foundation
0/8
▼
Inflatable PFD / Life Jacket (Coast Guard Approved)
Critical
Pro Tip: Wear it, do not store it. An inflatable PFD with a built-in harness gives full casting range of motion while keeping you Coast Guard compliant on open water.
Waterproof VHF Marine Radio
Critical
Pro Tip: Clip the VHF to your PFD shoulder strap, not to the kayak. If you swim, it stays with you. Pre-program Channel 16 as your emergency channel.
Whistle or Air Horn (Emergency Signaling)
Critical
Pro Tip: Zip-tie a Fox 40 pealess whistle to your PFD zipper pull. Pealess whistles work when wet. Standard whistles with a pea inside can fail.
Paddle Leash (36-inch fabric-wrapped)
Critical
Pro Tip: Attach the leash to a deck pad eye, not your wrist. A paddle dragging in the water during a capsize pulls against you. Secured to the yak, it stays close without fighting you.
Safety Knife (PFD shoulder mount)
Critical
Pro Tip: Mount a blunt-tip line cutter on your PFD shoulder strap. If you get tangled in your own line during a capsize, you need to cut free with one hand in seconds.
Float Plan Filed with Shore Contact
Critical
Pro Tip: Text your launch point, GPS coordinates of your target area, and expected return time to someone onshore before every trip. Set a check-in alarm for halfway through your session.
Flush-Mount Rod Holders x4 (YakAttack or Scotty)
High
Pro Tip: Mount at 15-to-30-degree outward angle behind the cockpit. Use stainless steel hardware and marine-grade sealant on every hull penetration. Reseal annually.
Waterproof Flashlight or Navigation Light
High
Pro Tip: A 360-degree white light is required by USCG regulations if you fish before sunrise or after sunset. Mount it on a flag pole at the stern so it clears your rod tips.
Phase 2: The Tech Suite — Electronics & Power
0/6
▼
Fish Finder with CHIRP Sonar and GPS (Humminbird or Garmin)
High
Pro Tip: The Humminbird Helix 7 CHIRP SI GPS G4 offers side-imaging sonar that scans structure 60 feet to each side without paddling over fish. Lock the display on a RAM Mount with a locking knob.
12V Lithium Battery (10Ah minimum) in Sealed Dry Box
High
Pro Tip: Store the battery in the front hatch or under the seat, not in the rear crate. Low and centered weight keeps the hull stable in swells. A 10Ah lithium battery runs a fish finder for 8-plus hours and weighs under 3 pounds.
Transducer with Shoot-Through or External Mount
High
Pro Tip: For polyethylene hulls under 3/4 inch thick, use the shoot-through method. Epoxy the transducer flat against the inside hull with a small pool of water or mineral oil as coupling medium. You lose 10% sensitivity but eliminate capsize loss risk.
Waterproof Cable Ports and Self-Amalgamating Tape for Wiring
High
Pro Tip: Run all wiring through a Hobie or YakGear cable port with a rubber grommet. Wrap every connector junction with self-amalgamating tape. This tape fuses to itself and creates a watertight seal that saltwater cannot dissolve.
RAM Mount with Locking Knob for Display Unit
Standard
Pro Tip: A display that bounces off during a surf launch is gone. Use a RAM Mount with a double-lock knob. Position the display at an angle readable from your seated paddling position without leaning forward.
GoPro Camera Mount (Bow or Helmet)
Standard
Pro Tip: A GoPro camera mount on a GearTrac system lets you swap the camera position for different shots. Bow mount captures the fish strike. Helmet mount captures the fight. Use a tether on the GoPro so a wave does not take it.
Phase 3: The Management Zone — Storage & Tackle
0/8
▼
Kayak Crate (YakGear Angler's Crate or Milk Crate)
High
Pro Tip: Lace bungee cord through the crate and hook it to the tankwell cleats. A loose crate in breaking surf becomes a projectile. A budget milk crate lined with a yoga mat cut to size costs $5 and works as well as a $60 branded crate.
Waterproof Tackle Boxes x2 (Plano Guide Series)
High
Pro Tip: Dedicate one box to lures and one to terminal tackle and rigs. Waterproof boxes float after a capsize. Standard tackle boxes sink and take your entire lure collection with them.
Dry Box for Phone, Keys, and Wallet (Pelican 1060 or similar)
Critical
Pro Tip: Clip the dry box to a deck pad eye with a carabiner so it stays with the yak if you swim. A Pelican 1060 Micro Case costs under $20 and survives full submersion. Do not use a ziplock bag as a substitute offshore.
Cooler or Fish Bag (Secured in Tankwell)
Standard
Pro Tip: A soft-sided fish bag takes less space than a hard cooler and sits flat in the tankwell. Place it below the crate. Keep weight low in the hull to maintain stability in swells.
Medium-Action Spinning Rod and 2500-Size Reel
High
Pro Tip: Choose a 2500-size reel with brass gears, stainless steel bail wire, and a graphite rod blank. Spool with 20-pound braid and a 2-foot 30-pound fluorocarbon leader attached with a double uni knot.
Medium-Heavy Baitcaster on 7-Foot Rod
Standard
Pro Tip: Use this setup for larger lures targeting redfish over 30 inches, tarpon, or pelagic species. 30-pound braid with a 40-pound fluorocarbon leader handles the abrasion of structure and the runs of big fish.
Landing Net (Bow-Positioned, Clipped to Bungee)
Standard
Pro Tip: Position the net in front of you, angled toward your dominant landing side. A net stored behind the seat requires reaching back during a fight, which destabilizes the yak. Clip the handle to a bow bungee so it is always within reach.
Corrosion Inhibitor (Corrosion X) for Hardware and Connections
Standard
Pro Tip: Apply Corrosion X to all electrical connections after every rinse. It displaces water and creates a protective film that slows saltwater corrosion on stainless steel and aluminum hardware significantly.
Phase 4: Anchor & Position Control
0/8
▼
Anchor Trolley System (YakAttack or YakGear Kit)
High
Pro Tip: Mount the anchor trolley on your non-paddle side to avoid tangles during your stroke. The ring slides from bow to stern, letting you control the angle your yak faces into wind or current without moving the anchor.
Folding Grapnel Anchor (1.5 to 3 lb for inshore)
Standard
Pro Tip: A 1.5-pound folding grapnel anchor holds a kayak in up to 15 mph winds on a hard bottom. Use 6 to 1 scope: 6 feet of anchor line for every 1 foot of water depth. More scope equals better hold.
Stakeout Pole for Shallow Water Flats
Standard
Pro Tip: Drive a fiberglass stakeout pole into the bottom and clip your trolley ring to it. The yak holds position silently, which is critical when targeting redfish and snook in skinny water where any anchor splash spooks fish.
GearTrac Modular Rail System (YakAttack)
Standard
Pro Tip: A GearTrac system lets you slide rod holders, camera mounts, and electronics mounts to any position without tools. Swap your rig from inshore flats setup to offshore trolling setup in under 10 minutes at the launch site.
Kayak Cart for Transport from Vehicle to Launch
Standard
Pro Tip: A kayak cart with wide pneumatic tires handles sand and gravel launch ramps without bogging down. Load the cart at the vehicle, walk to the water, remove the cart, and stow it in the tankwell or lock it to your vehicle.
Rudder System (for Offshore and Big Water)
Standard
Pro Tip: A rudder keeps the yak tracking straight in crosswinds and following seas without constant corrective paddle strokes. This saves significant energy on long offshore paddles and lets you focus on fishing rather than steering.
UV Protectant Spray for Hull
Standard
Pro Tip: Apply UV protectant spray to the hull after every cleaning. UV degradation makes polyethylene brittle and fades thermoform surfaces. A $12 can of 303 Aerospace Protectant applied monthly extends hull life by years.
State Saltwater Fishing License and Kayak Registration
Critical
Pro Tip: In most U.S. states, kayaks used in coastal waters require registration. If you fish beyond 3 nautical miles, a federal fishing license is required in addition to your state license. Check NOAA FishWatch annually for current regulations on your target species.
🎣 RIG READY!
Your saltwater kayak is fully rigged.
Get out on the water.
Conclusion: Build the Rig, Then Fish It Hard
")
Knowing how to rig a kayak for saltwater fishing is a process, not a single purchase. Start with the foundation: a stable hull, a worn PFD, a VHF radio, and rod holders mounted with proper hardware. Add electronics when the budget allows. Refine your crate system after your first few trips reveal what you actually reach for and what stays buried.
The anglers who catch fish consistently from kayaks are not the ones with the most expensive gear. They are the ones who know their rig, maintain it after every trip, and launch prepared.
Here are your next steps:
- Print the checklist above and work through Phase 1 before your next trip.
- Inspect every rod holder mount for corrosion and reseal any that show wear.
- File a float plan before every offshore session, starting today.
- Rinse your yak with fresh water within two hours of every saltwater trip.
- Visit FishOnYak.com for rigging masterclasses, one-on-one coaching, and tournament preparation resources built by anglers who fish these waters.
Kayak. Drill. Catch. Repeat.
See you on the water.
References
[1] Mastering The Art Of Kayak Fishing In Saltwater - https://www.coastalfishing.com/blogs/saltwater-fishing-101/mastering-the-art-of-kayak-fishing-in-saltwater
[2] Beginners Guide To Saltwater Fishing - https://www.saltwatersportsman.com/howto/beginners-guide-to-saltwater-fishing/
[3] Ultimate Rigging Guide For Fishing Open Water - https://kayakanglermag.com/tactics-skills/rigging/ultimate-rigging-guide-for-fishing-open-water/
[4] Watch - https://www.youtube.com/watch?v=hIWXx-Gvk_Y
[5] Rig Your Fishing Kayak With Function In Mind - https://www.bendingbranches.com/blogs/resources/rig-your-fishing-kayak-with-function-in-mind
[6] Kayak Fishing Rigging - https://oldtownwatercraft.johnsonoutdoors.com/us/blog/kayak-fishing-rigging


